
UV DTF transfer on fabrics has emerged as a game-changer for designers and crafters seeking vibrant, durable graphics on a wide range of textiles. This method blends UV-curable inks with a transfer film, enabling crisp detail and color brightness that stands up to washing in UV DTF printing on fabric. From custom clothing to tote bags and home textiles, learning how to apply DTF transfer on fabric correctly helps you achieve professional results. A careful choice of materials, accurate press settings, and proper curing contribute to reduced waste and faster turnaround for DTF transfer on textiles. This guide also uses practical, SEO-friendly terms like DTF transfer settings for fabric to help you optimize search visibility while keeping content reader-friendly.
In broader terms, this technique is often described as a film-based, UV-activated transfer rather than a branded method, highlighting its underlying chemistry and workflow. Equivalent concepts include direct-to-film technology for textiles and digital textile printing, which emphasize image fidelity, soft hand, and durable adhesion. LSI principles suggest weaving related ideas such as UV-curable films, adhesive transfer, and garment decoration processes to connect with related searches. By focusing on substrate compatibility, curing behavior, and workflow efficiency, designers can apply the same principles across cotton, blends, and synthetics. As with any fabric printing technique, practical testing on swatches remains essential to dial in temperature, time, and pressure for best results.
1) Understanding UV DTF transfer on fabrics
UV DTF transfer on fabrics represents a modern approach to fabric decoration, combining a printable film with UV-curable inks or adhesives to create sharp, vibrant designs. This method sits between traditional heat transfers and digital printing, offering detailed imagery and solid color on a wide range of textiles. In practice, it aligns well with UV DTF printing on fabric, which emphasizes fast curing and strong adhesion when properly executed.
The key to success lies in choosing compatible films, inks, and curing equipment, as well as optimizing the interaction between heat, time, and UV curing. When you understand how UV DTF transfer on fabrics works, you can anticipate color accuracy, edge definition, and wash durability—especially on dark or colored fabrics where opacity is crucial. This foundation also allows you to explore related workflows like DTF transfer on textiles and the nuances of applying UV-curable systems to different fiber blends.
2) Essential materials and workstation setup for UV DTF on textiles
Getting reliable results starts with the right toolkit. Gather UV DTF film printed with your design, a UV-curable adhesive or clear layer, and curing equipment such as a UV lamp or UV LED unit calibrated to your film. A heat press or cold-press system, coupled with protective silicone sheets, helps you control heat delivery and protect both the film and fabric during transfer.
Prepare the workspace to minimize misalignment and contamination. Keep lint-free fabrics, a clean pressing surface, and testing swatches on the same fabric type you’ll use for production. Safety gear, proper ventilation, and a clean, organized area contribute to consistency, especially when balancing UV DTF printing on fabric with post-press curing steps that rely on specific temperatures and UV exposure. These considerations tie into DTF transfer settings for fabric as you dial in the optimal parameters.
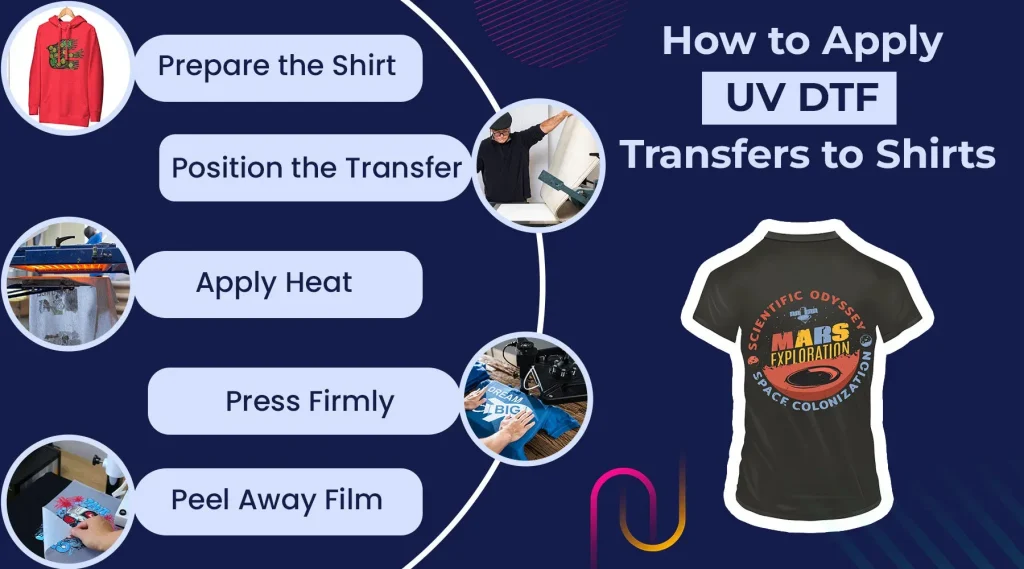
3) Step-by-step: how to apply DTF transfer on fabric
Step-by-step workflows begin with high-resolution artwork prepared for UV DTF printing on fabric. If your system supports a white underprint, enable it to improve opacity on dark textiles, and mirror the image if required by your transfer film. This aligns with guidance on how to apply DTF transfer on fabric to ensure that the final piece reads correctly once positioned on the garment or textile.
Next, align the transfer on the fabric using precise placement tools, then cover with a non-stick sheet to promote even heat distribution. Apply heat according to the film producer’s recommendations—typical ranges involve controlled temperature, time, and pressure—and follow through with the recommended UV curing for the adhesive or ink. Cooling and post-press care complete the process, ensuring the print is firmly bonded before washing tests or long-term use.
4) Troubleshooting and quality checks for UV DTF transfers
Quality checks begin with color and edge integrity. If you notice ghosting, dull colors, or edge lifting, review curing duration and ensure proper film-to-fabric contact. These issues often signal insufficient UV curing, incorrect ink density for UV DTF printing on fabric, or misalignment during pressing, all of which can be addressed through adjustments to your DTF transfer settings for fabric and workflow calibration.
Carry out a patch test on a scrap fabric before committing to a full run. Use the test results to tune white underprint strength, color profiles, and curing intervals. When problems persist—such as cracking, sticking, or color shifts on blends—revisit material compatibility, adhesive cure times, and the possibility that your curing unit’s intensity or distance needs recalibration.
5) UV DTF vs other fabric decoration methods: when to choose UV DTF
Compared with sublimation, UV DTF transfer on fabrics generally offers broader fabric compatibility, including cotton and blends, with the added benefit of vibrant color on dark backgrounds. It can deliver crisp details with a softer hand than vinyl or HTV, particularly when the adhesive cures fully under UV exposure. This makes UV DTF an appealing option for mixed-fiber productions where color fidelity and durability are priorities.
When deciding between UV DTF printing on fabric and other methods, consider fabric type, color requirements, and wash durability. For polyesters and light fabrics, sublimation might be optimal, but for cotton-rich textiles or dark fabrics, UV DTF often provides superior opacity and durability, especially with proper post-cure practices and DTF transfer settings for fabric tuned to your equipment.
6) Post-press care and long-term durability of UV DTF transfers
Post-press care focuses on curing fully and following washing guidelines to maximize durability. Allow the print to cool naturally after pressing, then complete any UV post-curing recommended by your adhesive or ink supplier. Proper post-curing helps achieve wash-fastness and color stability for UV DTF transfer on fabrics, ensuring that bright colors remain vibrant through multiple laundry cycles.
Maintain consistent maintenance routines for your equipment and test periodically with representative fabrics. Recalibrate temperatures, times, and pressures as you switch fabric types or film batches, and keep your UV lamps in good working order. By applying disciplined test patches and documenting results, you can sustain high-quality outcomes across different textile applications and ensure the longevity of your UV DTF transfers.
Frequently Asked Questions
What is UV DTF transfer on fabrics and how does it differ from UV DTF printing on fabric?
UV DTF transfer on fabrics uses UV-curable inks or adhesives on a transfer film that is cured with UV light, delivering sharp detail and vibrant color on many textiles. Compared with UV DTF printing on fabric, the transfer approach can offer faster cure times, strong wash durability, and a different hand depending on the adhesive. Always test on your fabric to confirm compatibility and performance.
How to apply DTF transfer on fabric using UV DTF transfer on fabrics?
Design and print your artwork on UV DTF film using UV-curable inks. Align the transfer on the fabric, then press at the recommended temperature and time (e.g., around 160–170°C for 12–20 seconds with medium pressure). After pressing, cure the print under UV light as directed by your adhesive or ink supplier and allow it to post-cure before handling.
What are the recommended DTF transfer settings for fabric when using UV DTF transfer on fabrics?
Common starting settings are around 160–170°C (320–340°F) for 12–20 seconds with medium pressure. If you’re working on dark fabrics, enable a white underprint to improve opacity. Always run a small test patch to dial in color density, curing time, and overall adhesion for each fabric.
Which fabrics work best with UV DTF transfer on fabrics and DTF transfer on textiles?
UV DTF transfer on fabrics generally works well on cotton, cotton blends, and many synthetics. Some polyesters or specialty finishes may require adjusted settings or adhesive formulations. Always test on a swatch of the exact fabric to verify adhesion, color, and wash durability for DTF transfer on textiles.
What are common issues and troubleshooting tips for UV DTF transfer on fabrics?
Common issues include ghosting or faint colors from insufficient curing, cracking if the fabric stretches during pressing, and sticky film if post-press curing is incomplete. Color shifts can occur on blends or non-cotton fabrics. Adjust cure time, ensure proper film-to-fabric contact, and verify adhesive/ink density to resolve these problems.
What safety and post-care steps should you follow for UV DTF transfer on fabrics?
Always test on a fabric swatch before production and work in a well-ventilated area. Follow the manufacturer’s cure times for UV lamps and adhesives, and provide proper post-curing. After curing, follow garment care instructions and maintain equipment to ensure consistent results.
| Key Point | Description |
|---|---|
| Definition and concept | UV DTF transfer on fabrics combines a film carrying the design with a UV-curable adhesive or ink system. When exposed to UV light, the ink/adhesive cures quickly, creating a strong bond to the fabric and yielding sharp detail, bright color, and durability across a wide range of textiles (including some dark fabrics). Compare this to traditional heat-only methods. |
| Key advantages | High-resolution detail and color vibrancy; durable washes when cured properly; broad fabric compatibility (cotton, blends, and some synthetics); quick UV curing can streamline production and reduce handling time. |
| Careful handling and optimization | Not a one-size-fits-all method. Requires proper film handling, precise curing, and correct press settings. Testing on chosen fabrics before large runs is essential to avoid waste and ensure consistent results. |
| Materials and tools | UV DTF film with the design; UV-curable inks or DTF inks; UV-curable adhesive or clear layer; UV lamp/UV LED curing unit; heat press or cold-press system with protective sheets; lint roller, flat pressing surface, cleaning supplies; scrap fabric for testing; non-stick sheet/parchment paper. |
| Step-by-step overview | Step 1: Design and print on UV DTF film (high-res, mirror if needed). Step 2: Powdering/pre-curing if applicable. Step 3: Prepare/preheat fabric. Step 4: Align and apply transfer. Step 5: Press (typical): ~160–170°C for 12–20s with medium pressure; then UV cure per supplier. Step 6: Cool, peel carrier, and post-cure as required. |
| Troubleshooting | Ghosting/faint colors: increase curing time or adjust ink density. Cracking/peeling: check fabric stretch and cure. Sticky carrier remnants: ensure correct carrier sheet and cure. Color shift on some fabrics: calibrate color profiles and consider white underprint for opacity. |
| Safety and best practices | Test on fabric samples first; work in well-ventilated area; follow safety guidelines for adhesives, inks, and UV lamps; keep work area clean; maintain equipment per vendor recommendations. |
| UV DTF vs other methods | Compared to standard DTF, UV-curable inks may cure faster and behave differently with white underprints. Sublimation suits polyester/light fabrics; UV DTF works on cotton and blends. DTF generally offers durable prints with a softer hand; UV curing adds protection and speed. |
| Post-press care and wash durability | Once cured, most UV DTF transfers resist typical washing cycles, but always verify with test washes and follow garment care instructions. Proper curing and handling maximize wash durability. |
Summary
UV DTF transfer on fabrics is a transformative approach in fabric printing that blends a design-carrying film with UV-curable inks or adhesives to create vibrant, durable graphics on textiles. The process involves selecting the right materials, precise film handling, controlled curing, and careful press settings, with testing on representative fabrics to ensure reliable results. By mastering design, printing, alignment, pressing, and post-press care, you can achieve high-quality results across a wide range of fabrics, from cotton blends to synthetics, while minimizing waste and improving production efficiency. This guide’s steps—design and print, powdering if applicable, fabric preparation, alignment, pressing and curing, and post-press care—form a practical workflow that supports consistent, professional outcomes for UV DTF printing on fabric.