
UV DTF transfer on cotton and polyester is redefining how designers apply durable, vibrant designs to everyday fabrics. To learn how to apply UV DTF transfer effectively, this guide walks you through material prep, printing quirks, and heat-press basics. Cotton vs polyester UV DTF differences matter for prepress and finishing. By testing DTF transfer temperature and time, you can dial in the ideal heat and dwell for each fabric. Attention to the UV DTF curing process and choosing the best fabrics for UV DTF transfers dramatically improves wash durability.
This overview reframes the topic as digital textile printing with UV-curable films applied to common fabric bases. Viewed across cotton and synthetic blends, the approach emphasizes adhesion, color fidelity, and wash durability on each substrate. LSI-aligned terms such as UV inks, adhesive transfer films, curing steps, and heat-press protocols help search engines connect the concept with related topics. By considering substrate behavior, you can anticipate outcomes for cotton or polyester and navigate practical choices in material selection and process timing.
UV DTF transfer on cotton and polyester: Fabric-specific insights
Fabric choice fundamentally shapes how UV DTF transfers perform. Cotton tends to be more forgiving, offering slightly longer pressing windows and robust color saturation, which makes dense, bold designs pop with clarity. In contrast, polyester requires tighter temperature control and shorter dwell times to prevent issues like scorching or edge cracking. Understanding these differences helps you tailor your process for each fabric and minimize surprises in production.
Blends add another layer of nuance, as cotton/poly fabrics can respond differently across the same settings. This is why running small test swatches on each fabric type is essential before committing to a full run. By recognizing how cotton, polyester, and blends behave under UV DTF, you can plan adjustments to pre-press, heat, and cure steps to achieve consistent results.
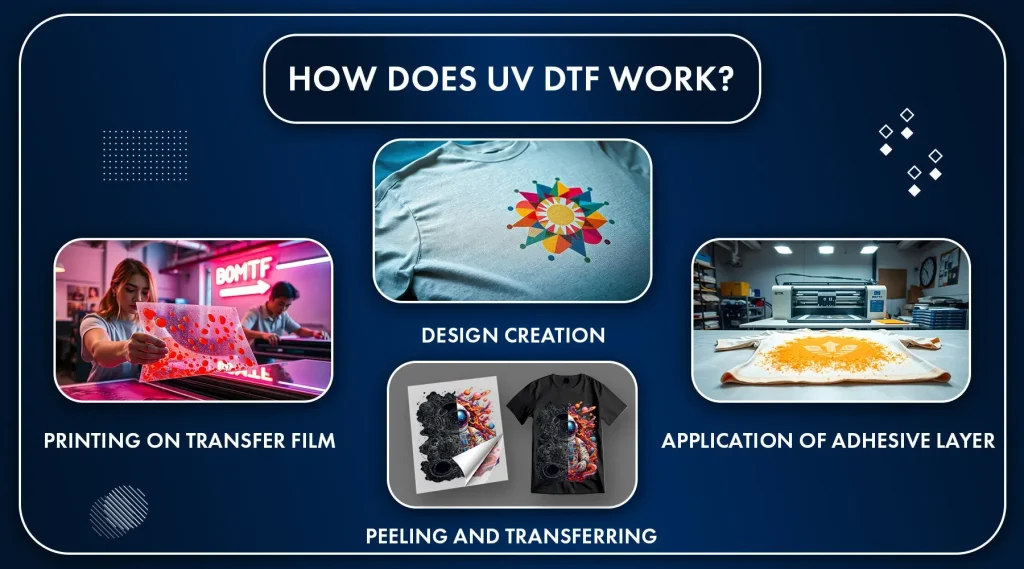
How to apply UV DTF transfer: Step-by-step on cotton and polyester
Descriptive guidance starts with art and prep. Begin with a high-resolution design (at least 300 dpi) and ensure correct color management and soft proofing so colors read well on both cotton and polyester. Prepare the artwork with safe margins and consider saturation tweaks for cotton to compensate natural fiber absorption, while keeping colors slightly cooler on polyester to prevent oversaturation after bonding.
The actual application flow follows a clear sequence: print the UV DTF film, cure if needed, align and pre-press the garment, then transfer with even pressure and a prescribed dwell time. Finish with a peel (hot or cold per the adhesive) and a post-press if required. If your system uses UV-curable adhesives, you may perform a final curing step after bonding to maximize durability.
DTF transfer temperature and time: optimizing heat for cotton and polyester
Temperature and time are the levers that determine bond strength and color fidelity. For cotton, typical guidance suggests a higher tolerance for dwell time (5–10 seconds) at around 150–165°C (300–330°F). This helps achieve strong adhesion and rich saturation without excessive edge wear.
Polyester, by contrast, benefits from lower temperatures and shorter or carefully managed dwell times to avoid gloss, scorching, or edge cracking. A common starting point is 140–150°C (285–300°F) for 8–12 seconds, with adjustments based on fabric thickness, dye stability, and the specific adhesive layer in use. Always run a small test print to calibrate for your garment and transfer.
UV DTF curing process: post-bonding care and enhancements
The UV DTF curing process can be an optional yet valuable step to improve abrasion resistance and wash durability. If your system uses UV-curable adhesives, curing after bonding can lock in the image and reinforce the bond, but be mindful of heat exposure that could shift colors on sensitive fabrics.
Follow the manufacturer’s guidelines for curing time, distance, and light intensity. Cure either the bonded area or the whole garment as directed, and allow the item to rest before handling or washing. Proper curing also helps ensure the transfer remains securely bonded through multiple wash cycles.
Best fabrics for UV DTF transfers: cotton, polyester, and blends
Choosing the right fabric is a core strategic decision. Cotton generally yields richer color saturation and stronger adhesion when paired with appropriate pre-press and dwell times, making it a reliable choice for bold designs. Polyester is excellent for performance fabrics and color stability when processed with careful temperature control and shorter dwell periods.
Cotton/poly blends require a balanced approach. You may need to compromise between the cotton-friendly settings and the needs of the polyester portion, often starting with cotton-like timings and then fine-tuning for the blend’s dye stability and fiber content. Testing remains essential to find a sweet spot that delivers both durability and print quality.
Troubleshooting and longevity: maintaining consistent UV DTF results
Consistent results come from deliberate testing and meticulous workflow checks. Common issues include edge lifting, color shifts on polyester, or stiff hand after curing. Address edge lifting by ensuring proper alignment, tack down edges before final bonding, and slightly increase pressure or time if needed.
Long-term success hinges on equipment calibration, organized documentation, and a living library of fabric swatches. Regularly calibrate heat presses, printers, and curing devices; keep records of parameter changes and outcomes; and refer to your swatches when approaching new fabrics or transfer batches to minimize trial-and-error iterations.
Frequently Asked Questions
How to apply UV DTF transfer on cotton and polyester?
To apply a UV DTF transfer on cotton and polyester, start with a high-resolution design and a test print. Pre-press the garment to remove moisture, align the transfer with heat resistant tape, and press for 12–15 seconds at the appropriate temperature (cotton 150–165°C, polyester 140–150°C) with medium to high pressure. Then peel according to the adhesive guidelines and, if required, perform a post-press cure to finalize adhesion.
Cotton vs polyester UV DTF: how do they differ when applying UV DTF transfers?
Cotton vs polyester UV DTF transfers differ in tolerance and behavior: cotton tends to be more forgiving, supports longer dwell times, and yields rich color saturation when pre-pressed correctly; polyester is more heat sensitive, requiring lower temperatures and shorter dwell times to avoid scorching or edge cracking. Always run a test garment to calibrate temperature and time for each fabric.
DTF transfer temperature and time for cotton and polyester?
DTF transfer temperature and time for cotton and polyester: Cotton is typically 150–165°C (300–330°F) for 5–10 seconds during pre-press and about 12–15 seconds for bonding. Polyester often uses 140–150°C (285–300°F) for 8–12 seconds, with careful pressure and even contact. Adjust these settings based on fabric weight and the adhesive layer.
UV DTF curing process for transfers on cotton and polyester?
UV DTF curing process: If using UV-curable adhesives or inks, cure after bonding following the supplier guidelines. This can be done with a UV light source while the transfer remains in place or after a post-press cure. UV curing can improve abrasion resistance and wash durability but avoid heat exposure that could affect color stability on cotton or polyester.
Are cotton and polyester the best fabrics for UV DTF transfers?
Are cotton and polyester the best fabrics for UV DTF transfers? In general, 100% cotton offers strong adhesion and vibrant color with proper pre-press, while 100% polyester requires stricter temperature control and shorter dwell times to prevent gloss or edge cracking. Blends may work well with adjusted settings, but always run tests.
What are key steps and tips for reliable UV DTF transfer on cotton and polyester?
Key steps and tips for reliable UV DTF transfer on cotton and polyester: plan a test print, calibrate heat press temperature, and verify edge adhesion. Align carefully with heat resistant tape, apply 12–15 seconds at the recommended temperature, perform a peel as advised, and consider a post-press cure if required. Maintain a small swatch library to reference when changing fabrics or adhesives.
| Topic | Key Points |
|---|---|
| What UV DTF transfer is and why it matters for cotton and polyester |
|
| Materials and prep you’ll need |
|
| Step-by-step workflow (high-level) |
|
| Cotton vs polyester considerations and best practices |
|
| Tips for consistent results and troubleshooting |
|
| Maintaining your UV DTF workflow for long-term success |
|