
Printing on dark fabrics with screen printing opens up bold possibilities for standout apparel. Dark-colored garments can make designs pop, but they also present unique challenges. A white underbase helps brighten designs. Choosing the right inks to maximize opacity and durability is crucial for vivid results on deep tones. This intro section covers basics for dark fabrics and tips to improve wash-fastness.
From an SEO perspective, the topic can be framed using related terms such as dark textile printing and base-layer opacity. Latent Semantic Indexing encourages discussing concepts like underbase strategies and color density to signal relevance across related searches. In practice, you can also address pre-treatments for dark fabrics to improve ink adhesion and wash durability.
Printing on dark fabrics with screen printing: fundamentals for bold results
Printing on dark fabrics with screen printing presents both opportunity and challenge. Dark base colors can dull inks, so designers typically start with a white ink underbase to create a bright foundation that allows subsequent color layers to read clearly. This foundational step helps ensure contrast remains intact across navy, black, charcoal, and other deep tones.
A well-planned underbase also influences durability and wash reliability. When choosing between plastisol and water-based inks, consider how each behaves on dark fabrics, including curing temperatures and potential hand feel. With careful planning, you can maximize opacity and color fidelity from the first pass.
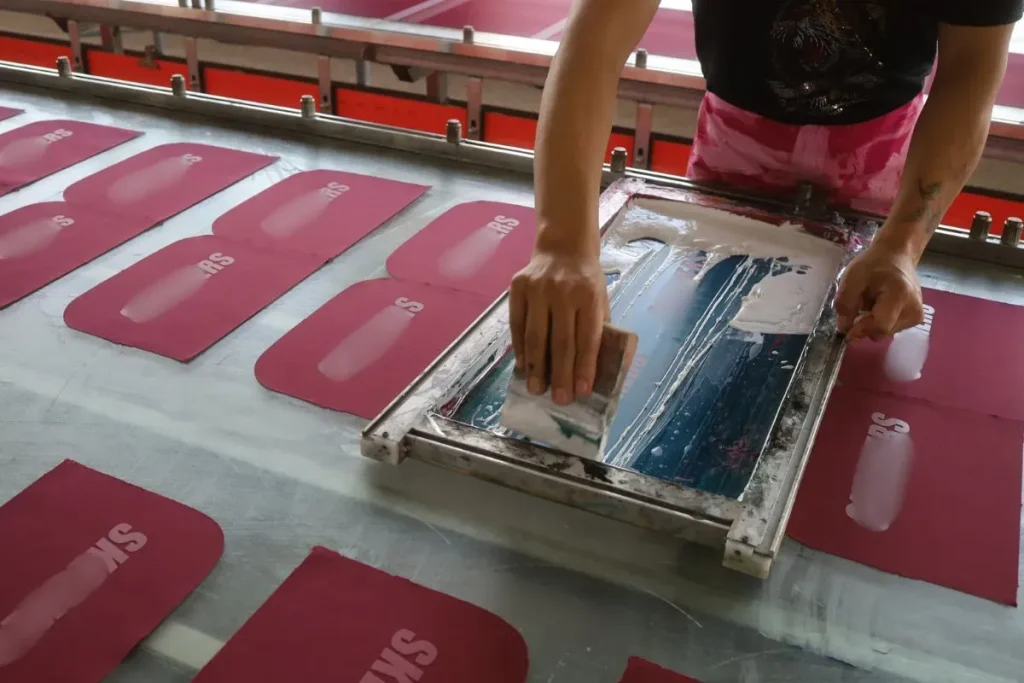
White ink on dark fabrics: maximizing brightness and durability
White ink on dark fabrics is the critical first step for vibrant results. Selecting a high-coverage white base and ensuring it cures properly is essential to prevent future color shifts and to give top colors a true ride on the garment’s surface. Proper white underbase sets the stage for clean lines and consistent opacity.
After laying the white base, opaque inks for dark fabrics can layer effectively without appearing washed out. Using sufficiently opaque top inks helps reduce the amount of underbase required and preserves color brightness, especially on black and midnight navy garments.
Pre-treatments for dark fabrics: prep steps to improve adhesion and wash performance
Pre-treatments for dark fabrics are not universal, but they are essential on many 100% cotton fabrics and some blends to improve ink adhesion and reduce dye migration. Pretreatments act as a barrier that moderates fabric absorbency and enhances brightness, particularly when printing on dark backgrounds.
Follow the manufacturer’s guidelines for application thickness, drying time, and curing conditions. Uniform coverage matters—uneven pretreatment can cause blotches or color inconsistencies that compromise opacity and color payoff on dark fabrics.
Opaque inks for dark fabrics: building solid, vibrant color layers
Opaque inks for dark fabrics enable solid color blocks on deep garment colors. By highlighting whites, yellows, and reds with high opacity, you can achieve vivid results with less dependence on a thick underbase for every shade.
Top-color opacity works best when paired with the right mesh and underbase strategy. Layering opaque inks over a properly cured white underbase yields crisp edges and durable color that resists fading in wash cycles.
Color opacity on dark fabrics: layering techniques and color management
Color opacity on dark fabrics depends on ink selection, layering order, and curing. Managing opacity means balancing underbase coverage with the density of top inks to preserve legibility and brightness across the design.
Experimentation with test prints on the actual fabric helps you tune ink density, color density, and curing times. By iterating, you can ensure the final print reads clearly on the darkest garments while maintaining a soft hand feel where possible.
Process workflow for successful dark garment prints: from artwork to cure
Process walkthrough for dark garment prints starts with artwork optimized for bold lines and high contrast. Use a white underbase and decide whether opaque inks or conventional inks with underbase will best suit the design, then plan pretreatment if needed.
A reliable workflow includes pretreating compatible fabrics, aligning screens precisely, curing each layer properly, and inspecting after final cure. Address common issues like fading, bleeding, or cracking by adjusting mesh counts, squeegee pressure, and ink viscosity, then re-test to ensure durability across washes.
Frequently Asked Questions
Printing on dark fabrics with screen printing often starts with white ink on dark fabrics. How does this work and why is it essential?
A bright white underbase creates a neutral canvas so top colors read true on dark garments. The underbase is printed and cured before applying color inks, and some fabrics may require multiple passes for sufficient opacity. Plastisol underbases are common for durability, but the choice can affect hand feel and brightness.
What are the key pre-treatments for dark fabrics before screen printing (pre-treatments for dark fabrics)?
Pretreatments reduce absorbency and dye migration, improving ink adhesion and brightness on 100% cotton or dark blends. Apply evenly, follow the product’s cure guidelines, and allow proper drying before printing.
Which inks are best as opaque inks for dark fabrics in screen printing (opaque inks for dark fabrics)?
Plastisol inks with an underbase deliver high opacity and durability on dark fabrics. Use opaque top inks to maximize brightness and reduce reliance on thick underbases; discharge inks can work on compatible fabrics, and water-based inks with a well-designed underbase can offer a softer hand while maintaining opacity.
How can you achieve color opacity on dark fabrics without sacrificing hand feel (color opacity on dark fabrics)?
Start with a high-opacity white underbase and choose opaque top inks. Optimize mesh counts and stencil for sharp edges, then cure properly to preserve brightness without a stiff feel.
What setup tips for screen printing on dark fabrics (screen printing on dark fabrics) help with mesh, emulsion, and curing?
Use a two-stage approach: a relatively open mesh for the white underbase and a finer mesh for top colors. Select compatible emulsions, ensure proper exposure, and adjust squeegee pressure and stroke to maximize opacity. Cure each layer in sequence and allow cooling between layers to prevent smearing.
What are common issues when printing on dark fabrics with screen printing and how can you fix them (fading, bleeding, cracking)?
Fading or color shift usually stems from underbase opacity or incomplete curing; bleeding can result from uneven pretreatment or misalignment; cracking often occurs on stretch fabrics, so consider softer inks and correct curing. Address these by tuning underbase thickness, ensuring consistent pretreatment, adjusting ink viscosity, and verifying cure temps and times.
| Aspect | Key Points |
|---|---|
| Ink options |
|
| White underbase |
|
| Pre-treatments |
|
| Screen printing setup |
|
| Practical tricks |
|
| Process walkthrough |
|
| Common issues & fixes |
|
| Maintenance & care |
|
Summary
This table summarizes the key points for Printing on dark fabrics with screen printing, including ink options, white underbase, pretreatments, setup, tricks, workflow, common issues, and maintenance. A well-managed combination of underbase strategy, opaque inks, proper pretreatment, and disciplined curing leads to vibrant, durable prints on dark garments.