
Modern 3D embroidery techniques are transforming fabric art by creating tactile depth that you can see and feel. This evolution blends elements from 3D embroidery layering and foam embroidery technique to push beyond flat stitching. Raised stitch embroidery adds height and shadows, while layering embroidery textures stack components to form sculptural motifs. Designers now mix modern embroidery methods with careful planning to produce durable, wearable, and expressive pieces. Together, these approaches invite makers to experiment with color, form, and light, turning fabric into a small sculpture.
From an LSI-informed perspective, the topic can be described as 3D embroidery layering that adds height and tactile presence to textiles. In practice, makers treat it as textile sculpture, using foam embroidery technique and layered fabrics, with deliberate stitch planning to lift elements off the base. Related terms such as ‘raised stitch embroidery’, ‘layering embroidery textures’, and ‘modern embroidery methods’ help readers connect to the concept across different contexts.
Modern 3D embroidery techniques: Understanding Layering, Foam, and Raised Stitches
Modern 3D embroidery techniques blend texture, color, and form to create fabric art that can be felt as well as seen. This approach expands beyond flat surface stitches, introducing layering, foam, and raised stitches as core elements of a single cohesive design. By thinking in three dimensions from the outset, designers tap into a wider toolbox of modern embroidery methods that yield durable, sculptural results.
These techniques are not competing with traditional applique but complement it by adding height and shadow. When used together, 3D embroidery layering concepts enable soft, tactile layers; foam embroidery technique provides buoyant centers; and raised stitch embroidery defines edges and highlights. Together, they transform a motif into a small sculpture that catches light and invites closer inspection.
3D Embroidery Layering Techniques: Building Depth with Base and Layer Components
Layering starts with a stable base and grows with overlapping pieces of fabric, felt, or stabilizers. In 3D embroidery layering practice, designers build depth by adding deliberate tiers—this creates layering embroidery textures that read as depth rather than just color. The technique emphasizes planning the stack order, edge finishing, and secure adhesion so each layer stays true to the design under movement.
Practice how many layers your motif needs, from petals to scales or leaves. Satin stitches or tight zigzags secure the edges and prevent shifting while light plays across the raised edges. The discipline of layering helps you control height, shadow, and the final silhouette.
Foam Embellishment in 3D Embroidery: Creating Buoyant Texture and Volume
Foam is a lightweight core that creates volume without a heavy footprint. By cutting foam to the silhouette and sandwiching it behind stitched outlines, you get a buoyant center that pushes stitches outward. Foam embroidery technique thrives on thin sheets and careful stabilization so the fabric remains flexible in wear.
Positioning foam correctly is essential: it should sit behind stable layers and be secured with anchor stitches along the perimeter. When combined with careful edge stitching, the foam lends rounded petals, bulbous centers, or curved features that catch light and add tactility.
Raised Stitch Embroidery: Elevating Details and Shadows on Fabric
Raised stitches pull threads above the base fabric with long satin stitches, straight stitches, or strategic zigzags. This method creates distinct focal points, such as the center of a flower or the contour of an animal figure, making the design pop from the surface.
Experiment with combining raised stitches with foam or layered pieces to position details on different planes. This approach embodies raised stitch embroidery, where height differences translate into dramatic highlights under light and ambient shadows that enhance readability and texture without sacrificing durability.
Combining Layering, Foam, and Raised Stitches: Designing Dimensional Motifs
The strongest 3D projects emerge when all three techniques are woven together like a sculpture. Start with a strategy that defines which elements are recessed, which sit at the surface, and where the height will come from. This planning supports a cohesive composition that remains stable through washing and wear.
Consider motifs such as a floral motif or a small animal: layered petals, foam centers, and raised outlines create a multi-plane image that reads as three-dimensional. Using stabilizers compatible with foam and layered fabrics helps maintain the texture and prevents distortion while integrating color and texture.
Materials, Tools, and Care for Modern 3D Embroidery Projects
A successful 3D embroidery project requires deliberate material choices: sturdy backing fabrics, cut-away stabilizers, foam sheets, and a thread line that can withstand height. Selecting the right tools—sharp needles, efficient scissors, water-soluble topping, and compatible stabilizers—helps you translate planned depth into durable texture.
Care is different for textured pieces. Wash and dry instructions should consider foam and layered materials, with gentle cycles and cold water. By labeling care needs and testing a sample before finishing, you ensure that layering embroidery textures retain their dimensional integrity over time.
Frequently Asked Questions
What is 3D embroidery layering and how does it fit into Modern 3D embroidery techniques?
3D embroidery layering is a foundational component of Modern 3D embroidery techniques. Start with a stable base, then add fabric scraps, felt, or stabilizers in stacked layers to create height and shadows. Secure edges with satin stitch or small zigzags to prevent shifting, and plan where each layer sits in three dimensions. When layered correctly, it yields layering embroidery textures that read as dimensional and tactile rather than flat.
How does the foam embroidery technique contribute to dimensional design within modern embroidery methods?
Foam embroidery technique adds buoyancy and volume without bulk, a hallmark of modern embroidery methods. Cut foam to match the motif, place it behind the embroidery or between layers, and anchor the edges with light stitching or spray adhesive. Cover with fabric and stitch around the perimeter to trap the foam in place, producing a raised, soft volume ideal for petals, wings, or other curved shapes. Choose foam thickness to suit the design’s scale to avoid warping.
What is raised stitch embroidery and how can it enhance layering embroidery textures for 3D projects?
Raised stitch embroidery intentionally lifts thread above the base fabric using long satin stitches, straight stitches, or tight zigzags. Height can be increased by anchoring behind stabilizers or by layering foam and fabric points beneath the stitches. When used with layering embroidery textures, raised stitches define edges and highlights, creating dramatic light and shadow on a 3D surface.
What essential tools and materials are recommended when combining layering, foam, and raised stitches in Modern 3D embroidery techniques?
A practical starter kit includes fabric stabilizers (cut-away or tear-away), foam sheets in varying thicknesses, sturdy backing fabrics, a stabilizing spray or temporary adhesive, a mix of cotton, rayon, or polyester threads, appropriate needles, scissors, and water-soluble topping. Ensure materials are compatible (foam with stabilizers, fabrics that can handle layering). Keep edges tidy with finishing stitches to prevent shifting.
What care and maintenance guidelines help preserve 3D embroidered pieces that use foam and raised stitches in Modern 3D embroidery techniques?
Care should be gentle to preserve dimensional elements. Hand-wash or machine-wash on a gentle cycle in cold water, turning the item inside out. Avoid high heat, which can warp foam and distort layers. Air-dry flat and reshape edges if needed. Check care labels and, when possible, avoid tumble drying to maintain the piece’s structure.
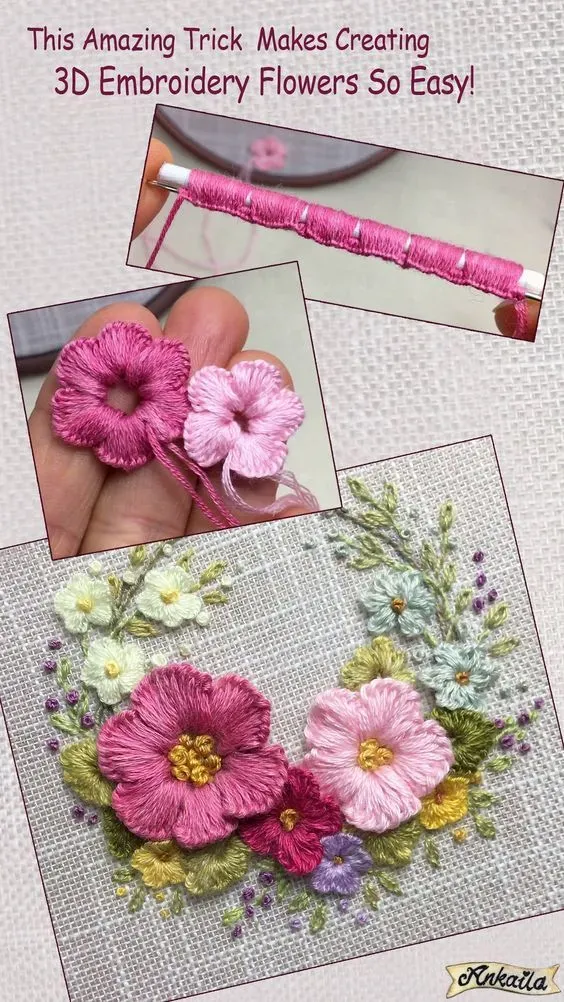
What is a practical step-by-step approach to a mini project that uses layering, foam, and raised stitches to achieve 3D effects?
Try a simple 3D flower project: 1) prepare the base by cutting stabilizer and a matching fabric circle, with a small foam center; 2) layer several small fabric petals around the center and secure with light adhesive; 3) add foam teardrops or ovals for inner petals and anchor; 4) apply raised stitches with long satin stitches to outline petals and lift the center; 5) finish by removing stabilizers, tidying threads, and setting with light steam if fabrics permit. This approach demonstrates Modern 3D embroidery techniques by combining layering, foam, and raised stitches to build dimension.
| Topic | Core Idea | Notes / Examples |
|---|---|---|
| Overview | Modern 3D embroidery techniques add dimension to fabric art using layering, foam, and raised stitches; not a replacement for flat embroidery but a toolkit to expand texture, height, and tactility. | Designed to create tactile, sculptural effects by combining techniques; used to tell stories through texture, color, and form. |
| Layering Techniques | Foundation strategy: start with a base layer, then add layers to build depth using scraps, felt, or stabilizers. | Layering creates volume and soft shadows; plan top layer and overall height from the outset. Edges are secured with edges satin-stitched or small zigzags. |
| Foam Embellishment | Foam provides buoyancy and volume behind or between layers; cut to match silhouette and secured with adhesive or stitches. | Traces or cuts the foam to the design silhouette; the foam pushes stitches outward for a raised, light-catching surface. |
| Raised Stitch Methods | Stitches that stand up from the base plane; use long stitches or anchor over stabilizers to lift threads higher. | Common stitches include long satin, straight, or closely spaced zigzags; combine with foam or layers for added lift and emphasis. |
| Combining Techniques | Most striking work blends all three techniques into a cohesive design. | Treat the design like a small sculpture: plan base, recessed pieces, and height sources; select compatible stabilizers and topper aids; consider care implications. |
| Materials & Tools | Essential tools and materials to start: fabric stabilizers, foam, backing fabrics, stabilizing spray, threads, needles, scissors, water-soluble topping, and edging materials. | Good organization ensures layers stay aligned and edges stay secure throughout stitching and finishing. |
| Choosing the Right Combination | Choice depends on project size, fabric type, and wear considerations. | Smaller patches may benefit from firmer foam and denser raised stitches; delicate fabrics may need lighter foam and gentler edges. |
| Mini Project (Practical Step-by-Step) | A simple 3D flower using layering and raised stitches with a foam center. | Demonstrates how to plan base, layer petals, add foam details, apply raised stitches, and finish. |
| Care & Maintenance | 3D embroidery uses multiple materials; care differs from traditional embroidery. | Hand-wash or gentle cycle cold; turn inside out; avoid high heat; air-dry and reshape as needed. |
| Inspiration & Applications | Dimensional designs for jackets, bags, hats, wall art, and home decor. | Dimensional motifs add tactile interest to textiles and scale well from wearable to decorative pieces. |
| Common Mistakes & How to Avoid | Common pitfalls that can distort the design: over-thick foam, wrong stabilizer, poor edge finishing, and neglecting care instructions. | Prevent by starting thin, matching stabilizer weight, securing outer edges, and planning care labels. |
| Impact on Modern Crafting | 3D techniques redefine possible outcomes in fabric art, enabling expressive, durable pieces with tactile depth. | Applications span fashion, accessories, and decor with a versatile textural vocabulary. |
| Conclusion | Summary of benefits and approach to modern three-dimensional embroidery. | Techniques combine to expand creativity while emphasizing planning, material selection, and careful stitching. |
Summary
Modern 3D embroidery techniques open new dimensions in textile art by introducing texture, height, and shadow that you can feel as well as see. They blend layering, foam, and raised stitches to turn flat motifs into tactile sculptures for clothing, accessories, and home decor. With thoughtful planning, appropriate materials, and a willingness to experiment, crafters can create durable, expressive pieces that invite closer inspection and appreciation.