
Mesh Count for Screen Printing is a foundational decision that determines how ink sits on fabric, how much detail survives in edges and lines, how crisp gradients appear, and how durable the final image will be after repeated washing, making it one of the most impactful choices you’ll make during screen-printing setup and preproduction planning. The mesh count you pick directly affects ink deposition, dot and line fidelity, and the perceived opacity, so selecting the right value is essential for production speed as well as color fidelity, while also determining opacity on challenging substrates, the ease of layering color stops, and the ability to reproduce tonal transitions cleanly. In this guide, we’ll explore balancing artwork, ink type, substrate, curing conditions, squeegee pressure, and press alignment to help you make fast, informed decisions that consistently deliver bright color, sharp detail, uniform halftones, and durable results across diverse fabrics and lighting conditions. For ongoing guidance, consult a screen printing mesh count guide, a mesh count chart, and silkscreen mesh count tips to translate counts into opacity and detail across fabrics, inks, and production speeds, so you can reproduce reliable outcomes without repeating costly trials and while benchmarking against industry standards. You’ll also learn how to choose mesh count by testing with strips and evaluating opacity, edge sharpness, and wash durability across fabrics, while comparing results under different inks, fabric colors, and processing conditions to tailor a robust starting point for your shop’s most common jobs, for repeatable results across multiple runs and operators.
Beyond the exact mesh count, you can think in terms of stencil openness, print density, and fabric compatibility—the underlying ideas that govern how much ink passes through the mesh and how crisp the image appears. In practical terms, this means evaluating how the stencil apertures, emulsion thickness, and ink viscosity interact to produce solid blocks or fine lines. Consider the interplay between substrate texture, fabric color, and ink type as you tune color projection and gradient smoothness. LSI-inspired terms such as screen mesh density, fabric compatibility, halftone fidelity, and print permanence can strengthen your content and help search engines link this guide to broader screen printing topics while remaining accessible to readers.
Mesh Count for Screen Printing: A Practical Guide to Ink Opacity and Detail
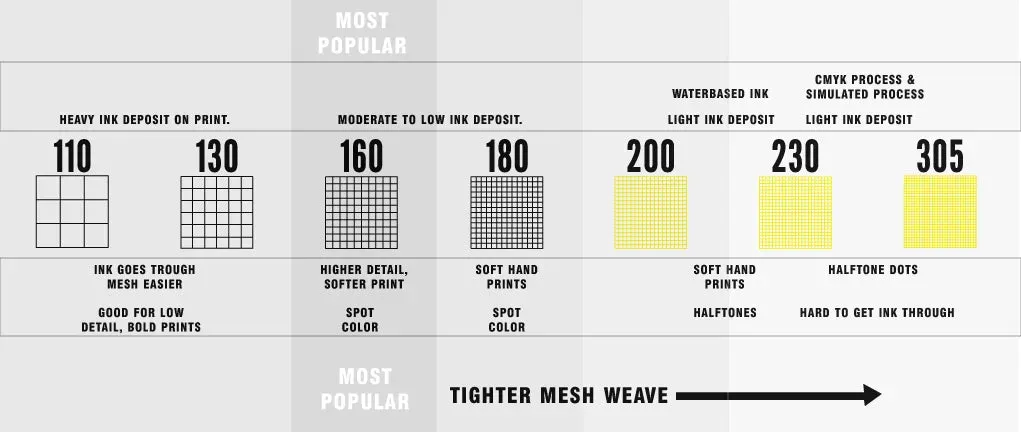
Understanding mesh count is foundational to control ink deposition, detail, and the durability of your print. In screen printing, the number of threads per inch directly influences how much ink can pass through the stencil, which in turn affects color opacity and edge definition. A lower mesh count generally delivers heavier ink deposits and bolder color blocks, while a higher count produces finer detail but lighter deposits. This balance is what determines whether a design reads solid on dark fabrics or reveals delicate lines on pale substrates.
When approaching a project, avoid chasing the highest count for every job. Instead, reference the idea of a screen printing mesh count guide that helps you match ink type, substrate, and artwork complexity. By considering factors like substrate color, ink opacity, and required detail, you can select a starting point from common ranges (for example, 110–156 for bold colors on cotton, or 195–230 for finer detail with water-based inks) and then validate through controlled testing.
How to Choose Mesh Count: A Step-by-Step Method Aligned with Ink and Substrate
Choosing the right mesh count begins with a clear view of the artwork and the printing conditions. Start with how much detail the design contains, then assess the ink type and substrate to determine a baseline. This aligns with a practical how to choose mesh count approach, where you map the artwork requirements to an initial mesh range and plan controlled tests to verify opacity and sharpness.
A typical baseline might be 156 for plastisol on cotton or 230 for water-based inks on light fabrics. From there, create test strips that copy real production conditions, including the color separation, curing temperature, and fabric type. Evaluating the results—checking for ghosting, feathering, or excessive ink build—lets you iterate toward a final mesh count that balances detail with color strength.
Screen Printing Mesh Count Guide: Ink Types, Substrates, and Detail Considerations
A solid screen printing mesh count guide should cover ink behavior across plastics, fabrics, and finishes. Plastisol inks tend to be thick and opaque, often benefiting from mid-range counts (roughly 110–156) for strong opacity on light fabrics. Water-based inks, which rely on capillary action, typically require higher counts (195–305) to preserve halftones and prevent bleed, while discharge inks sit in the mid-to-high range (195–230) to balance deposit with fabric drape.
Substrate choices dramatically influence mesh count decisions. Cotton and cotton blends often respond well to 110–156 for solid colors on light fabrics or 156–230 for darker substrates where opacity is crucial. For dark fabrics, higher counts (156–230, or even 230–305 for fine halftones) can improve opacity without sacrificing detail. This is why the screen printing mesh count guide emphasizes matching ink, substrate, and artwork complexity rather than pursuing a universal optimum.
Using a Mesh Count Chart: Quick Reference for Common Substrates and Inks
A mesh count chart provides a quick reference to align substrates, inks, and design requirements. By using a chart, you can gauge whether a design with fine lines, small text, or bold blocks will deposit the right amount of ink. For example, 110–156 can deliver bold solids on cotton, while 195–230 supports more detail on light fabrics when using water-based inks.
Remember that charts are starting points. Real-world results depend on emulsion thickness, squeegee pressure, and curing conditions. Always verify with controlled test runs that include solid blocks and fine lines. Document the outcomes so you can rapidly reproduce successful combinations across future jobs using the same chart as a reference.
Silkscreen Mesh Count Tips: Pro Tips for Halftones, Fine Lines, and Color Richness
Silkscreen mesh count tips emphasize how to preserve sharp edges and smooth halftones. For fine lines or tiny text, higher mesh counts (230–305 or higher) are common to minimize ink spread and maintain legibility. Conversely, bold, high-coverage areas can benefit from lower counts (110–156) to ensure dense pigment deposition and vibrant color on a range of fabrics.
Additional tips focus on ink compatibility, squeegee dynamics, and stencil preparation. Adjustments to emulsion thickness, squeegee durometer, and printing speed can shift how a given mesh count performs, so pairing mesh choice with these process settings is essential. Documenting each test, including ink brand, fabric type, and cure temperature, helps build reliable silkscreen mesh count tips you can reuse across projects.
Common Pitfalls and Testing Protocols: Building a Reliable Mesh Count Workflow
A frequent pitfall is assuming a higher mesh count automatically yields better prints. Higher counts reduce ink deposition and can wash out colors on dark fabrics or obscure fine text on light fabrics if not tested properly. This is why a disciplined testing protocol—starting with a baseline, then incrementally adjusting mesh counts—helps identify the right balance for each job.
A robust workflow includes a controlled test matrix: baseline mesh count, a higher count for fine detail, and possibly a lower count for bold areas. Maintain a detailed log of ink type, fabric, transfer conditions, curing temperature, and observed results. This documentation supports rapid replication and better decision-making for future designs, reinforcing a measurable approach to achieving consistency and durability across prints.
Frequently Asked Questions
What is mesh count for screen printing and why does it matter?
Mesh count for screen printing is the number of threads per inch on the screen. A higher mesh count yields a finer stencil with less ink passing through, improving detail and color transitions; a lower count deposits more ink for opacity but can blur fine detail. Choosing the right mesh count affects ink deposition, color opacity, and print durability, and should be balanced with ink type, substrate, and artwork.
How to choose mesh count for screen printing?
Start with the artwork and ink/substrate, using a baseline such as 156 for plastisol on cotton. Use a screen printing mesh count guide to pick starting points, then create controlled test strips to evaluate opacity and detail. Analyze results, adjust up or down, and iterate until the deposit, edge sharpness, and wash durability meet your goals.
What is a mesh count chart and how do I use it in screen printing?
A mesh count chart provides recommended mesh ranges for different inks, fabrics, and detail levels (e.g., 110–156 for bold solids, 195–230 for more detail). Use it as a starting point to map your ink and substrate to a mesh count, then run tests to confirm opacity and crispness before committing to production.
What mesh count should I start with for plastisol on cotton or for white ink on dark fabrics?
Start with 156 mesh for plastisol on cotton. For white or bright inks on dark fabrics, move to 195–230 mesh to improve opacity while preserving detail. For very fine halftones or delicate lines, test at 230–305 mesh. This approach aligns with common silkscreen mesh count tips.
How does ink type influence mesh count in screen printing?
Ink type drives the starting mesh count: plastisol is thick and often uses 110–156; water-based inks are thinner and typically need 195–305 for detail; discharge inks balance pigment with fabric drape around 195–230; specialty inks may require higher or lower counts. Always test to confirm output.
What steps should I follow to determine the final mesh count for a new design?
1) Analyze the artwork for fine lines and text. 2) Pick a baseline based on ink and substrate (e.g., 156 for plastisol on cotton). 3) Create a controlled test strip set using that baseline. 4) Evaluate opacity and detail after curing. 5) Iterate with other counts to map changes in detail and deposition. 6) Consider production realities and maintain a test log for repeatability.
| Topic | Key Points |
|---|---|
| What is mesh count and why it matters? | Mesh count equals the threads per inch on the screen. Higher counts create a finer stencil but allow less ink through; lower counts permit more ink. This balance determines opacity, detail, and print durability. |
| Ink type and opacity | Ink type and opacity: Plastisol 110–156; Water-based 195–305; Discharge 195–230; Specialty inks may use 110–156 or 230–305 depending on opacity. |
| Substrate and fabric color | Cotton and blends: 110–156 for solid colors on light fabrics; 156–230 for darker substrates demanding opacity. Dark fabrics: 156–230 to boost opacity while preserving detail; 230–305 for very fine halftones. Specialty fabrics may push counts higher for bleed reduction. |
| Artwork detail and color count | Simple bold designs: 110–156. Fine lines and small text: 230–305. Halftones and gradients: 230–305 or higher for smoother transitions. |
| Screen preparation and process | Emulsion thickness and sealing affect how high counts pass ink. Squeegee durometer/pressure influences deposition through higher counts. Printing speed interacts with mesh count; higher counts usually require slower, more precise printing. |
| Artwork scalability and future-proofing | Choose a moderate starting mesh (e.g., 156) and adjust with emulsion/inks. Consider a two-grid approach to cover a range of jobs without excessive tooling. |
| Common mesh count ranges and what they are best for | 110–156: bold, opaque colors on cotton/light fabrics. 156–195: versatile for standard plastisol printing. 195–230: more detail and color on light/mid fabrics. 230–305: fine detail and halftones. 305–355+: very fine detail and high-definition halftones on smooth fabrics. |
| Step-by-step approach to choose the right mesh count | 1) Analyze artwork for fine lines, small text, and color separations. 2) Pick a baseline for ink and substrate (for example, 156 for plastisol on cotton). 3) Create controlled test strips with the baseline. 4) Evaluate opacity and detail after curing. 5) Iterate with variations in mesh count. 6) Align with production realities (two-grid approach if needed). |
| Practical tips and common pitfalls | Don’t assume higher mesh equals better; test. Use swatches that mimic production substrates. Start with a mid-range mesh (around 156) for plastisol on cotton and adjust. Document tests for reproducibility. Combine mesh with stencil strategies (tight halftone for crisp prints). |
| Putting it all together: practical workflow for mesh selection | For most jobs, begin with 156 for plastisol on cotton; test 230 for fine lines; 195–230 for water-based or discharge on light fabrics; test 195–230 or 230–305 for dark fabrics. Maintain a test log to reproduce results quickly. |
Summary
Mesh Count for Screen Printing is a nuanced factor that shapes how ink deposits, how crisp lines appear, and how durable a print remains through washes. By balancing ink type, substrate, and artwork detail, you can select mesh counts that optimize opacity and sharpness without sacrificing production efficiency. Start with a practical baseline (such as 156 for plastisol on cotton), then test and iterate with higher counts for fine lines or halftones and lower counts for bold blocks. Maintain a detailed log of ink, fabric, curing temperature, and wash conditions to reproduce reliable results across jobs. The Mesh Count for Screen Printing framework helps you deliver consistent, high-quality prints—from bold logos to intricate multi-color artwork—while reducing waste and guesswork. With practice, you’ll build a dependable reference library that speeds decision-making and ensures predictable outcomes for future projects.