
Machine vs Hand 3D Embroidery is a topic that longtime stitchers, designers, and small-business owners regularly revisit. This comparison pairs the capabilities of a 3D embroidery machine with the tactile charm of hand embroidery vs machine embroidery to help you decide what best fits your project and budget. For those seeking dimensional detail, 3D puff embroidery tips show how foam, underlay, and stitch planning affect height, texture, and durability. Understanding machine embroidery pros and cons—speed, consistency, setup costs, and scalability—helps you compare options for logos, uniforms, or art pieces. Practical tips for 3D embroidery, from stabilizers to foam thickness and stitch density, set the stage for choosing the right method and workflow.
A closer look reveals how automated, gear-driven embroidery systems and careful, hand-sewn techniques approach raised designs from different angles. Industrial machines excel at reproducibility and speed for large runs, while artisans bring personality and irregular texture through traditional needlework. The trade-offs touch on foam-backed puff effects, stabilizer choices, and planning, all framed by related terms that connect technique, texture, and fabric compatibility. Budgeting, production timelines, and quality control sit alongside creative intent to guide a hybrid approach when you want both efficiency and artistry. In practice, designers often blend automated base stitching with hand-finished 3D details to achieve a premium look across small batches or apparel lines.
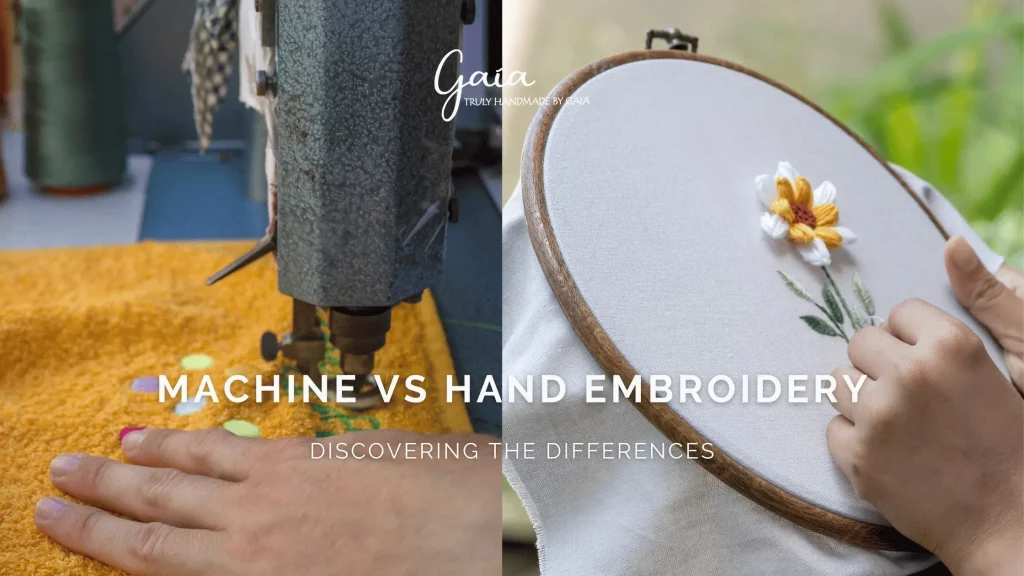
Machine vs Hand 3D Embroidery: Assessing When to Use Each Method
Choosing between machine-driven and hand-stitched 3D embroidery hinges on project scale, desired texture, and production timelines. A 3D embroidery machine delivers speed and consistency, making it ideal for bulk runs, logos on uniforms, or promotional items where uniform puff height and stitch density are essential. When you weigh machine embroidery vs hand embroidery, the contrast in workflow becomes clear: automation accelerates output while preserving repeatable results.
However, the unique character of hand embroidery—its tactile irregularities and artisanal nuance—can elevate limited runs or art-driven pieces. Incorporating hand-made 3D elements introduces texture variation that some designers prize for a handcrafted feel. For projects that demand both efficiency and personality, a hybrid approach combining machine foundation work with hand-stitched accents often yields the best balance of speed, texture, and brand identity.
What is 3D Embroidery? Texture, Foam, and Puff Techniques
3D embroidery adds depth and texture by layering stitches or using foam or felt beneath the embroidery to create raised, dimensional effects. This is especially true for 3D puff embroidery, where a raised ridge stands out against the fabric. In many shops, a 3D embroidery machine drives the process to ensure uniform puff results across products, while hand embroidery can achieve similarly striking effects with a more personalized touch.
Understanding the practical differences helps in planning: machine-driven 3D designs excel in consistency and repeatability, whereas hand-stitched textures offer unique variances that can enhance a one-off piece. When deciding how to approach a design, consider fabric stability, the intended use, and whether the goal is a bold logo, decorative element, or a combination of both.
3D Puff Embroidery Techniques and Tips
Effective 3D puff embroidery starts with careful foam selection. Choose foam thickness that matches the fabric and the desired puff height; too thick a layer can cause needle breaks or fabric distortion. For consistent height, plan stitches with satin or column patterns and apply pull compensation to keep layers even, while backstitching at the start and end secures the structure.
Color, shading, and layering contribute to the perceived depth of the raised design. Layered thread choices can simulate light and shadow on the puffed elements, enhancing the three-dimensional look. After stitching, removing stabilizers cleanly and testing wash cycles helps ensure durability, especially for garments that will see frequent laundering. Designers often blend hand-padded 3D elements with machine-backed embroidery to combine texture with dependable production quality.
Machine Embroidery: Pros and Cons for 3D Projects
Machine embroidery brings notable pros for 3D designs: speed, consistent stitch length and density, automatic color changes, and strong reproducibility across large runs. For brands needing uniform logos and badges, a 3D embroidery machine supports scalable production with reliable results and is accessible to beginners who work from pre-designed files.
On the downside, the upfront cost of equipment and software, limited fabric compatibility, and ongoing maintenance can add to the total expense. The rigidity of machine setups can also limit certain textures or asymmetries that some designers seek. Weighing these machine embroidery pros and cons is essential when planning budgets and timelines for a 3D project.
Hand Embroidery: Pros and Cons for 3D Effects
Hand embroidery offers rich texture and a handcrafted feel that’s hard to replicate with machines. It excels on irregular shapes, delicate fabrics, and designs that benefit from artisan customization. For small batches or one-off art pieces, hand-crafted 3D textures can create a distinctive, premium look that resonates with customers seeking individuality.
However, hand embroidery is time-intensive and riskier in terms of consistency between pieces without meticulous technique. Achieving uniform 3D effects requires skilled artisans, which can limit turnaround for larger projects. When reliability and scale are factors, designers often evaluate the balance between hand-made texture and machine-assisted production.
Practical Tips for Choosing Between Machine and Hand 3D Embroidery
To decide between machine and hand 3D embroidery, start by defining project scope, quantity, and branding requirements. For large orders with consistent artwork, machine embroidery provides efficiency and brand uniformity, while hand embroidery can deliver premium details for limited runs. These practical tips for 3D embroidery help set expectations on timelines and costs.
Plan the design with materials in mind: stabilize fabrics properly, consider foam underlay for puff effects, and test stitch density on swatches. Designing for a hybrid approach—machine-based bases with hand-finished 3D highlights—can optimize speed and texture. Use pilot samples to compare outcomes and adjust variables like foam thickness, color layering, and stabilizer choice before full production.
Frequently Asked Questions
What is the difference between a 3D embroidery machine and hand embroidery when creating 3D puff effects?
A 3D embroidery machine can produce fast, consistent puff effects across many items by using a foam underlay or raised stitches, delivering uniform height and density. Hand embroidery creates a tactile, artisanal texture with subtle variations from stitch to stitch, which can add character but may be less repeatable. For best results, control foam height and stabilizers in both approaches, and follow 3D puff embroidery tips such as testing foam thickness for consistent results.
In terms of machine embroidery pros and cons, when is hand embroidery a better choice for 3D puff designs?
Machine embroidery pros include speed, repeatability, and easy color changes, with strong brand consistency for logos; cons are upfront equipment costs and less texture variation. Hand embroidery is ideal for small runs or focal art pieces where texture, variation, and a handmade feel matter. For 3D puff designs, consider blending approaches and applying 3D puff embroidery tips to balance consistency with texture.
What practical tips for 3D embroidery help when deciding between machine vs hand embroidery?
Practical tips for 3D embroidery: define project scope and production volume, plan the design with machine-friendly shapes (bold lines, simple curves) while reserving organic textures for handwork, use proper stabilizers and foam for puff effects, build swatches on similar fabric, test stitch density, and sample results to compare outcomes before full production.
How do texture and variability differ between machine embroidery and hand embroidery in 3D puff projects?
Machine embroidery yields uniform puff height and consistent density, which is ideal for repeatable branding. Hand embroidery offers richer texture and organic variability that can feel more tactile and artisanal. Many designers blend both methods to achieve a regulated base with hand-stitched 3D elements, using 3D puff embroidery tips to optimize transitions.
What budget, tools, and materials should you consider for a 3D embroidery machine vs hand embroidery workflow?
For machine embroidery: budget for a 3D embroidery machine, digitizing software, stabilizers, foam for puff effects, threads, and routine maintenance. For hand embroidery: invest in quality embroidery floss or thread, appropriate needles, an ergonomic hoop, and texture options (foam, felt, beads). Consider long-term costs, training time, and downtime when comparing overall value.
When would a hybrid workflow between machine and hand embroidery be advantageous for 3D puff effects?
A hybrid workflow is beneficial when you need bulk production plus notable texture. Use machine embroidery for the base 3D puff across large runs and add hand-stitched details to create focal points. This approach balances speed, cost, and texture while preserving a distinctive look.
| Aspect | Key Points |
|---|---|
| What is 3D Embroidery? |
|
| Key Differences |
|
| Pros and Cons: Machine Embroidery |
|
| Pros and Cons: Hand Embroidery |
|
| Practical Tips for Choosing Between Machine and Hand Embroidery |
|
| 3D Puff Embroidery: Techniques and Tips |
|
| Budget, Tools, and Materials |
|
| Real-World Use Cases |
|
| Integrating Both Methods |
|
| Common Myths and Misconceptions |
|
Summary
Machine vs Hand 3D Embroidery is not a binary choice but a spectrum that unfolds across scale, budget, design intent, and tactile quality. This overview highlights how machines deliver speed and consistency for bulk production while hand embroidery offers texture, personalization, and artisanal charm for unique pieces. A blended, hybrid workflow often provides the best balance of cost, speed, and texture, enabling you to leverage the strengths of both approaches as you plan and execute 3D embroidery projects.