
Dive into this DIY patch tutorial to learn how patching clothing and gear can be a fun, budget-friendly way to personalize outfits. From iron-on patches to sew-on patches, this guide covers both and explains how to apply patches so you can choose the method that fits your style. This beginner patch tutorial walks you through easy, reliable steps for each method so you can start creating right away. By the end, you’ll be comfortable choosing patches, preparing fabric, and applying patches with confidence. Whether revamping a denim jacket, backpack, jeans, or exploring patch ideas for clothing, you’ll achieve clean, durable results while keeping the process simple and approachable.
Seen through a broader lens, this project centers on fabric embellishment and basic mending, transforming plain garments into personalized pieces. In this framing, terms like decorative patches, fabric appliqués, and fashion embellishments describe the same idea from different angles. You might explore heat-activated patches, self-adhesive options, or sew-on appliqués, all aimed at long-lasting wear and creative expression. Whether repairing a snag, adding color and texture, or creating a sustainable upcycle, these techniques let you control texture, color, and care. By using these related concepts, you align your content with search terms people use when learning about DIY clothing upgrades.
DIY Patch Tutorial: Iron-On Patches vs Sew-On Patches
Starting a DIY patch tutorial is a fun way to customize jeans, jackets, bags, and more. In this guide we explore two popular methods: iron-on patches and sew-on patches, so you can choose the approach that fits your project and budget. Understanding both options helps you select patches, prepare fabric, and learn how to apply patches with confidence. By the end, you’ll be ready to revamp pieces you already own and express your personal style with durable, clean results.
Iron-on patches rely on heat-activated adhesive that bonds with fabric when heated, while sew-on patches are stitched into place for long-lasting wear. Both methods have strengths—iron-ons can be quick for lightweight fabrics, and sew-ons may endure heavy use or frequent washing. This section equips you with clear, beginner-friendly steps and shows you how to apply patches so you can tackle projects with assurance.
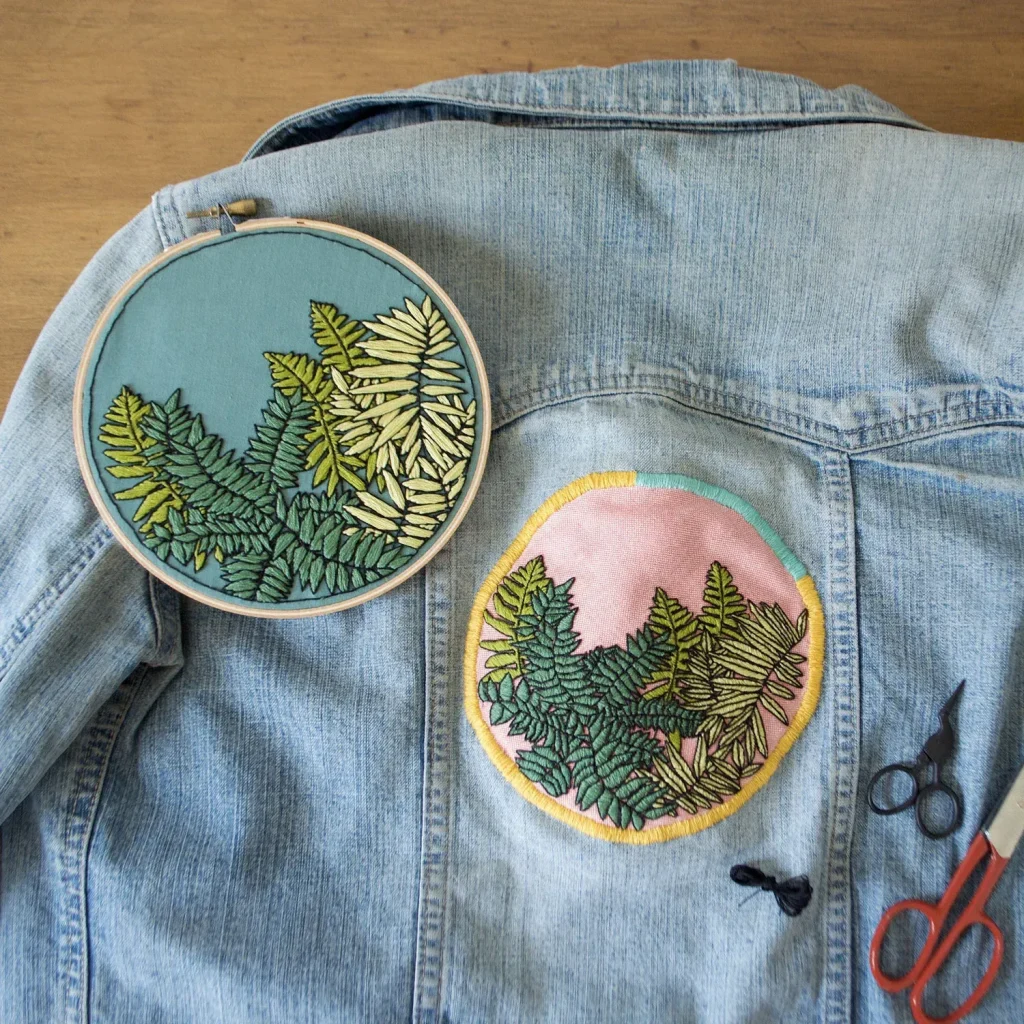
Patch Ideas for Clothing: Creative Ways to Personalize Denim and More
Inspiration for patch ideas for clothing flows from texture, color, and message. Think retro logos, botanical designs, or quirky icons to personalize denim, backpacks, or hats. By pairing iron-on patches with sew-on options, you can mix durability with creative flair while keeping the process accessible through a range of patch ideas for clothing.
Start with a color story and consider placement that complements seams and hardware. If you’re new to patching, sketch layouts or tape patches in place before pressing or sewing. These patch ideas for clothing can span themes from vintage patches to modern minimalist symbols, giving you a broad palette to choose from as you build your collection.
Beginner Patch Tutorial: Materials, Prep, and Setup
Materials and prep are the first steps in any beginner patch tutorial. Gather iron-on patches, sew-on patches, scissors, needles and thread, a ruler or chalk, and a reliable iron or sewing machine. Prepare your fabric by washing and drying it, then lay the garment flat to map patch locations; this helps you avoid shifting during application. This is a great entry point for a beginner patch tutorial, emphasizing simple tools and clear steps.
Set up for success by testing patches on a scrap fabric first and choosing a backing if necessary. For thicker fabrics like denim or canvas, select stronger needles and sturdy thread, and plan a simple layout so the patch edges align with seams or hems. This prep phase makes the rest of the process straightforward and approachable.
Step-by-Step: How to Apply Patches on Fabric
Iron-on step: turn the garment inside out and place the patch exactly where you want it. Cover it with a thin cloth, then apply heat with a hot iron according to the patch’s instructions. Apply firm pressure for 15 to 30 seconds, and let the patch cool before handling to ensure the heat-activated adhesive bonds properly. This is a core part of how to apply patches in many projects.
Sew-on method: pin the patch in place and stitch around the edges using a backstitch or a tight satin stitch for durability. Use a matching thread to blend in, or a contrasting color for a bold look. Finish with secure knots and trim thread tails; always test wash to confirm the stitches hold and the patch stays secure over time.
Common Mistakes and Fixes for Patch Applications
Common pitfalls include using too little heat on iron-on patches, skipping fabric prep, or placing patches on areas that bend or stretch. Not pre-washing fabric can lead to adhesive failure or puckering, and skipping edge sealing can cause fraying over time. These mistakes are common even for first-timers learning how to apply patches.
Fixes include reapplying heat with a dry press, reinforcing edges with a few extra stitches, and choosing a compatible needle and thread for the fabric. If a patch peels, add a thin line of fabric glue or use a fray-preventing product and re-seal the edges. Regular care and gentle washing help patches last longer.
Care, Longevity, and Maintenance for Your Patches
Care for patches depends on the method. Iron-on patches should be heat-activated again after heavy washing, and sewing patches benefit from occasional re-stitching to prevent edge lift. Drying on a line or flat surface helps prevent distortion and keeps patches looking fresh.
Longevity comes from smart maintenance such as avoiding high-heat dryers, using mild detergents, and addressing wear patterns early. Topstitching around the patch edge or adding a reinforcing zigzag stitch can extend life, as can choosing patch ideas for clothing that suit the garment’s weight and fabric. With proper care, your patched gear stays stylish longer.
Frequently Asked Questions
What is a DIY patch tutorial, and how can I start with iron-on patches in this beginner patch tutorial?
A DIY patch tutorial is a step-by-step guide to personalizing or repairing clothing with patches. In this beginner patch tutorial, you’ll learn two common methods: iron-on patches and sew-on patches. You’ll cover how to choose patches, prep fabric, position them, and heat-set or sew them for clean, durable results. For iron-on patches, use a household iron at the recommended temperature, press firmly for 15–20 seconds, and let the fabric cool before handling.
In a DIY patch tutorial, should I use iron-on patches or sew-on patches for a beginner patch tutorial, and what are the trade-offs?
Iron-on patches are quick and easy, making them great for a fast start in a DIY patch tutorial. Sew-on patches are more durable and washable but require stitching. In a beginner patch tutorial, start with iron-on for speed, and consider adding sew-on stitches around the edges for extra security in high-wear areas.
How do I prep fabric for a DIY patch tutorial to ensure a smooth application with iron-on patches?
Prep the fabric by washing and drying it, then ironing to remove wrinkles. Place the patch where you want it, cover with a thin cloth, and follow the patch’s heat instructions. Press firmly for the recommended time, and allow it to cool. This prep step is key in any DIY patch tutorial when using iron-on patches.
How do I apply patches using the sew-on method in a DIY patch tutorial, and what tools do I need?
For sew-on patches, thread a needle with a close-match thread, position the patch, and sew around the edge using a tight backstitch or small zigzag stitch. Secure the end and trim excess thread. This approach is a core part of a beginner patch tutorial and yields a durable finish.
What are some patch ideas for clothing to try in this DIY patch tutorial?
Patch ideas for clothing include patch ideas for clothing such as band logos, nature motifs (flowers, leaves), geometric shapes, travel or hobby icons, or humorous quotes. Use these ideas on jackets, jeans, backpacks, or hats to personalize items as shown in this DIY patch tutorial.
How should I care for patches after completing a DIY patch tutorial to keep them durable?
After finishing the patch, allow any adhesive to set and wash gently. Turn garments inside out and use a mild cycle, or hand wash. For iron-on patches, consider a light stitch around the edges for extra security in your DIY patch tutorial, and avoid high heat on laundry unless advised.
| Aspect | Key Point |
|---|---|
| Purpose | Patching clothing and gear is a fun, budget-friendly way to personalize outfits, repair wear, and showcase your style. |
| Methods | Two popular methods: iron-on patches and sew-on patches, each with its own advantages. |
| Guide Type | Beginner-friendly guide with easy, reliable steps for each method so you can start creating right away. |
| Skills You’ll Gain | Choosing patches, preparing fabric, and applying patches with confidence. |
| Suitable Projects | Versatile for denim jackets, backpacks, jeans, and other garments. |
| Outcome | Clean, durable results while keeping the process simple and approachable. |
Summary
A DIY patch tutorial is your doorway into a creative, hands-on world of customizing clothing and gear. This conclusion reinforces the two accessible methods—iron-on and sew-on patches—and emphasizes that with beginner-friendly steps, choosing patches, prepping fabric, and applying patches with confidence, you can revitalize garments like denim jackets, backpacks, and jeans in an affordable and enjoyable way. The overall goal is clean, durable results achieved through a simple, approachable process that encourages ongoing DIY fashion projects.