
DIY patch collection organization transforms a scattered stash into a meaningful archive you can enjoy and share. Thinking through patch organization ideas helps you turn memories of teams, events, and trips into a structured, searchable collection. As you sort and store, explore patch storage solutions so the colors stay bright for years. Practical steps like labeling, cataloging, and thoughtful display help the process feel doable. This deliberate system turns a hobby into a durable archive that grows with your patch stash.
From a practical hobby to a curated badge archive, this topic can be framed as collection management for fabric emblems. Think of it as inventory, cataloging, and wardrobe displays that keep memories accessible while protecting delicate threads. Using related terms like badge storage techniques, preservation strategies, and display concepts helps search engines recognize the topic without overloading keywords. By embracing semantic connections such as archival methods, organization systems, and gallery-style showcases, you set the stage for a long-lasting, enjoyable patch journey.
DIY patch collection organization: Principles for a scalable archive
DIY patch collection organization is more than tidying up; it’s a strategic system that grows with your stash. Start by defining what to display, what to archive, and how categories like themes, eras, and colors will guide you. This is where patch organization ideas come to life—sorting, labeling, and cataloging lay the groundwork for quick retrieval and long-term preservation. Treating patches as an ordered archive helps you protect memories and makes future finds easier to locate.
A scalable archive relies on cohesive storage choices and careful protection. Choose materials that guard fibers and colors, from archival sleeves to acid-free backing boards. When storage and planning align, you unlock joy in display and sharing, while reducing handling damage as your collection grows. This is where patch storage solutions fit into the bigger picture, creating a durable system you can rely on.
Sort, assess, and plan: from chaos to cataloged patches
Start by collecting every patch you own, removing any surface oils with clean hands, and planning how you’ll categorize. Begin with broad groups—themes, eras, colors—and refine by size or patch type. This ‘from chaos to cataloged patches’ approach also informs how you preserve patches, as you’ll note provenance and acquisition details during sorting, strengthening future display and storage decisions.
Draft a step-by-step plan that fits your space and budget, with a timeline for upgrades. Decide on a starting system—binder, pockets, or a wall board—and set regular reviews to keep the catalog accurate. The goal is a sustainable workflow that makes it easy to display patches neatly when you want to showcase a new find or rotate in a themed display.
Choosing storage and display options: patch storage solutions that fit your space
Your patch storage solutions should match your space, budget, and how you intend to enjoy the collection. Binders with archival sleeves, pocketed organizers, clear plastic bins, and display boards each offer different accessibility and protection levels. Consider how many patches you want in rotation versus archival storage and plan for future expansion, since scalability is a core part of smart patch organization.
If you love a gallery vibe, pair a wall board with a rotating display plan so you can showcase patches neatly without sacrificing access. Use labels and a simple catalog to track what’s displayed, what’s stored, and what’s next to rotate in. These choices help you create a visually cohesive space while preserving the integrity of each patch.
Labeling and cataloging: metadata that makes your patches searchable
Labeling and cataloging transform a random stash into an organized archive. Build fields like Patch Name, Theme, Color, Size, Material, Acquisition Date, Source, and Notes. A consistent naming convention makes cross-referencing patches across sleeves or wall displays effortless, tying back to your patch organization ideas and making retrieval fast during display planning.
Digital catalogs—spreadsheets or lightweight databases—give you portable, shareable inventory. As you add patches, update metadata so you can locate items quickly for display or gifting. A thorough catalog supports long-term preservation by tracking provenance and care history, helping you answer how to preserve patches when needed.
Preservation and care: patch care tips to extend life
Preservation and care are the heart of a lasting patch collection. Avoid direct sunlight, heat, and moisture; store in acid-free materials and maintain a climate-controlled space if possible. The aim is to minimize fading and fiber breakdown while keeping color integrity intact. These patch care tips help you extend the life of treasured pieces and keep them ready for display.
Handle patches with clean hands or cotton gloves, remove patches from garments when not worn, and plan back-up strategies such as fabric swatches for transferring designs. For vintage patches, avoid adhesives and use acid-free stabilizers if backing is needed. Regularly checking humidity, storage integrity, and handling practices is part of how to preserve patches over time.
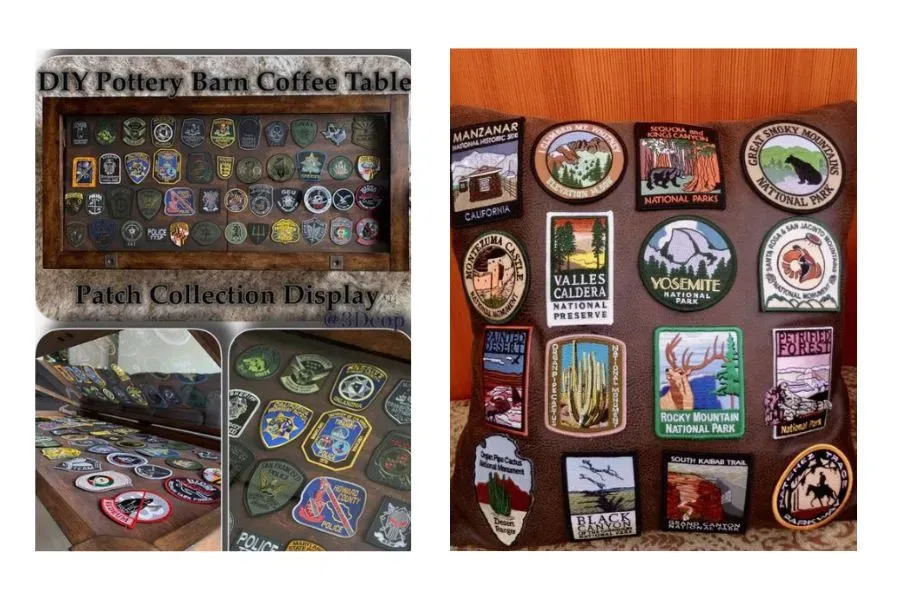
Display patches neatly: curating a wall gallery that tells your story
Display patches neatly by creating thematic sections, color gradients, or era-based walls for a living gallery. Thematic wall displays, UV-protected frames, shadow boxes, and display boards offer structure while letting you rotate pieces as your collection evolves. A well-executed display demonstrates your care for the patches and makes your setup a conversation piece.
Rotate displays to reflect new acquisitions and to tell your collection’s evolving story. Mix patches with photos and small memorabilia to add narrative depth, while keeping storage organized in the background. A thoughtfully designed display not only looks appealing but also reinforces the pride you take in your patch collection, echoing ongoing ideas for display patches neatly and clearly.
Frequently Asked Questions
In DIY patch collection organization, how can patch organization ideas help me sort and plan my stash for long-term enjoyment?
Begin with a clear plan: assess all patches, decide what will be displayed versus archived, then sort by themes, eras, or colors. Patch organization ideas that emphasize scalability let you start with a small binder system and expand to modular storage as your collection grows. Create category labels and a simple catalog to make quick retrieval easy and to turn your stash into a lasting memory archive.
What patch storage solutions work best for a scalable DIY patch collection organization without breaking the budget?
Choose storage options that scale with your collection and budget. Binders with archival sleeves offer a cost-effective, searchable catalog; pocketed organizers or photo albums protect flat patches; clear plastic bins with dividers organize larger groups; display boards or shadow boxes let you enjoy patches while keeping them safe. Pair these with a basic catalog to keep track of what you own and where it belongs.
How can I implement patch care tips to preserve patches effectively as part of DIY patch collection organization?
Follow patch care tips that protect embroidery and fabrics: avoid direct sunlight and heat, use acid-free storage materials, keep patches dry, handle with clean hands or cotton gloves, and store patches separately from worn garments. When patches are on clothing, consider removing them for storage or mounting them on a display page. This approach helps keep patches looking their best as part of DIY patch collection organization.
What’s the best approach to labeling and cataloging patches in DIY patch collection organization to ensure quick retrieval?
Labeling and cataloging should be consistent and scalable. Create a catalog with fields like Patch Name, Theme, Color, Size, Material, Acquisition Date, Source, and Notes, and use a consistent naming scheme. A simple spreadsheet or lightweight database works well for DIY patch collection organization, enabling fast search when you want to display patches or re-home them.
Which display patches neatly strategies are most effective for a wall display or shadow boxes within DIY patch collection organization?
Display patches neatly with a plan that suits your space. Thematic wall displays or color-gradient layouts are visually pleasing, while UV-protected frames reduce fading. Shadow boxes add depth for patches with texture, and display boards (magnetic or cork) let you rearrange patches as your collection grows. All of these are compatible with DIY patch collection organization and help you enjoy the result.
How can I budget and maintain DIY patch collection organization, including how to preserve patches and display patches neatly as the collection grows?
Start small with a binder and a handful of archival sleeves, then scale up as needed. Schedule regular catalog audits and display updates, replace worn storage components, and keep duplicates for gifting or trading. Focusing on how to preserve patches and display patches neatly within a budget-friendly plan helps you maintain DIY patch collection organization over time.
| Section | Key Points | Notes / Examples |
|---|---|---|
| Introduction |
|
A well-organized patch collection fits your space and budget, and helps prevent loss and fading. |
| Core Principles |
|
These principles guide decisions about storage, labeling, and how to present patches while preserving longevity. |
| Step-by-step Plan |
|
Plan should be scalable and tackled in stages. |
| Preservation and care |
|
These tips help extend patch life. |
| Displaying patches neatly |
|
Choose options that fit your space and patch size. |
| Cataloging and maintenance routines |
|
This keeps the collection accurate and organized. |
| Budgeting and space considerations |
|
A modular, affordable approach supports growth without disruption. |
| Common pitfalls and how to avoid them |
|
Label consistently, use archival materials, and maintain a stable climate. |
| A practical, budget-friendly starter plan |
|
Progressively build your system with simple, achievable steps. |
| Conclusion (from base content) |
|
A durable archive grows with your collection and remains a joy to explore. |
Summary
DIY patch collection organization is a mindful approach to preserving memories while organizing patches for easy viewing and sharing. A well-planned system around sorting, protecting, labeling, cataloging, and displaying helps protect patches from damage and loss while turning your stash into an accessible, enjoyable archive. Start small, stay consistent, and let your patches tell their story clearly and beautifully.