
Embroidered Patches have transformed from niche embellishments to mainstream fashion and DIY tools for personal storytelling. Whether you’re reviving a favorite denim jacket or upgrading a backpack, they offer a versatile fusion of art and durability. This guide celebrates embroidered patches styles, showing how different textures and motifs can transform a garment. Learn patch placement tips to balance symmetry and readability, and discover how to apply embroidered patches with confidence across fabrics. We also cover care for embroidered patches and the choice between iron-on vs sew-on patches, so your designs stay bold through washes and wear.
Beyond the term ‘Embroidered Patches,’ designers refer to stitched emblems, fabric appliques, and embroidered badges that act as portable art on clothing and accessories. These stitched accents come in varied textures—from satin-sheen surfaces to raised foam-backed 3D elements—and share the same goal: personal expression with durable, machine-stitched reinforcement. In practice, choosing where and how these decorative badges appear echoes the same considerations you’d apply to textile embellishments, including backing types, fabric compatibility, and care routines. Whether aiming for a subtle accent or a bold focal point, the idea of combining color, shape, and placement resonates across patchwork traditions and modern streetwear.
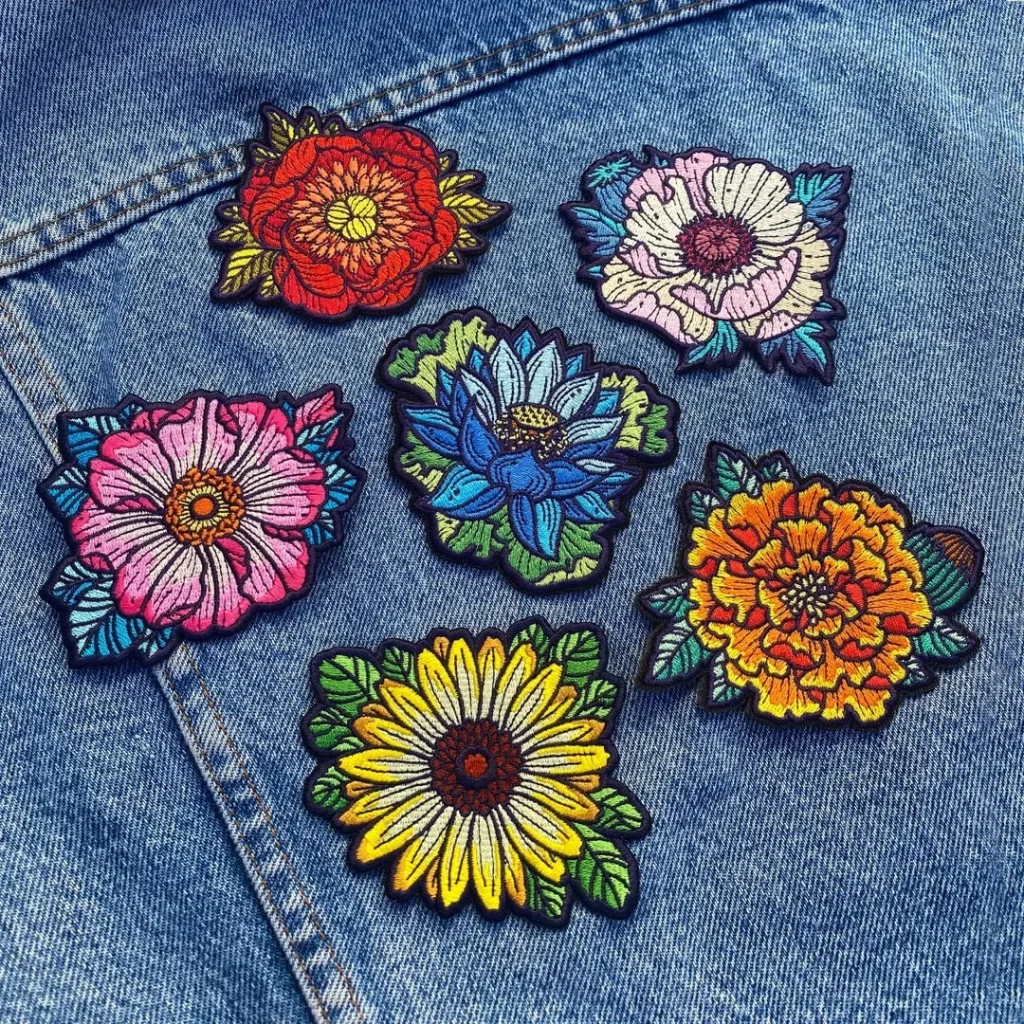
Embroidered Patches Styles: From Satin to 3D Puff
Within embroidered patches styles, you’ll find a spectrum from glossy satin-stitch surfaces to sculpted 3D puff textures. Classic satin‑stitch patches deliver clean lines for bold logos, while vintage options evoke nostalgia with weathered threads and antique color palettes. Monogram patches add a personalized touch, and embroidered art patches blur the line between illustration and embroidery for streetwear or boutique pieces.
Backings and fabrics matter for longevity: iron-on backs offer quick updates, sew-on backs provide lasting security, and heat-seal or Velcro options add removable flexibility. When you match patches to fabric—denim, leather, twill, or lightweight knits—consider how texture and permanence will hold up in regular wear.
Patch Placement Tips for Maximum Impact
Effective patch placement tips help you plan a balanced layout on jackets, bags, and hats. Start with symmetry on jackets or backpacks, placing patches in opposite sleeves or along the chest for visual harmony. If you prefer an asymmetric look, anchor a large focal patch with smaller accents nearby while keeping readability of logos or text.
Think about fabric behavior and seams; denim and canvas hold patches well, while knits require gentler placement or sew-on backing. Layering and negative space ensure each patch stands out, and accessories like hats and bags benefit from flat surface panels for stable adhesion.
How to Apply Embroidered Patches: Quick, Practical Methods
How to apply embroidered patches is easiest with an iron-on backing for a fast update. Prep the fabric by washing and drying to remove sizing, then position the patch and cover with a protective layer before applying heat. Apply the iron with steady pressure for 15-30 seconds, then cool and check adhesion; if desired, finish with a tight zigzag stitch around the edge.
Sew-on patches require a needle and thread; position, pin, and stitch around the edge with tight spacing to prevent fraying. For durability on heavy fabrics, use a satin edge stitch or cross-stitch; alternative methods like heat-seal or Velcro are available for removable designs.
Care for Embroidered Patches: Preserving Color and Adhesion
Care for embroidered patches starts with smart washing: turn the garment inside out, use a gentle cycle, and avoid high heat that can loosen adhesives or fade threads.
Air drying is best; inspect edges after several washes and re-sew or re-adhere as needed. Store garments flat to prevent patch lifting, and protect patches from direct sunlight to minimize color fade.
Choosing the Right Patches for Your Wardrobe
Choosing the right patches means balancing fabric type, patch size, and backing. Heavier fabrics like denim and leather tolerate denser stitching and thicker patch backs, while lightweight knits may require smaller patches or a sew-on backing for durability.
Consider color palettes and branding; custom embroidered patches offer consistent colors and patterns for teams or clubs, with vector logos and precise color specs to guide production.
Iron-on vs Sew-on Patches: Pros, Cons, and Best Uses
Iron-on vs sew-on patches each have distinct benefits; when comparing iron-on vs sew-on patches, you’ll see quick updates and easy fabrication contrasted with lasting security and durability.
Iron-on patches are fast and convenient but can loosen on stretch fabrics or high-friction areas, while sew-on patches require a sewing setup yet hold up across fabrics and washing cycles. For uniforms, gear, or active wear, sew-on patches tend to deliver the most reliable long-term performance.
Frequently Asked Questions
What are the main embroidered patches styles, and how do you choose the right embroidered patches styles for a project?
Embroidered patches styles span classic satin-stitch, vintage/retro, 3D puff, embroidered art, and monogram designs. To select the right embroidered patches styles, consider the fabric type, intended wear, and desired texture: satin-stitch works well for bold logos on denim or leather; 3D puff adds lift on hats and jackets; vintage patches suit retro looks; monograms personalize accessories. Also check backing compatibility and color palette to ensure a cohesive result.
What are patch placement tips for applying Embroidered Patches on jackets, bags, and hats?
Patch placement tips include planning symmetry on garments like jackets and backpacks, choosing flat areas away from thick seams, zippers, and pockets, and ensuring logos or text remain readable. Position patches on fronts or shoulders for visibility, with negative space left between patches to keep each design legible. For hats and bags, target flat panels or front-facing areas to maximize impact.
How to apply embroidered patches?
How to apply embroidered patches: Iron-on patches can be applied by heating the patch backing with a cloth cover and pressing firmly for 15-30 seconds, then cooling and optionally sewing around the edge for extra security. Sew-on patches require stitching around the edge with a tight stitch to anchor the patch to the fabric. For removable options like heat-seal backs or Velcro, follow the product instructions and care guidelines to avoid residue or wear.
How to care for embroidered patches to preserve color, texture, and adhesion?
Care for embroidered patches includes washing inside-out or in a mesh bag on a gentle cycle with cold water, and avoiding high dryer heat that can loosen backing. Use mild detergents and skip fabric softeners that can affect adhesion. Inspect patches after several washes, re-sew or re-adhere as needed, and store garments flat away from direct sunlight to preserve color and texture.
Iron-on vs sew-on patches: which backing is best for your garment and how do you decide?
Iron-on patches are quick and convenient for temporary updates but can loosen on stretch fabrics or high-friction areas, while sew-on patches are more durable across fabrics and washing cycles. Choose iron-on for quick styling changes on sturdy fabrics; opt for sew-on when you need long-term security and longevity. You can also consider removable options like Velcro backs for frequent changes.
How can you design a cohesive look using embroidered patches styles and patch placement tips?
Designing a cohesive look with embroidered patches styles and patch placement tips starts with a plan: choose a unifying color palette, select a mix of patch sizes, and map a layout that respects negative space. Use patch placement tips to balance symmetry and readability, placing larger focal patches with smaller accents nearby. Test a small layout on similar fabric before committing to stitching or ironing.
| Aspect | Key Points |
|---|---|
| Styles of Embroidered Patches | • Classic satin-stitch patches: smooth, glossy surface; ideal for bold logos, clean lettering, and simple shapes; ages gracefully on denim, leather, or twill. • Vintage and retro patches: weathered threads, antiqued color palettes, retro fonts; pairs with jean jackets, vintage backpacks, and military-inspired outerwear. • 3D puff patches: foam under embroidery creates lift and dimension; works well on hats, hoodies, and letterman jackets. • Embroidered art patches: blends illustration with embroidery to resemble painted/drawn art; suits creative projects and streetwear. • Monogram/initial patches: personalized typography for a refined, custom touch. Backing options influence style and durability: iron-on backs for quick updates, sew-on backs for long-term security, and heat-seal/Velcro for removable options. Fabric compatibility (thick denim, lightweight knit, leather) and permanence level also matter. |
| Patch Placement Tips | • Plan with symmetry: place patches in pairs on opposite sleeves, shoulders, or along the chest; balance large focal patches with smaller accents for an asymmetric look. • Consider fabric and seams: denim/canvas hold patches well; knit fabrics need extra care; avoid thick seams, buttons, or zippers where movement can cause tearing. • Function and readability: position logos/text so they’re easily seen; don’t cover zippers or pockets. • Layering and negative space: leave negative space so each patch can breathe; avoid a crowded patch layout. • Accessories placement: hats (front/side panels), bags (top/front panel), and shoes/plints benefit from flat surface placement. |
| How to Apply Embroidered Patches | • Iron-on patches: prep fabric, position patch, apply heat with a hot iron (15–30 seconds), let cool, optionally sew around edges for extra security; note: frequent washing/high heat can loosen adhesive. • Sew-on patches: align, pin, and stitch with a tight running or satin stitch around edge; finish securely and trim threads; ideal for heavy fabrics and frequent washing. • Alternative methods: heat-seal or Velcro for removable patches; glue-based options exist but may damage fabrics or reduce longevity if adhesives aren’t compatible. |
| Care for Embroidered Patches | • Washing/drying: turn inside-out or use a mesh bag; wash gentle, cold; air dry to protect stitches. • Avoid harsh chemicals: mild detergents; skip bleach; avoid fabric softeners that can affect adhesive backs. • Inspect regularly: check for fraying or looseness after washes; resew/re-adhere as needed. • Storage: store garments flat; avoid direct sunlight. • Repairs: re-sew edges or apply a bit of fabric glue behind edge if peeling; ensure 3D foam backing remains intact for height. |
| Choosing the Right Patches for Your Wardrobe | • Fabric compatibility: heavier fabrics tolerate dense stitching; lightweight knits may need smaller patches or sew-on backing. • Size and scale: large patches create bold focal points; small patches add subtle texture; consider garment proportions. • Backing preference: Velcro/heat-seal/backing for removability; sew-on/iron-on with extra stitching for longevity. • Color and thread: high-contrast patches stand out; tone-on-tone designs are cohesive; test on similar fabric before committing. • Custom options: for teams/clubs/brands, provide vector logos and color specs for precise results. |
| Iron-on vs Sew-on Patches: Pros and Cons | • Iron-on: quick, convenient; good for temporary updates; less secure on stretch fabrics/high-friction areas; heat application must be precise. • Sew-on: durable and versatile across fabrics (including stretch); longer-lasting; requires sewing setup but allows edge repairs. |
Summary
Embroidered Patches offer a versatile way to express personality and identity while refreshing how you design and wear clothing. By understanding patch styles, placement strategies, and care practices, you can craft cohesive looks that stay vibrant through wear and wash cycles. Whether adding a single monogram to a favorite jacket, building a club or team patch set, or designing layouts for a fashion line, thoughtful design, precise application, and proactive care elevate everyday apparel into durable, story-telling pieces—one stitch at a time.