
A patches placement guide can transform ordinary garments into expressive canvases for personal style. From where to place patches to imagining embroidery patch placement, this guide blends practical steps with ideas for patch styling. By considering alignment, proportion, color, and storytelling, you’ll learn patch style tips that elevate jackets, bags, and hats. The guidance emphasizes balance between visibility and wearability, ensuring patches complement rather than clash with your outfit. Whether you’re restoring vintage denim or customizing daily carry, this introductory overview sets the stage for confident patch projects and timeless looks.
Viewed through a broader lens, this topic acts as an embellishment placement guide, treating decorative patches as intentional surface accents. Terms like decorative patch layout and surface decoration planning echo the same goal: a cohesive look that respects garment lines, color psychology, and wearer movement. This approach mirrors LSI principles by linking embroidery patch placement, patch styling ideas, and storytelling through texture and motif. By exploring these related concepts, you’ll gain techniques that translate across denim, canvas, and knitwear while keeping personal meaning at the center.
patches placement guide: Core Principles for Balanced Patch Layout
A well-executed patches placement guide rests on core principles that transform random patches into a cohesive story. Focus on proportion and scale so that large patches don’t overwhelm small surfaces, and use alignment to create a clean, deliberate look along seams or natural garment lines. By understanding these basics, you can guide the eye where you want it and prevent visual chaos from creeping in.
Color and theme are equally vital for a curated result. Establish a cohesive palette or a clear motif—nature, travel, retro logos—that ties the collection together. This is where patch style tips and patch styling ideas come into play: a consistent color family and deliberate variation in size produce a polished, intentional outcome rather than a haphazard collage.
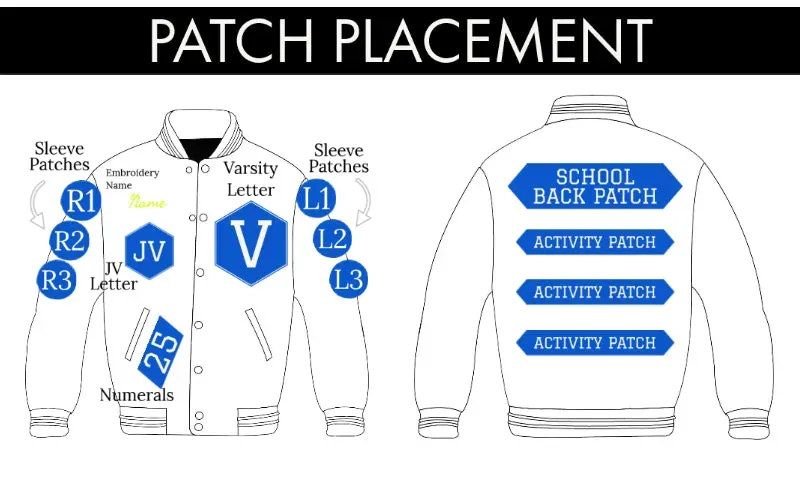
Where to Place Patches on Denim Jackets: Practical Layout for Impact
Denim jackets are a popular canvas for patch work because their flat, durable surface supports varied layouts. Start by identifying the jacket’s primary focal points—back yoke, upper sleeves, and chest area—and plan patches to draw attention upward while keeping the torso visually balanced. Considering where to place patches on denim helps maintain wearability without sacrificing style.
Use a mix of large and small patches to create rhythm without clutter. Patch styling ideas for denim often involve symmetrical arrangements along the spine or a balanced triad on each shoulder, ensuring movement follows the garment’s natural lines. Pair this with patch style tips like repeating a color or theme to maintain cohesion across the jacket’s surface.
embroidery patch placement on Bags and Backpacks: Create a Visual Narrative
Embroidery patch placement is about aligning stitching with existing seams, panel lines, and structural features to integrate patches into the bag’s architecture. The goal is a clean silhouette that reads intentional and stylish, rather than stitched-on clutter. When you think about embroidery patch placement this way, the patches become part of the bag’s story.
Backpack and bag layouts benefit from a narrative approach: plan a front panel that tells a journey—travel, music, or hobbies—through a curated sequence of patches. This is where fashion patches ideas shine, as a cohesive storyline can elevate everyday accessories into personal mood boards, enhanced by patch styling ideas like coordinating textures and subtle color contrasts.
patch styling ideas for a Cohesive Look: Color, Theme, Texture
A cohesive look hinges on color harmony, theme consistency, and texture variety. Patch styling ideas suggest sticking to a single theme (travel, nature, retro logos) and using a restrained color palette to keep the finish refined. Texture—felt, embroidery, rubber—adds tactile contrast that reads well from afar and up close, supporting a deliberate visual rhythm.
Layering and overlapping should feel intentional, not accidental. Use a mix of large, medium, and small patches to create interest while avoiding overwhelm. The best results come from balancing patches with negative space, ensuring essential features like pockets or closures remain accessible, and letting the garment’s lines guide the arrangement.
Practical Steps to Apply and Test Your Patches: Plan, Anchor, and Verify
Turning a patch plan into reality starts with planning before you sew or glue. Lay patches on the item, chalk the intended positions, and take photos to compare configurations without committing. This practical approach helps answer where to place patches and establishes a baseline that informs later adjustments.
Begin with an anchor patch—the largest or most meaningful—then add smaller patches to achieve balance. Test-fit the item in wear or use conditions to verify comfort and movement, and adjust if a patch interferes with pockets or zippers. Finishing touches, including a final stitch or reinforcement along the edges, guarantee durability and a polished, long-lasting result.
Maintenance and Longevity: Care, Removal, and Durable Attachment
Once patches are attached, maintenance matters as much as the initial layout. For removable patches, keep experiments reversible while you refine your look. For permanent patches, use proper stitching techniques and durable thread types (polyester or nylon) to withstand daily wear and washing.
Washing guidance helps protect patches: turn garments inside out, avoid aggressive agitation, and air-dry when possible. If you need to reposition patches, carefully remove and resew to prevent fabric damage. By avoiding common mistakes—overcrowding, placing patches on seams, or neglecting fabric type—you’ll extend the life of your patches and preserve a clean, stylish finish.
Frequently Asked Questions
What is the patches placement guide and why should I use it?
The patches placement guide is a practical framework for positioning patches on garments and accessories to achieve balance, alignment, and storytelling. It emphasizes proportion, baseline alignment, color cohesion, and ensuring patches don’t hinder function, so your look feels intentional rather than random. Using it helps you plan layouts around a central motif and ensure durable, wearable results.
Where to place patches on a denim jacket according to the patches placement guide?
The patches placement guide suggests prioritizing the back yoke and upper sleeves for a strong focal point, with smaller patches along the shoulder line or near pockets for texture. Consider a spread pattern on longer jackets or stacked clusters on cropped pieces, always aligning with seams and avoiding pockets or closures to maintain wearability.
What are some patch style tips from the patches placement guide to achieve color harmony?
Apply a cohesive color palette that complements the garment, choose a clear theme (travel, nature, retro), and vary patch sizes to create rhythm. Texture variety can add interest, but keep color harmony so patches read as a coordinated collection rather than a random assortment.
How does embroidery patch placement fit into patch styling ideas?
Embroidery patch placement refers to aligning stitching with seams, panel lines, or existing features to create a clean silhouette and durable attachment. It supports patch styling ideas by integrating patches with the garment’s architecture, making the result look deliberate and stylish rather than haphazard.
How can I use fashion patches ideas to build a narrative layout as described in the patches placement guide?
Start with a unifying fashion patches ideas theme (such as travel or nature), select a central motif, and arrange patches to tell a story across surfaces like a jacket sleeve or bag front. A deliberate sequence of patch sizes and placements creates a visual journey that aligns with the patches placement guide.
What practical steps does the patches placement guide recommend for planning and testing patch placement?
Plan first with chalk sketches, lay patches out on the item, and anchor the largest patch before adding smaller ones. Take photos, test wear or use to ensure comfort and movement, then sew or reinforce edges for durability.
| Topic | Key Points |
|---|---|
| Introduction |
|
| Core Principles |
|
| Where to Begin |
|
| Patch Placement by Garment Type: Denim jackets |
|
| Backpacks and bags |
|
| Jeans and casual wear |
|
| Shoes, hats, and accessories |
|
| Practical steps |
|
| Embroidery patch placement and why it matters |
|
| Fashion patches ideas and trends |
|
| Patch style tips for a cohesive look |
|
| Maintenance, removal, and longevity |
|
| Common mistakes to avoid |
|