
DTF Transfers have rapidly gained popularity in apparel decoration, offering a versatile and beginner-friendly path to vibrant designs. Direct-to-Film Printing (DTF) lets you print full-color images onto a special film, apply adhesive powder, cure it, and then transfer the design onto fabrics with a heat press, a streamlined DTF transfer process. With the right heat press settings for DTF and high-quality DTF film, beginners can achieve professional-looking results. In comparisons of DTG vs DTF, the latter offers flexibility and durability that many newcomers value. By understanding the process, selecting quality materials like DTF film and powders, and prioritizing DTF film quality and best practices, you can start creating durable, colorful garments with confidence.
From another angle, this approach can be described as a film-based printing method that embeds color into fabric through a heat-assisted transfer. You may also hear it called a direct-to-film technique, a transfer-on-film workflow, or simply garment decoration via adhesive-coated film. LSI principles suggest pairing this terminology with related concepts such as film quality, white ink opacity, curing, and heat-press parameters to maximize relevance for search engines. In practice, designers and hobbyists benefit from understanding both the core steps and the wider vocabulary around DTF to plan projects and compare methods.
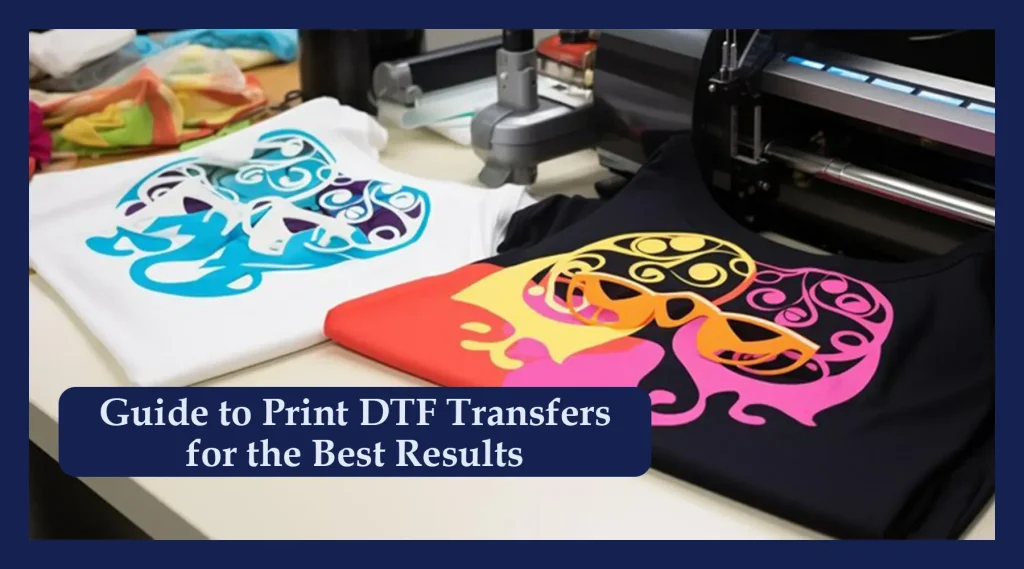
1) Understanding Direct-to-Film Printing: What DTF Is and How It Works
Direct-to-Film Printing (DTF) is a versatile method that lets you produce full-color designs by printing onto a special PET film, then transferring the image onto fabric using heat and pressure. The process begins with CMYK inks, and white ink is often used underneath on dark fabrics to achieve opacity and vibrant color. This approach is beginner-friendly because it separates design creation from the final substrate, allowing you to print a wide range of images without pre-mixing colors on separate layers. As you master the workflow, you’ll discover why many makers prefer DTF for on-demand garment decoration.
In simple terms, DTF is a two-stage system: print the design on film, then apply a powdered adhesive and cure it before pressing the film to the garment. The ink is embedded into the fibers during transfer, producing a flexible, durable image that withstands washing better than some surface-printed methods when done correctly. Understanding the interplay between film, adhesive, and press settings is foundational to achieving consistent results.
2) The DTF Transfer Process: Step-by-Step from Film to Fabric
The DTF transfer process hinges on selecting quality materials and following a repeatable sequence. Start with a well-prepared design, ensuring color management aligns with your printer’s capabilities. Print onto DTF film using CMYK inks, and apply white ink beneath as needed for opacity on dark fabrics.
After printing, evenly coat the wet print with adhesive powder and cure it to fix the powder in place. Align the cured film with the garment, place a silicone cover sheet over the design, and apply heat, time, and pressure on a heat press to bond the image to the fabric. The final reveal comes when you peel away the film, leaving a durable transfer embedded in the textile.
3) Selecting DTF Film Quality and Inks for Best Results
Choosing the right DTF film is as important as selecting the correct inks. DTF film quality affects color vibrancy, translucency, tackiness, and how cleanly the design peels off after transfer. Look for films designed for your printer model and ink combo, and consider doing trial runs to compare how different films handle the same artwork.
Ink selection, especially the use of white ink for light vs. dark fabrics, directly influences opacity and brightness. Use reputable CMYK formulations and ensure your white ink system is reliable for full coverage where needed. Matching ink performance to film quality helps minimize color shifts, edge halos, and missing colors in multi-layer designs.
4) DTF vs DTG: Performance, Costs, and Fabric Compatibility
DTF and DTG each have distinct strengths. DTG uses a textile printer to apply ink directly to fabric, often requiring pretreatment for certain fabrics, and it tends to excel on 100% cotton with a soft hand-feel. DTF uses a transfer film and can be more versatile across a wide range of fabrics, including blends and some synthetics, with generally lower upfront substrate constraints.
From a cost perspective, DTF often provides a more economical option for small runs or on-demand prints, since it minimizes pretreatment steps and setup compared to some DTG workflows. Durability and feel are competitive for DTF transfers, especially on blended fabrics, where the film-based approach can yield a smooth finish similar to screen printing while maintaining flexibility.
5) Optimizing Heat Press Settings for DTF: Temperature, Time, and Pressure
Effective heat press settings for DTF are essential for consistent results. A common starting target is around 305-320°F (150-160°C) with 12-15 seconds of pressing, but exact values should be adjusted based on film, adhesive, and fabric type. Begin with manufacturer guidelines and run test prints to dial in temperature, time, and pressure for your specific setup.
Pressure usually falls in the medium to firm range. Too little pressure can leave incomplete transfers, while excessive pressure risks scorching or distortion on thicker fabrics. Post-press care matters too—allow adequate cooling and avoid washing soon after pressing to protect adhesion and color integrity.
6) Common Issues, Troubleshooting, and Maintenance for DTF Transfers
Even with careful setup, issues can arise. Fading colors, color bleed, or white spots often point to improper color management, uneven powder coating, or insufficient curing. Regular nozzle checks, printer maintenance, and test prints on similar fabrics help catch these problems early and keep colors vibrant.
Maintenance and storage practices are part of long-term success. Keep the work area clean to prevent dust from contaminating films, store finished transfers flat away from heat or humidity, and implement a simple quality-control checklist for each run—alignment, ink, film handling, powder coating, curing, and pressing. By treating DTF Transfers as a repeatable system, you can minimize headaches and maximize durability and color fidelity.
Frequently Asked Questions
What are DTF Transfers and how does direct-to-film printing fit into the DTF transfer process?
DTF Transfers describe the full workflow of direct-to-film printing: artwork is printed on a PET film using CMYK inks (and white ink as needed), adhesive powder is applied and cured, then the film is pressed onto fabric with a heat press. In the DTF transfer process, you design, print on film, apply and cure powder, align, heat-press, and peel to reveal a durable, vibrant print.
DTG vs DTF: which method is better for beginners in terms of cost, setup, and durability?
DTG prints directly on fabric and often requires pretreatment and a higher upfront investment, while DTF offers a simpler workflow with lower startup costs and broad fabric compatibility. DTF transfers are typically durable and flexible across cotton, blends, and some poly fabrics, making them a strong option for small runs and on-demand printing.
What heat press settings for DTF should I use to ensure a clean transfer?
A good starting point is 305-320°F (150-160°C) for 12-15 seconds with medium to firm pressure. Test on similar fabrics, preheat as needed, follow the film’s guidelines for curing, and allow a brief post-press cooldown to prevent edge issues.
How does DTF film quality affect the vibrancy and durability of DTF transfers?
DTF film quality directly influences color accuracy, opacity, and ease of peeling. High-quality film works well with compatible inks, resists tearing, and supports reliable curing, resulting in crisper details and better washfastness.
Are DTF transfers suitable for dark fabrics, and how does the white ink strategy impact results?
Yes. DTF transfers perform well on dark fabrics when a reliable white ink layer is printed underneath to provide opacity. The white ink strategy is essential for bright, vibrant colors on dark textiles and should be tuned with your printer and cure process for best results.
What are the most common issues in the DTF transfer process and how can I troubleshoot adhesion and color problems?
Common issues include color fade, cracking, and edge peeling. Troubleshoot by confirming proper color management and test prints, ensuring complete curing of the adhesive powder, maintaining consistent film handling, and adjusting temperature, time, and pressure. Also verify film quality and even powder coating to improve adhesion.
| Topic | Key Points | Notes |
|---|---|---|
| What Are DTF Transfers? | Direct-to-Film printing on a PET film; CMYK inks (plus white ink for some fabrics); adhesive powder is applied and cured; transfer to fabric via heat press. | Carrier film enables vibrant, durable prints on many fabrics. |
| Why DTF Transfers Matter | Simple, beginner-friendly workflow; relatively low setup costs vs traditional screen printing; strong color fidelity and washfastness. | Ideal for on-demand, small-batch runs. |
| How It Works (Simple Terms) | Two-stage process: print onto film, then transfer design to fabric using heat and pressure; ink embeds into fibers. | Produces flexible, wash-fast results. |
| Step-by-Step Overview | 1) Design preparation; 2) Printing on film; 3) Powder application; 4) Curing; 5) Preparation for transfer; 6) Heat pressing; 7) Reveal/finish. | Follow steps in order for reliable transfers. |
| Materials & Tools | DTF printer with CMYK (and/or white ink); DTF film; Adhesive powder and curing device; Heat press; Silicone sheets; Garment blanks; Ventilated workspace. | Quality components improve results. |
| Choosing Film & Ink | Film quality affects color vibrancy and peeling; select films compatible with your printer; use stable CMYK inks; white ink is essential for opacity on dark fabrics. | Test different films with your setup. |
| DTF vs DTG: Key Differences | Process: DTF uses a transfer film; DTG prints directly on fabric; Cost/Setup: DTF usually lower upfront; Durability/Feel: DTF tends to be very durable and flexible; Versatility: DTF works on a wider range of fabrics. | DTG excels on 100% cotton with pretreatment. |
| Heat Press Settings | Temperature: 305–320°F (150–160°C); Time: 12–15 seconds; Pressure: medium to firm; Post-press care: wait 24 hours before washing and turn garment inside-out. | Adjust per film/adhesive/fabric. |
| Troubleshooting & Maintenance | Fading/color bleed; Cracking/peeling; White spots/opacity; Edge peeling. | Solutions: proper curing, good film/adhesive quality, correct alignment; keep equipment clean. |
| Post-Processing & Care | Keep area clean; store transfers flat; perform routine printer checks; use a simple quality-control checklist. | Long-term storage and consistency. |
| Frequently Asked Questions | Are DTF transfers wash-durable with proper curing? Can DTF print on dark fabrics? Is pretreatment necessary? What fabrics work best? Is DTF scalable from small runs to large orders? | Always test on your fabric and follow care guidelines. |
Summary
DTF Transfers offer a compelling entry point into garment decoration, delivering vibrant color, durability, and a beginner-friendly workflow. By understanding the direct-to-film printing process—from artwork preparation to adhesive powder curing and heat pressing—you can produce professional-looking transfers for a wide range of fabrics. Start with simple designs, run tests on similar fabrics, and gradually scale to more complex artwork as you gain confidence. With practice, you’ll master the DTF transfer process and enjoy the flexibility to create colorful, long-lasting garments across a variety of textiles.