
Custom banner size and template guide sets the foundation for how your message travels from idea to visually crisp print, guiding typography, color, and layout decisions so every size delivers consistent impact across channels, venues, and formats; when you start with a clear specification, you reduce guesswork, eliminate back-and-forth revisions, and empower designers, printers, and marketers to align on a shared vision from the first concept sketch to the final proof. Knowing roll up banner dimensions helps you balance portability with legibility and informs decisions about margins, bleed, and the safe area across formats, ensuring headlines remain readable whether the banner is tucked into a conference tote or displayed on a showroom wall. A well-crafted banner template guide ensures consistent margins, alignment, and hierarchy, while print-ready templates provide a reliable blueprint for file setup, color profiles, and font handling so production runs smoothly and consistently. Relying on standard banner sizes enables scalable campaigns so your assets can be repurposed for different venues without reinventing the wheel, maintaining branding integrity while saving time and reducing the risk of mismatched colors or typography. Together, these elements form a practical framework you can apply across projects, helping teams deliver eye-catching banners that perform well on site, capture attention at events, and reinforce your brand.
In other words, the topic translates into size specifications, layout grids, and template structures that designers rely on to maintain consistency across placements and formats. Alternative terms such as display dimensions, banner proportions, and scalable assets reflect the same core idea in different contexts, helping marketing teams think beyond a single size. By thinking in terms of a design framework, you can plan for different widths and heights while preserving typography, color, and imagery across signage, digital displays, and print. This semantic approach helps search engines connect related concepts like print-ready templates, standard banner sizes, and banner template guide even if the exact phrasing changes. Ultimately, treating the subject as a system of interchangeable parts makes it easier to scale campaigns and keep audiences engaged across venues.
1) Why the Custom banner size and template guide matters for branding
A well-defined Custom banner size and template guide is essential for maintaining a cohesive brand presence across all display moments. Proper sizing influences readability, visual hierarchy, and perceived professionalism, helping your message land with clarity whether it appears at a trade show, storefront, or conference. By starting with the right dimensions and a solid template, you reduce the risk of misalignment, clipping, or color drift from concept to print.
A unified approach ensures that font sizes, logo placement, and color palettes stay consistent across sizes. This is why the banner template guide and print-ready templates are not afterthoughts but foundational elements of a scalable marketing system. When you apply a consistent custom banner size guide to every asset, your campaigns become instantly recognizable and easier to reproduce.
2) Roll-Up Banner Dimensions: Balancing Portability and Legibility
Roll-up banners are the backbone of portable, quick-turn displays. The standard roll-up size is typically around 33 inches wide by 80 inches tall (approximately 84 cm by 200 cm). This dimension strikes a balance between on-site legibility and ease of transport, making it a preferred choice for events, conferences, and lobby displays. The roll-up height also sets critical template considerations like safe areas and bleed.
Understanding roll-up banner dimensions helps you design with real-world constraints in mind. Since these banners are often viewed from closer distances than large wall banners, ensuring strong contrast, bold typography, and clear messaging is essential. A rolling format also emphasizes the need for a precise banner template guide to keep consistency across multiple displays.
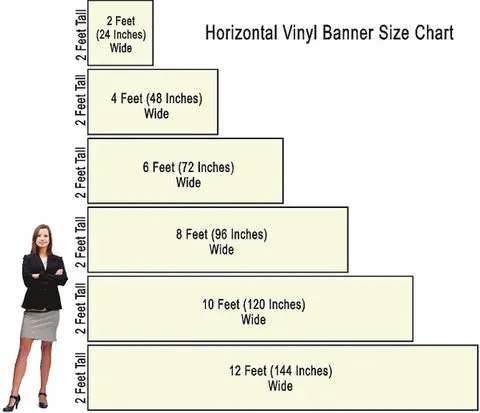
3) Standard Banner Sizes Across Venues: Matching Space and Distance
Standard banner sizes provide a framework for planning display spaces across venues. Common options include smaller wall-mounted formats such as 24×60 inches, larger displays like 36×72 inches, and even bigger 48×96 inches. In metric terms, you’ll frequently encounter 60×150 cm, 90×180 cm, or 120×240 cm. Knowing these sizes helps you anticipate viewing distances and audience reach, ensuring your main message remains legible.
Choosing the right size starts with the display space and viewing distance. A good rule is to select a width that keeps your core message readable from the farthest point in the venue, while still fitting the intended display environment. Referencing standard banner sizes guides decisions and helps you scale campaigns without sacrificing clarity.
4) The Banner Template Guide: Designing for Print-Ready Success Across Sizes
The banner template guide serves as a blueprint for how graphics will print across sizes. It outlines bleed (typically an extra 1/8 inch or 3 mm on all sides), safe margins (at least 1/4 inch or 6 mm inside the trim), color mode (CMYK) and resolution (300 DPI), and required file formats. By following the banner template guide, you ensure that every asset prints with consistent margins, color accuracy, and sharp typography.
A practical template approach maps content blocks—headline, subhead, and call to action—to the exact dimensions of each size. When you work from a banner template guide, you minimize last-minute layout changes and maintain a cohesive look across roll-up banners and larger display banners. This consistency is what makes multi-size campaigns instantly recognizable.
5) Print-Ready Templates: File Prep for Production
Print-ready templates translate design concepts into production-ready files. They specify how to embed or outline fonts, how to convert to CMYK color profiles, and how to preserve image sharpness at final print size. When you prepare print-ready templates, you reduce the risk of font substitution, color shifts, or pixelation during production.
Preparing files for print also involves practical steps like exporting PDFs/X-1a or TIFFs, keeping logos scalable, and validating that all critical elements stay within safe zones. Using print-ready templates ensures that your banners are ready for production with minimal back-and-forth, speeding up turnaround times while preserving brand integrity.
6) A Practical Workflow: From Size Selection to High-Impact Banners
A practical workflow starts with choosing the appropriate size based on venue, purpose, and viewing distance, then selecting a suitable template. Begin with a roll-up banner template if you’re new to printing and scale up to larger banners as needed. This approach keeps font sizes and color contrasts consistent across sizes and aligns with standard banner sizes.
Next, build the layout with a clear hierarchy: headline, supporting copy, and a strong call to action. Use high-resolution images and scalable logos, convert text to outlines if necessary, and proof at 100% size to ensure legibility from typical distances. Finally, save print-ready files in the required formats (PDF/X-1a or TIFF, CMYK, 300 DPI) and request a physical proof when feasible to confirm color accuracy and fidelity before running the full batch.
Frequently Asked Questions
How does the Custom banner size and template guide help when choosing roll-up banner dimensions and standard banner sizes?
The Custom banner size and template guide provides a structured approach to selecting roll-up banner dimensions and standard banner sizes, ensuring consistent margins, bleed, and alignment across formats. It helps you plan for readability and brand consistency from event displays to storefronts by starting with the correct size.
What is a banner template guide and how does it relate to print-ready templates for banners?
A banner template guide is a blueprint that maps content blocks to each size and defines bleed and safe margins. It connects to print-ready templates by specifying color mode, resolution, and file formats, so your final files print accurately with the intended look.
Why is it important to consider both roll-up banner dimensions and larger display banners in the Custom banner size guide?
Knowing both roll-up banner dimensions and larger display banner sizes is important to ensure readability at the intended viewing distance and to maintain a cohesive brand presence. The Custom banner size guide helps you choose sizes that fit a venue and keep typography and logos consistent across formats.
How should I prepare print-ready files using the custom banner size guide to ensure color accuracy and crisp text?
Prepare print-ready files by following the custom banner size guide: use CMYK color mode, 300 DPI resolution, and include a 3 mm bleed and 6 mm safe margins. Save as PDF/X-1a or TIFF (or provide vector logos) and embed fonts to ensure crisp text and color accuracy.
What common mistakes should I avoid when following the Custom banner size and template guide workflow?
Common mistakes to avoid include skipping bleed and safe zones, using low resolution imagery, ignoring orientation, and compromising branding consistency across sizes.
Can I reuse a single banner template across multiple sizes with the banner template guide, and what should I watch for?
Yes, you can reuse a single banner template across sizes with the banner template guide, but adjust the layout for each size while keeping typography, logo placement, and color palette consistent. This ensures a cohesive look when deploying print-ready templates at different dimensions.
| Aspect | Key Points |
|---|---|
| Purpose | Provides a structured reference for proper banner sizing, template usage, and print-ready preparation to ensure crisp text, accurate color, and a professional look from concept to print. |
| Size & Template Importance | Size and template affect readability, visual hierarchy, and brand perception; paired approach ensures consistency across banners and events. |
| Banner Formats | Roll-up banners (~33″ W x 80″ H); static/larger banners (e.g., 24×60, 36×72, 48×96; metric equivalents). Choose size based on display space and viewing distance. |
| Choosing Dimensions | Ask about location, purpose, and multi-banner consistency; start with roll-up template if new, scale up as needed; maintain consistent fonts, colors, and logo placement. |
| Template Basics | Bleed (1/8″), safe margins (1/4″), CMYK at 300 DPI, safe zones, file formats (PDF/X-1a, TIFF, AI/EPS). Template acts as Banner Template Guide. |
| Design Tips (Across Sizes) | Typography: bold headlines; color/contrast; high-res images (150–300 DPI); vector logos; maintain branding consistency. |
| Choosing the Right Template | Use proven templates, map content blocks to exact dimensions; reduce layout changes; ensure cohesive look. |
| From Design to Print | Master template with bleed and safe margins; place critical content within safe area; convert to outlines or embed fonts; CMYK 300 DPI; print-proof. |
| Roll-up vs Larger Banners | Roll-ups require fold lines and stand considerations; larger banners need higher resolution and bleed management. |
| Common Mistakes | Skipping bleed/safe zones, low-res imagery, wrong orientation, inconsistent branding, underestimating viewing distance. |
| Workflow | Define size, choose template, build layout with hierarchy, use high-quality assets, proof at 100%, save in required formats, request physical proof. |
| Brand Impact | Consistent sizing and templates improve legibility, speed up production, and reinforce branding across environments. |
Summary
“