
UV DTF transfer on fabrics opens up exciting possibilities for vibrant, durable graphics on a wide range of textiles. As you explore UV-curable inks and direct-to-film workflows, you’ll discover how small missteps can dull colors or cause adhesion issues. This guide highlights the most common mistakes in fabric transfers and offers practical fixes to help you achieve crisp, lasting prints. Whether you’re printing on cotton, blends, or performance fabrics, a solid workflow reduces waste, speeds production, and supports reliable results. By following best practices for prep, curing, and post-treatment, you can unlock stronger adhesion and color fidelity.
In different terms, this workflow relies on UV-curable inks printed onto a release film, which is then prepared with an adhesive powder before pressing onto fabric. Think of it as a film-to-textile transfer within the broader realm of digital textile printing, where curing, surface prep, and precise heat combine to lock in color. Approaching the process with a materials-focused vocabulary—inks, powders, substrates, and cure regimes—helps you balance adhesion, vibrancy, and durability. This LSI-informed framing broadens your understanding beyond the exact workflow and supports troubleshooting across fabric types.
1. Understanding UV DTF transfer on fabrics: core concepts and setup
UV DTF transfer on fabrics blends UV-curable inks with the Direct-to-Film workflow to create vibrant, durable designs on a variety of textiles. In practice, a design is printed on a release film using UV inks, the film receives an adhesive powder, is cured, and is then pressed onto fabric to transfer the image. The UV curing step is critical, as it rapidly sets the ink and can improve color fastness when done correctly.
This process offers bright color reproduction, good fabric stretch, and the potential for high-detail prints. However, UV DTF introduces more variables than traditional solvent or water-based inks, so controlling fabric choice, adhesion, curing, and transfer parameters matters for consistent results. Understanding substrate compatibility and the sequence of preparation, print, cure, and transfer is foundational to success.
2. Common mistakes in fabric transfers and practical fixes
The guide starts with the topic of common mistakes in fabric transfers. Skipping thorough fabric prep, selecting finishes that repel ink, or using fabrics with residues can hinder adhesion. These missteps often lead to dull colors, cracking after washing, or uneven transfers.
To fix these issues, focus on fabric validation, uniform adhesive application, and proper curing. This is also where DTF transfer troubleshooting shines: test with swatches, verify compatibility, and adjust adhesion aids or surface preps as recommended by suppliers to prevent edge lift and ghosting.
3. Optimizing print quality for UV ink on textiles
Achieving optimal print quality begins with controlling resolution, color accuracy, and substrate-specific settings. For UV ink on textiles, a high-resolution output (commonly 300–600 dpi) paired with calibrated ICC profiles designed for UV DTF on the chosen film and fabric helps preserve detail and color integrity.
Regular test printing on similar fabrics helps detect issues before batching. By validating edge sharpness and color balance with color strips and grayscale tests, operators can minimize banding and saturation shifts, ensuring that the final UV DTF transfer on fabrics matches the design intent.
4. Achieving even adhesive coverage and precise transfer alignment
Uniform adhesive coverage is essential for a reliable transfer, especially for fine lines and small text. Powder clumps or uneven distribution can cause gaps, delamination, or ghosting in edges and curves.
Ensure even coating, bake or cure per powder guidelines, and check for uniform coverage on the film before the transfer. Use alignment marks and test placements on actual fabric types to prevent misregistration and achieve crisp, uniform results across the design.
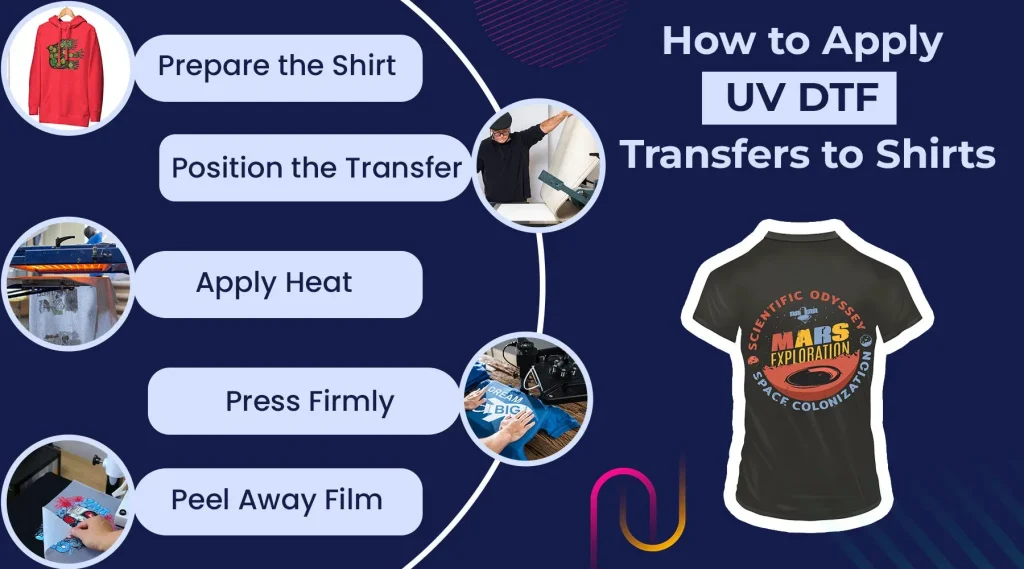
5. Curing, heat, and pressure: key parameters for durable transfers
Correct curing and consistent heat/pressure settings are central to durability. If UV curing is underpowered or distance is too wide, inks may remain uncured, leading to sticky prints and reduced wash durability. Calibrating your curing unit with a radiometer or manufacturer guidance helps ensure full cure.
During the transfer, use recommended heat, time, and pressure tailored to fabric thickness and weave. Even pressure with a suitable press and protective pillows helps prevent scorching or color shifts. Post-press cooling and verification of adhesion are also important steps in the workflow for UV DTF transfer on fabrics.
6. Troubleshooting guide and quick checks for UV DTF transfer on fabrics
When issues arise, quick checks can save batches. If colors appear dull, recheck color profiles, increase print density slightly, and verify fabric compatibility with UV inks used in DTF printing on fabrics. Edge lift or cracking may indicate uneven adhesive coverage or improper heat/pressure during transfer, or incomplete curing.
Blurry images or banding warrant re-testing printer alignment and ensuring proper resolution for the design. Sticky ink after transfer often points to insufficient curing; perform a longer UV exposure and a proper post-curing cooling period. A controlled wash test on a sample helps verify wash durability before full production.
Frequently Asked Questions
What is UV DTF transfer on fabrics, and how does it relate to DTF printing on fabrics?
UV DTF transfer on fabrics is a workflow that uses UV-curable inks with Direct-to-Film processes to create vibrant, durable prints on textiles. In DTF printing on fabrics, the image is printed onto a release film, coated with adhesive powder, cured, and then pressed onto fabric to transfer. The UV curing step sets the inks quickly and can improve color fastness, detail, and stretch, but it introduces more variables than traditional solvent or water-based inks, so execution at each stage matters.
What are the common mistakes in fabric transfers when using UV ink on textiles with UV DTF transfer on fabrics?
Common mistakes in fabric transfers include:
– Inadequate fabric preparation and substrate selection: skip washing or choose coated finishes that repel ink; fix by pre-washing and testing adhesion on swatches.
– Inconsistent print quality and resolution: use 300–600 dpi and calibrated color profiles; test on similar fabrics before batches.
– Uneven adhesive powder coverage: apply powder evenly and cure per guidelines to avoid edge lifting.
– Inadequate curing and improper UV exposure: ensure proper lamp distance and exposure time; verify full cure before handling.
– Incorrect heat-press/pressure and temperature: follow supplier-recommended settings and test on similar fabrics to confirm results.
How can I troubleshoot issues with UV DTF transfer on fabrics to fix dull colors or adhesion problems?
Troubleshooting steps:
– Recheck color profiles and increase print density if colors look dull; validate ink compatibility with the fabric.
– Verify adhesive powder coverage and evenness; re-bake if needed.
– Confirm complete curing with the UV unit; adjust exposure time or distance.
– Check heat and pressure uniformity during transfer; ensure proper alignment.
– Run a small test print and wash test to confirm durability before larger runs.
What is the proper curing and UV exposure process for UV DTF transfer on fabrics to ensure durability?
Proper curing steps:
– Calibrate the UV curing unit with a radiometer or manufacturer guidance; keep a consistent lamp distance and exposure time.
– Cure until the ink is fully set, then allow the material to cool before handling.
– Verify cure by a simple hand rub or wash test on a swatch; re-cure any zones that feel tacky or show color bleed.
– Document settings for future jobs to maintain consistency.
Which fabrics are most compatible with UV DTF transfer on fabrics, and how does fabric type affect adhesion and wash durability in DTF printing on fabrics?
Fabric compatibility guidance:
– Cotton and cotton blends with moderate polyester content typically offer good adhesion and color stability.
– High-polyester fabrics may require adhesive formulation tweaks and longer curing times.
– Consider fabric weight, weave, pretreatment needs, and care instructions when selecting materials.
– Test adhesion and durability on swatches before full production.
What post-transfer care steps should be followed for UV DTF transfer on fabrics to maintain color and adhesion?
Post-transfer care recommendations:
– Wash inside-out in cold water; avoid hot tumble drying in initial washes.
– Use mild detergents and avoid fabric softeners that can degrade ink performance.
– Do not iron directly on the print; if ironing is necessary, place a protective sheet and use a low heat setting.
– Store finished items away from direct sunlight to prevent color fading.
| Topic | Key Point | Impact / Why It Matters | Fix / Best Practice |
|---|---|---|---|
| Understanding UV DTF transfer on fabrics | Combines UV-curable inks with the DTF workflow: print the design onto a release film with UV inks, apply an adhesive powder, cure, and press the film onto fabric to transfer the image. | Bright color reproduction, good fabric stretch, and potential for high-detail prints; however, this process introduces more variables than traditional inks, so careful control of each step is essential. | Follow a calibrated workflow, verify ink/film compatibility, calibrate curing, and test on similar fabrics before production. |
| Inadequate fabric preparation | Pre-wash fabrics to remove finishes, residues, or coatings that can repel ink or affect adhesion. | Faded colors, poor adhesion, and cracking after washing. | Pre-wash, dry thoroughly; test on swatches; verify compatibility for blends and consider supplier-recommended surface prep or adhesion aids. |
| Inconsistent print quality and resolution settings | Print at high resolution (300–600 dpi) and use calibrated ICC profiles tailored to inks and film. | Loss of detail, dull colors, and color banding. | Test print on similar fabrics; optimize printer settings; use calibration targets; ensure texture matches film. |
| Uneven adhesive powder coverage | Powder application can be uneven or clump, causing transfer gaps. | Transfer failure in edges and fine lines; ghosting. | Apply powder uniformly; bake/cure per guidelines; inspect distribution; keep a light, even coating. |
| Inadequate curing and improper UV exposure | UV curing requires appropriate lamp intensity, distance, and exposure time to fully set inks. | Sticky prints, color bleeding, reduced wash durability. | Calibrate the UV unit (radiometer or guidelines); maintain consistent lamp distance/time; ensure full cure before handling. |
| Incorrect heat-press/pressure and temperature settings during transfer | DTF transfers require precise heat, time, and pressure; in UV DTF, curing may occur before or after pressing depending on workflow. | Delamination, scorching, color shift, ghosting. | Use manufacturer-recommended settings; apply even pressure with a suitable press; test on similar fabrics first. |
| Fabric texture and fiber orientation effects | Looser weaves or textured fabrics can trap air or cause uneven contact between film and substrate. | Visible texture mismatch and reduced sharpness in edges. | Choose smooth fabrics when possible; adjust pressure/dwell time for textured textiles; use silicone sheets to distribute heat/pressure. |
| Poor design-to-film alignment and misregistration | Misalignment between design and placement on the garment, especially on curved seams. | A flawed finished look with misaligned elements. | Use clear alignment marks; test placements on sample garments; verify design positioning on the actual fabric. |
| Inadequate post-transfer care and finishing | Post-transfer care affects durability after washing and wear. | Color fading, edge cracking, or peeling after washing. | Allow sufficient curing time; follow fabric-care recommendations; provide washing instructions to customers. |
| DTF printing on fabrics and fabric compatibility | Cottons and cotton blends with moderate polyester generally offer good adhesion; high-polyester fabrics may need formulation and curing adjustments. | Fabric weight/weave, fiber content, pretreatment needs, care/durability affect adhesion and color saturation. | Choose fabrics with good compatibility; test swatches; adjust adhesives and curing for challenging fabrics. |
| Troubleshooting quick checks for UV DTF transfers | Common symptoms: dull colors, edge lift/cracking, blur/banding, sticky ink. | Identify root causes quickly to minimize waste. | Adjust color profile and print density; verify cure and alignment; ensure proper resolution; extend UV exposure if needed.” |
| Care and maintenance tips for UV DTF transfers on fabrics | Washing and ironing guidelines to protect transfers. | Durability and color retention depend on proper care. | Wash inside-out in cold water; avoid high heat initially; mild detergents; avoid fabric softeners; don’t iron directly on print; store away from sunlight. |
Summary
UV DTF transfer on fabrics involves UV-curable inks and a direct-to-film workflow to produce vibrant, durable graphics on textiles. By understanding common mistakes—such as inadequate fabric prep, inconsistent print quality, uneven adhesive coverage, improper curing, incorrect heat/pressure, fabric texture effects, misregistration, and insufficient post-transfer care—and applying practical fixes, printers can achieve crisp, lasting transfers. A structured workflow, from pre-testing fabrics to curing, transfer, and post-care, helps reduce waste and boost consistency across cottons, poly blends, and specialty textiles. Proper fabric selection, calibration, and testing on swatches are essential to maximize adhesion, color fidelity, and wash durability, making UV DTF transfer on fabrics a reliable option for apparel and textile projects.