
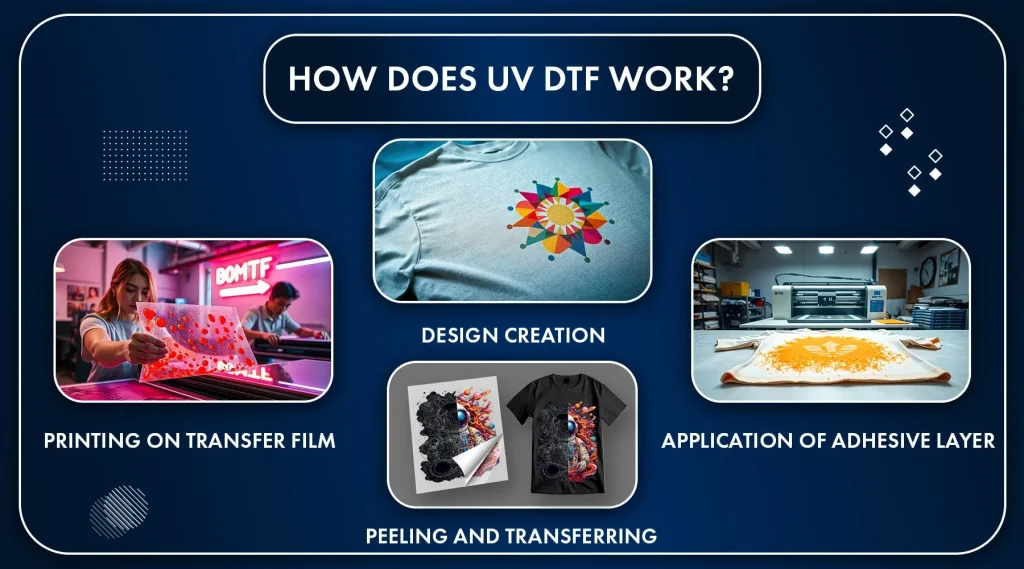
Layered UV DTF Transfers are reshaping how designers bring apparel graphics to life, combining pigment with UV-curable inks to achieve depth, crisp detail, and durable adhesion. This layered approach builds shading and texture through multiple passes, delivering dimensional effects that outperform single-pass methods. In this guide, you’ll explore shading techniques for DTF transfers, understand how DTF transfer shading interacts with color management, and see how UV printer DTF setups influence outcomes. You’ll also learn about details in DTF transfers, substrate choices, and print settings to maximize legibility of fine lines on fabric. Finally, the section highlights best practices for layered DTF transfers and practical workflows to help designers deliver vibrant, reliable results across garments and textiles.
From a terminology standpoint, this technique can be described as multi-pass UV-curable transfer printing that builds color, depth, and texture through stacked passes. The concept uses staged ink deposits, where base undercolor, midtones, and highlights are added in sequence to reproduce dimensional shading. Experts may call it stacked UV ink transfers, multi-layer pigment deposition, or texture-rich garment graphics produced with UV-curable inks. When thinking in LSI terms, focus on related ideas like color fidelity, substrate compatibility, print workflow, calibration, edge control, and repeatability to ensure consistent results.
Understanding Layered UV DTF Transfers: Core Concepts and Shading
Layered UV DTF Transfers blend pigment with UV-curable inks, enabling multiple passes that add depth, shading, and crisp details. Understanding this core concept helps you plan underbases, midtones, and highlights to simulate real lighting on fabric. As you design, consider how the layering sequence affects edge fidelity and color richness, and how UV curing solidifies each pass without smearing previous detail.
Working with a UV printer DTF system requires careful calibration between artwork, substrate, and ink behavior. Use color management tools to map tonal ranges across layers, and anticipate how underbase interactions with garment color influence shading accuracy. The goal is predictable layering results that translate well from screen to textile with minimal halos.
Shading Techniques for Layered UV DTF Transfers: Gradients, Halftones, and Color Balance
Shading techniques for Layered UV DTF Transfers rely on planning tonal ramps, gradients, and controlled saturation to create natural depth. Start with a light underbase and progressively add midtones and shadows, keeping transitions soft rather than abrupt to avoid banding in curved areas. This approach aligns with DTF transfer shading principles by preserving edge detail while building volume.
Edge treatment and print order matter here. Use tight outlines for critical features and feather edges on softer regions to prevent halos after UV curing. Layer management and color balance across passes are essential to deliver convincing shading on fabrics with varying textures.
Details in DTF Transfers: Preserving Texture and Fine Lines on Fabrics
Details give life to artwork in Layered UV DTF Transfers. Tiny textures such as fabric weave, hair flicks, or subtle surface highlights must survive the transfer process. Use high resolution vector details for outlines and ensure your RIP settings retain fine line work without collapsing during curing.
When adding details, separate them onto their own layer and maintain thinner ink deposits to avoid fill in as layers cure. You can also integrate delicate texture patterns that mimic real textiles to add tactile realism without compromising legibility.
Substrates and Ink Behavior with UV Printer DTF: How Fabric Choice Shapes Shading
Substrate choice dramatically affects how shading renders and how details hold up. Light colored cotton blends can enhance highlight pop, while dark fabrics require a well planned underbase to avoid dull outcomes. UV inks cure quickly and bond differently depending on fabric weave and fiber content, so testing on swatches is essential.
Consider pretreatments or primers if the base fabric absorbs ink unevenly. When you optimize ink behavior for Layered UV DTF Transfers, you’ll notice richer shading and more consistent detail retention across batches, especially on mixed fiber garments.
Color Management, Calibration, and Workflow for Consistent DTF Transfer Shading
Consistent results demand solid color management. Calibrate monitors to a standard color space and create ICC profiles aligned with your printer, ink, and substrate. Use soft proofs to validate shading translation before production, and incorporate reliable tolerances for color shifts between batches.
In the pressroom, maintain a clean workflow: align media, test print, adjust color curves for layers, and document layer settings. The combined effect of precise color management and careful layer sequencing leads to more reliable DTF transfer shading and better fidelity to the original artwork, a key element of best practices for layered DTF transfers.
Practical Workflow and Troubleshooting: From Design to Cure in Layered UV DTF Transfers
Design and separation form the foundation of a successful run. Begin with artwork and separate tonal ranges into layers for base color, midtones, shadows, highlights, and detailing, labeling layers clearly for quick identification during the print run.
Proofing, substrate prep, print settings, curing, and post processing complete the cycle. If halos or color shifts appear, adjust edge treatment on the affected layers and reproof before committing to the next batch. Maintaining a library of tested layer settings for different garment colors and textures makes troubleshooting faster and aligns with best practices for layered DTF transfers.
Frequently Asked Questions
What are Layered UV DTF Transfers and how do shading techniques for DTF transfers add depth to fabric graphics?
Layered UV DTF Transfers combine multiple passes of pigment with UV-curable inks to build depth. Shading techniques for DTF transfers start with a light underbase, then progressively add midtones and shadows using gradients and halftones, enabling smooth tonal transitions that create realistic depth while minimizing edge halos.
How does a UV printer DTF influence shading and edge fidelity in Layered UV DTF Transfers?
A UV printer DTF enables fast curing and strong adhesion, but it requires careful layer sequencing and precise alignment to prevent color bleed and edge halos. For Layered UV DTF Transfers, printing order (underbase, midtones, shadows, highlights) and tight registration are essential to preserve crisp details and convincing shading.
What are best practices for layered DTF transfers to ensure reliable color management across different fabrics?
Best practices for layered DTF transfers include solid color management: calibrate monitors, use ICC profiles for your printer and substrate, and run soft proofs before production. Maintain a consistent layer order and adjust color curves per fabric to keep shading accurate across runs.
Which details in DTF transfers are most at risk during Layered UV DTF Transfers, and how can you preserve them through printing and curing?
Details in DTF transfers—such as fabric texture, fine lines, and texture highlights—must be preserved by placing them on their own layer and using thin ink deposits. Use high-resolution vector details, ensure RIP settings retain fine lines, and avoid over-curing that can blur delicate details.
What common pitfalls should you avoid with DTF transfer shading on Layered UV DTF Transfers, and how can you prevent halos and banding?
Common pitfalls include haloing, banding, and color shifts. Prevent halos with precise edge treatment and light feathering between layers; reduce banding by using gradual gradients or dithering; maintain consistent underbase and calibration across batches.
What is a practical workflow for Layered UV DTF Transfers from design to curing that emphasizes shading control and alignment?
A practical workflow starts with design and separation into base, midtones, shadows, highlights, and detailing; create soft proofs; prep the substrate; set precise DPI and ramp speeds; cure each layer with controlled UV exposure; and finish with post-print inspection to verify edge crispness and shading fidelity.
| Key Point | Description |
|---|---|
| Core concept | Layered UV DTF Transfers use multiple passes (layers) to build color, shading, and fine details; UV-curable inks cure quickly and aid adhesion, but require careful calibration to prevent color bleed and edge halos; balance underbase, midtones, highlights, and texture for a natural fabric look. |
| Plan tonal range | Identify darkest shadows and brightest highlights; create separate layers for shadows, midtones, and highlights to control tonal ranges and preserve edge fidelity after UV curing. |
| Build gradual transitions | Use gradients or dithering to smooth shading on curves and fabric folds, avoiding hard steps that can appear bulky after curing. |
| Control saturation and color balance | Adjust saturation per layer and calibrate colors to the garment base so skin tones and fabrics look natural under various lighting. |
| Edge treatment | Overlay tight outlines on key features to preserve definition; selectively feather edges on soft regions to avoid halos. |
| Print order and alignment | Order matters: underbase, midtones, shadows, highlights, then details; precise alignment ensures layers stack cleanly and depth remains clear. |
| Details in DTF Transfers | Preserve tiny details using high-resolution vector lines; keep details on their own layer with thinner ink deposits to avoid fill-in; add subtle texture patterns for tactile realism. |
| Substrates and Ink Behavior | Substrate choice affects shading and detail retention; test swatches on different fabrics; light fabrics show more pop; dark fabrics need good underbase; UV inks cure quickly and bond differently; consider pretreatments. |
| Color Management, Calibration, and Workflow | Calibrate monitors and use ICC profiles; soft proofs to validate shading; maintain clean pressroom workflow, test prints, and consistent color curves across layers. |
| Practical Workflow | Design and separation; soft proof; substrate prep; precise print settings; controlled curing; post-processing and quality checks. |
| Best Practices for Layered DTF Shading | Maintain a consistent layer order; use soft gradients; separate high-detail textures; schedule regular calibrations; run swatch-based quality checks. |
| Common Pitfalls and How to Avoid Them | Haloing around edges; banding in shadows; color shifts between runs; ink bleed; address with edge refinement, increased gradient steps, recalibrated profiles, and fabric pre-treatment. |
| Advanced Tips for High-Fidelity Layered Printing | Use vector art for sharp edges; combine halftone shading with solid fills; experiment with opacity masks and second-scan passes; keep a library of successful layer settings by garment type. |
Summary
Layered UV DTF Transfers open a world of depth and realism for fabric graphics, achieving shading and texture through multiple ink layers and UV-curable inks. Mastery comes from planning tonal ranges, building gradual transitions, protecting edge fidelity, and coordinating color management with substrate choices to ensure consistent results. With careful design separation, print sequencing, and controlled curing, Layered UV DTF Transfers deliver durable, vibrant graphics on garments, bags, and textiles.