
A well-planned screen printing studio setup is more than just buying gear. It creates a functional, safe, and efficient workspace that supports consistent quality, reduces waste, and fits your space and budget, much like following a screen printing setup guide. From a thoughtfully assembled screen printing equipment list to realistic screen printing costs, you can move from concept to finished product smoothly. Practical space tips for screen printing studio help you arrange your area so you can start or grow your workflow with confidence, whether you’re in a home screen printing setup. Whether you’re printing T-shirts, posters, or custom merchandise, a solid setup makes the process efficient and scalable.
From a different angle, this topic reads as a garment-printing workspace designed around equipment layout, ergonomic work zones, and clean ventilation to support consistent quality. LSI-minded terms such as production workflow, budget-friendly studio design, and ink handling procedures map to the same core idea as a screen printing setup guide. For home-based projects, consider a compact, modular arrangement that keeps pre-press, printing, and curing in distinct zones while preserving space. Understanding these terms helps you optimize space, manage costs, and communicate what you need to partners or suppliers with clarity.
1. Mastering the Screen Printing Studio Setup: Space, Safety, and Core Equipment
A well-designed screen printing studio starts with a purpose-built layout that supports a smooth workflow from concept to finished product. By separating pre-press, printing, curing, and cleanup areas, you reduce cross-contamination and speed up production while keeping safety in mind. The goal is a workspace that is both functional and safe, enabling you to scale from hobby projects to small runs without constantly rearranging gear.
To underpin a reliable operation, you should reference the screen printing equipment list as you plan purchases. Core items like a screen printing press, a selection of screens, squeegees, inks, emulsion and coating supplies, an exposure unit, a washout area, and a curing solution form the backbone of any setup. It’s also important to create a light-safe work area for coating screens and handling emulsions, as this protects stencil quality and extends equipment life. Space tips for screen printing studio can help you fit these essentials into even modest rooms.
2. Creating a Practical Screen Printing Equipment List: Core vs Optional Items
A practical equipment list distinguishes between must-have core gear and optional upgrades that boost throughput or quality. Start with the essential elements—press, screens, squeegees, ink, emulsion, exposure, washout, and a curing system—and then evaluate upgrades based on your production goals and budget. This approach keeps you focused on what truly moves your workflow forward rather than chasing features you may not need yet.
As you refine your plan, consider the cost implications of each item. Screen printing costs can vary widely based on brand, durability, and maintenance needs, so map out a tiered budget that starts with a starter kit and scales toward a mid-range or professional shop. Optional upgrades—automatic or semi-automatic presses, specialty screens, and film positives printers—can dramatically change throughput, but align them with demand and long-term financial planning.
3. Budgeting for Success: Realistic Screen Printing Costs Across Starter to Full Shops
Understanding the starter setup helps you build a practical foundation without overextending cash flow. A basic manual press, a small set of screens, basic squeegees, entry-level inks, and a simple exposure unit can put you on the path to first jobs. In this phase, consider spaces that already exist (garage, basement, or a spare room) and plan around a lean, viable configuration that fits your budget.
As you scale, mid-range and full-shop configurations require larger investments but also deliver higher throughput and more consistent quality. Include items like upgraded presses (or semi-automatic units), higher-quality emulsions, a professional exposure setup, a dedicated wash area, and larger curing systems. A realistic total for a full shop can rise into the tens of thousands, so track ongoing costs for inks, coatings, screens, and maintenance to avoid budget surprises.
4. Space Optimization: Space Tips for Screen Printing Studio Layouts
Efficient space planning emphasizes dedicated zones and a logical workflow. Establish clear boundaries between pre-press, printing, curing, and cleanup to reduce clutter and save time changing setups between jobs. A one-way workflow—from design to film positives, then printing, then curing—helps minimize errors and improve consistency across runs.
Layout decisions should also focus on practical furniture and ventilation. Use sturdy, cleanable workbenches, accessible storage, and a dedicated drying area with proper airflow. Adequate ventilation reduces solvent exposure and improves safety, while modular, foldable, or mobile components maximize flexibility in smaller studios.
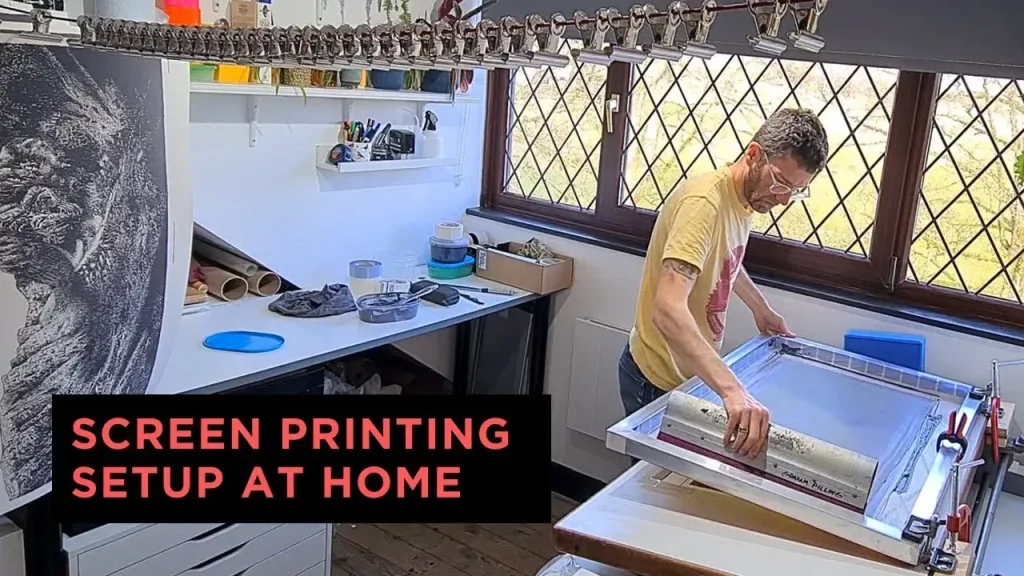
5. Starting Small: Home Screen Printing Setup Essentials
A home screen printing setup is a great way to begin learning the craft and validating demand before expanding. Prioritize a compact press, a handful of screens, basic squeegees, a simple ink system, and a basic exposure setup to begin producing small runs in limited space. Treat it as a learning lab where you can iterate designs and refine your process without a large upfront investment.
When working in a home environment, optimize space with modular gear and space-saving layouts. Choose compact furniture, wall-mounted storage, and foldable work surfaces to reconfigure the room as needed. Keep a dedicated wash area and ensure good ventilation, so safety and print quality remain consistent even in a small footprint.
6. Screen Printing Setup Guide: A Step-by-Step Plan from Pre-Press to Finish
This screen printing setup guide walks you from concept to finish, outlining concrete steps for pre-press, print, cure, and post-process. Start with standard operating procedures (SOPs) for ink mixing, screen preparation, and stencil creation to ensure repeatable results across runs. Document color management checks and setup adjustments to consistently hit design specifications.
Next, align your equipment list with a stepwise production flow: prepare screens and emulsions, expose stencils, wash and reclaim when needed, print, and cure. Maintain a calibration routine for squeegees and pressure settings to preserve tonal accuracy, and keep an organized inventory with labeled bins for inks, emulsions, and screens. This holistic approach helps both beginners and seasoned shop operators stay efficient and produce reliable results.
Frequently Asked Questions
What is a basic screen printing studio setup and what should it include, according to a screen printing setup guide?
A basic screen printing studio setup starts with a core screen printing equipment list: press, screens, squeegees, inks, emulsion and coating supplies, exposure unit, washout area, and curing equipment. Add a light-safe work area, proper ventilation, clean storage, and PPE to support safe, repeatable production. This aligns with common guidelines in a screen printing setup guide and the broader screen printing equipment list.
What are realistic screen printing costs for a home screen printing setup?
For a home screen printing setup, expect starter costs around $1,000–$3,000 for essential gear (manual press, a few screens, basic inks, an exposure setup). As you grow, mid-range scales run roughly $4,000–$12,000, and full professional shops can exceed $15,000–$60,000 depending on automation and space. Ongoing costs include inks, emulsions, screens, cleaners, and replacement parts.
What space tips for screen printing studio help maximize small areas?
Space tips for screen printing studio: create dedicated zones (pre-press, printing, curing, cleanup) and a logical one-way workflow to minimize waste. In small spaces, use modular, foldable, or stackable furniture, vertical storage for screens, and a compact wash area. Ensure good ventilation and a drying area with airflow to reduce solvent exposure.
What should be in the screen printing equipment list for a beginner?
Your screen printing equipment list should cover core items first: manual press, a selection of screens, squeegees and tools, ink and emulsion supplies, an exposure unit, a washout sink, and curing equipment, plus a light-safe area. Add upgrades like better lighting, pre-registration systems, and an ink-mixing station as your budget and runs grow.
What is a practical screen printing setup guide for scaling from hobby to small shop?
A practical screen printing setup guide for scaling from hobby to small shop: start with a minimal viable setup you can run reliably, then incrementally upgrade key components (press, screens, ink system, exposure, curing). Plan your space into pre-press, print, cure, and cleanup zones, budget for ventilation and safety, and revisit your plan every few months as demand changes.
How can I ensure safety and efficiency in a screen printing studio setup?
Essential safety and workflow tips in a screen printing studio setup: document standard operating procedures for ink mixing, coating, printing, and curing; maintain equipment calibration and color checks; ensure ventilation and PPE usage; store inks away from heat and light; keep the workspace clean and organized to reduce waste and misprints.
| Topic | Key Points |
|---|---|
| Overview | A well-planned screen printing studio setup is more than just buying gear. It’s about creating a functional, safe, and efficient workspace that supports consistent quality, reduces waste, and fits your space and budget. Whether you’re printing T-shirts, posters, or custom merchandise, the right screen printing studio setup helps you move from concept to finished product smoothly. |
| Core equipment (essential) |
|
| Workspace and safety essentials |
|
| Optional upgrades |
|
| Costs: Starter setup |
Approximate total starter cost: $1,000 – $3,000 |
| Mid-range to higher-volume studio setup |
Approximate total mid-range cost: $4,000 – $12,000 |
| Full professional or scalable shop |
Approximate total for a full shop: $15,000 – $60,000 or more |
| Space Tips for Optimizing Your Screen Printing Studio Setup |
|
| Budget-conscious optimization |
|
| Practical setup checklist |
|
Summary
Screen printing studio setup is a holistic process that blends the right equipment with thoughtful space planning. A well-organized workspace supports consistent quality, reduces waste, and enables a smooth flow from concept to finished product. By grouping functions into pre-press, printing, curing, and cleanup areas, ensuring adequate ventilation and safety measures, and choosing scalable gear, you create a studio capable of handling growing demands. Tailor the layout to your projects, invest in reliable basics first, and reinvest as demand grows to sustain efficiency and creativity in your screen printing journey.