
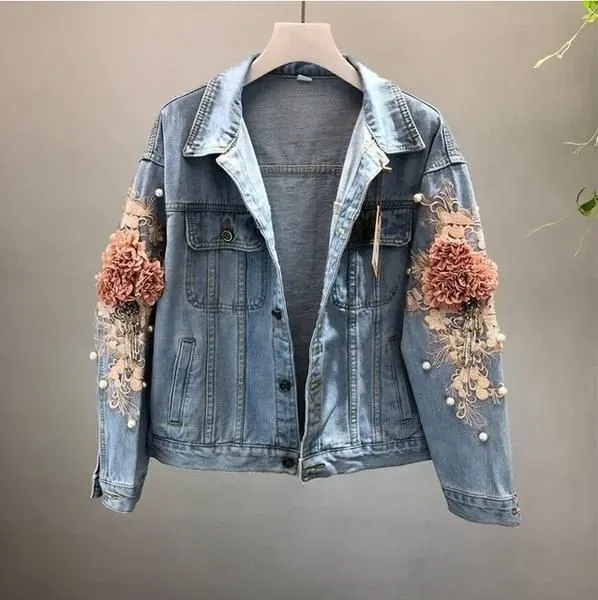
3D Embroidery on Denim opens a world where texture and color can elevate everyday jeans and jackets into art. This guide explores how 3D embroidery on denim techniques create depth, with durable threads and smart stabilizers that withstand washing. Learn denim embroidery tips for selecting materials, managing foam underlays, and choosing stitch methods that keep the puff looking fresh. From bright, colorful denim accents to reliable stitching, the approach balances aesthetics with long-lasting performance. With careful planning of placement and layering, you’ll master stitch techniques for denim that preserve the raised texture over years of wear.
Think of it as raised stitching that adds depth to sturdy blue fabric, using foam underlays and layered stitches to build dimensional art on jeans and jackets. Alternative terms such as three-dimensional stitching on denim, raised thread sculpture, and textured fabric embellishment capture the same technique from different angles. By exploring synonyms like elevated threadwork and puffed embroidery on jeans, designers can optimize content for search engines while guiding crafters toward durable results. This approach leverages related concepts such as stabilizers, underlay stitches, and foam inserts to protect the fabric during daily wear. Whether you call it elevated denim thread art or 3D puff embroidery on workwear, the principle remains: thoughtful planning and quality materials yield long-lasting, vibrant results.
Frequently Asked Questions
What are the essential 3D embroidery on denim techniques for beginners?
For beginners, master the core 3D embroidery on denim techniques: start with a stable underlay, add a foam underlay to create the puff, and finish with dense top satin stitches. Use heavyweight denim, a backing stabilizer, and polyester core-spun threads to maintain shape and color through washing.
How can you achieve durable embroidery on jeans using 3D methods?
To achieve durable embroidery on jeans, pair a backing stabilizer with a tear-away, add a foam underlay for the 3D puff, choose high-quality polyester threads, and keep machine tension moderate. Finish with edge stitching to lock edges and resist wear.
What denim embroidery tips help produce colorful denim accents that last?
Follow denim embroidery tips such as selecting colorfast threads, planning layered color changes, and testing colorfastness through washes. Use bold, saturated threads against blue denim to create colorful denim accents that stay vibrant after many washes.
Which stitch techniques for denim work best for a pronounced 3D effect?
Best stitch techniques for denim include solid underlay stitches, dense satin top stitches to cover the foam, and careful edge finishing. Layer stitches strategically to maintain the 3D puff and prevent fraying on denim.
How should I plan materials for 3D embroidery on denim to maximize durability?
Plan materials by selecting a sturdy denim, choosing the right stabilizers (backing + tear-away), appropriate foam thickness, sharp embroidery needles, and polyester threads with colorfastness. This aligns with 3D embroidery on denim techniques to maximize durability.
How can I care for 3D embroidery on denim to keep colorful denim accents vibrant?
Care for 3D embroidery on denim by washing inside-out on gentle cycles, using mild detergents, and air-drying. Iron on a low heat with a pressing cloth if needed to preserve colorful denim accents.
| Aspect | Key Points |
|---|---|
| Topic & Purpose | 3D embroidery on denim adds depth, texture, and personality to denim apparel; aims for durable, colorful accents that withstand wear and washing. |
| Why Denim Works | Denim’s sturdy weave provides a strong canvas for 3D effects; plan designs to resist wear, pilling, and edge fraying. |
| Materials & Tools | – Denim fabric (heavier weight) – Stabilizers (tear-away, cut-away) + foam/backing – Foam or felt underlay – Embroidery threads (polyester core-spun; colorfast) – Needles (80/12 or 90/14) – Stabilized hoop/frame – Embroidery machine or hand tools – Scissors & tweezers |
| Design Planning | Choose depth-friendly motifs (logos, florals, geometries); plan size/placement to avoid distortion; map layering, color strategy, and backing (cut-away + tear-away) for stability. |
| Step-by-Step Process |
|
| Stitches & Techniques | Underlay for base; satin top stitches for coverage; edge finishing to prevent fraying; use variegated threads for depth with fewer color changes. |
| Color & Aesthetics | Use contrast or tonal schemes; prioritize colorfast threads; metallics sparingly for accents; layered colors create depth without excessive changes. |
| Durability Tips | Stable foundations; high-quality, colorfast threads; avoid over-tightening; appropriate foam thickness; careful finishing and garment washing care. |
| Troubleshooting | Puckering: reduce tension; foam shifting: recheck alignment; thread breakage: use better thread and adjust needle/ speed; edges not flat: add outline; color bleed: pre-wash and use colorfast threads. |
| Applications & Ideas | Jackets with raised motifs; jeans with bold back-pocket patches; denim totes with 3D florals or geometric designs; pocket embellishments; patches for shoes/boots. |
| Care & Maintenance | Wash inside-out on gentle cycle; mild detergents; air-dry or lay flat; low-heat iron with pressing cloth; store to avoid heavy compression. |
Summary
Conclusion content goes here after the table for the requested descriptive SEO-friendly summary.