
3D embroidery on denim has moved beyond simple stitched logos to become a playful and durable way to express personal style. From denim patches ideas to denim embroidery panels, you can transform everyday jeans, jackets, or vests into wearable stories. Whether you’re a DIY enthusiast or a sewing hobbyist, this guide highlights DIY denim embroidery tips and helps you craft personalized denim patches with patch designs on jeans that suit your wardrobe. The result is fashion that stands out with texture, depth, and a distinct sense of personality. With careful planning, the right stabilizers, and the correct foam height, you’ll master techniques that keep 3D embellishments durable through daily wear.
In other words, three-dimensional stitching on jeans creates raised elements that catch the light and add tactile interest. These embellishments can function as integrated panels that flow with seams and garment shapes, rather than separate patches. Personalization can come through monograms, symbols, or meaningful icons that reflect hobbies or values, turning ordinary denim into a signature piece. To keep the look lasting, use proper stabilizers, manage foam height, test stitches on a scrap, and finish edges cleanly.
1) Mastering 3D Embroidery on Denim: Techniques, Texture, and Durability
3D embroidery on denim elevates traditional stitching by adding tangible depth and tactile texture that catches the light and the eye. This approach blends raised stitches with lightweight foam or felt to create elements that feel as substantial as appliqué, yet with the precision and durability of machine embroidery. When you begin with sturdy denim and the right stabilizers, your designs—whether patches or panels—gain a lasting presence on your jeans, jacket, or vest.
To get the most from 3D embroidery on denim, map out your design with texture in mind and choose patch designs on jeans that suit the fabric’s natural fade. DIY denim embroidery tips include planning foam height, selecting dense fill stitches, and pairing vivid thread colors with the denim’s base tone. The result is a wearable artwork that wears well, resisting wear-and-tear while maintaining a bold, three-dimensional look.
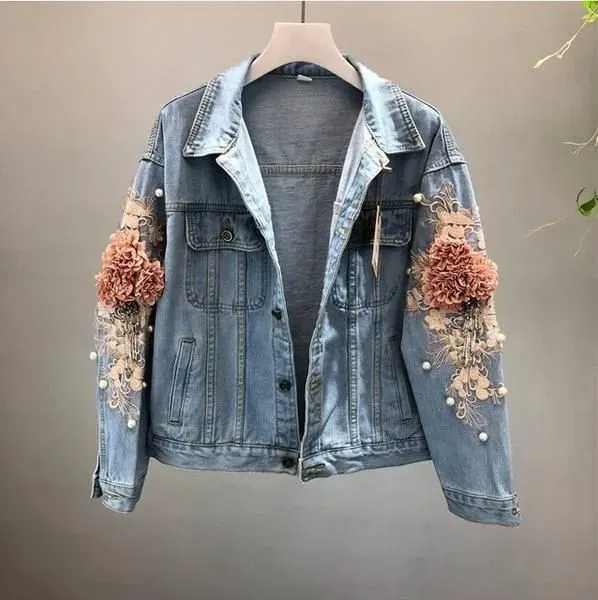
2) Denim Patches Ideas: Creative Motifs, Colors, and Placement Strategies
Denim patches ideas span everything from playful motifs to refined symbols, and they’re an easy entry point into textured wearables. Think stars, hearts, initials, or floral icons that pop against the classic denim backdrop. Grouping patches with similar tones or motifs helps the garment read as a cohesive design, even as you layer 3D textures for added depth.
When planning patch designs on jeans, consider color stories that complement the denim shade and fade pattern. Personalized denim patches become even more meaningful when you incorporate typography, monochrome silhouettes, or metallic threads that catch the light. For a balanced look, mix small tonal patches with a few bolder statements to create an intentional, gallery-worthy patchwork.
3) Embroidery Panels on Denim: Layout, Flow, and Integration
Embroidery panels on denim blend artwork with the garment’s structure, delivering a unified design that flows with seams and body lines. A panel along a leg, across the back of a jacket, or across the chest offers a canvas that can be read from a distance, yet rewards closer inspection with layered texture. Start by drafting a layout that respects the garment’s natural lines and folds, then translate that plan into stitched depth and color transitions.
3D techniques shine most when applied to panels designed to wrap around curves or follow the garment’s silhouette. Layer a dense base of stitches, add a foam layer for height, and finish with satin or long-and-short stitches to simulate petals, scales, or architectural motifs. Balancing stitch density, foam height, and thread tension is essential to avoid puckering while preserving a crisp, wearable artwork.
4) Personalization Ideas for Everyday Denim: Monograms, Symbols, and Storytelling
Personalization is where denim truly becomes your own. Monograms, names, or symbols can be integrated into patches or embedded within panels to tell a story you wear daily. By using contrasting or metallic threads, you can turn a simple patch into a statement piece that feels both personal and enduring.
Iconography with meaning—whether a favorite musician’s note, a mountain motif for hikers, or a beloved animal silhouette—adds a layer of identity to your wardrobe. Seasonal patches or event-specific embellishments allow you to refresh your denim with new stories while maintaining a cohesive look when paired with denim embroidery panels and other patches.
5) Practical Tips for Clean, Durable Denim Embroidery
Durability comes from proper preparation. Stabilize denim with a cut-away stabilizer to support dense stitches on both sides of the fabric. Always test stitchouts on a scrap piece of denim to check tension, density, and foam height before applying a patch to your cherished garment.
Edge finishing and foam height control are crucial for comfort and longevity. Satin stitches around patch edges help prevent fraying, while maintaining a neat silhouette. Start with a thin foam layer and adjust if needed to avoid bulk or flattening of the 3D effect. Regular care—gentle washing inside-out and air drying—keeps patches and panels vibrant for years.
6) Step-by-Step Guides: Patch Creation to Panel Integration on Denim
A practical patch-creation workflow begins with planning, transferring designs to denim, and hooping with stabilizer to prevent puckering. Layer foam behind the design area to heighten the 3D effect, then embroider a dense base followed by textural stitches. Finish by trimming excess foam and applying edge stitches to secure, then remove stabilizer and press lightly.
For embroidery panels, start with a layout that aligns with seams and garment shape. Stabilize both the panel area and surrounding fabric, use tear-away stabilizer for larger panels, and build the design with raised elements and layered stitches. Attach the panel to the garment with careful seam alignment and add subtle finishing touches—micro-stitches, color shading, or small accents—to unify the overall look.
Frequently Asked Questions
What is 3D embroidery on denim, and how does it elevate denim patches ideas and patch designs on jeans?
3D embroidery on denim adds depth by layering stitches with foam or felt under the thread to create raised elements. It elevates denim patches ideas and patch designs on jeans by adding texture and dimension that still survives daily wear. Start with a cut-away stabilizer for dense areas, test on scrap denim, and adjust foam height for the best lift.
What are denim embroidery panels, and how can I use 3D embroidery on denim to create them?
Denim embroidery panels are integrated designs that run along a jacket, leg, or other garment areas to form a unified artwork. To create panels with 3D embroidery on denim, plan a layout that follows garment lines, stabilize the area (tear-away stabilizer for larger panels), layer foam for height, and combine dense stitches with satin or long-and-short stitches to shape elements while keeping edges neat.
How can I create personalized denim patches with 3D embroidery on denim to express my style?
Personalized denim patches can feature monograms, names, or symbols using 3D embroidery on denim. Choose a color palette that contrasts or complements your base denim, and add a foam layer to raise the personalization for a tactile effect. Finish with a neat satin edge and securely sew the patch onto the garment.
What are DIY denim embroidery tips for beginners working with 3D embroidery on denim?
Here are DIY denim embroidery tips: use sturdy denim and the right stabilizers (cut-away for dense designs), test stitchouts on scrap denim, and select appropriate needles for denim. Manage foam height carefully to avoid bulk, finish edges with satin stitching, and follow proper care to maintain results.
What factors should you consider when planning patch designs on jeans using 3D embroidery on denim?
Consider patch shapes, color story, and how patches interact with the denim’s fade. Plan the layout on paper, group similar tones for cohesion, and balance stitch density with foam height to avoid puckering while keeping the 3D effect.
How should you care for denim patches and embroidery panels created with 3D embroidery on denim to keep them durable?
Care for denim patches and embroidery panels by washing inside-out on a gentle cycle and air-drying when possible. Avoid high heat that can compress foam, re-sew edges if they loosen, and press lightly to maintain a crisp finish without flattening the 3D elements.
| Aspect | Key Points |
|---|---|
| What is 3D embroidery on denim? | Adds depth and dimension by layering stitches with foam or felt (puff stitches) under thread; works well on sturdy denim for patches and panels; creates raised, textured elements beyond flat embroidery. |
| Materials and basics you’ll need | Denim items in good condition; stabilizers (cut-away for dense designs; tear-away for lighter patches); foam or felt (1–2 mm); embroidery machine and needles (#80/12 or #90/14; ballpoint if stretch); threads (polyester or rayon); scissors/pins/clips; design transfer method (water-soluble pen, erasable pencil, or heat-eraser marker). |
| Choosing the right design: denim patches ideas | Patch ideas range from stars, hearts, initials, florals, badges, to geometric forms. Plan shape and color, consider how patches interact with denim fade, and group similar tones for a cohesive look. |
| From patches to panels: building embroidery panels on denim | Patches are standalone; panels are integrated into the garment. Plan layout on paper, follow garment seams and lines, and use raised elements to catch light. Balance density, foam height, and thread tension for a crisp finish. |
| Personalization ideas: making it yours | Monograms, names, or symbols; icons reflecting hobbies or values; seasonal or event patches; color storytelling with curated palettes (e.g., jewel tones or monochrome for different vibes). |
| Practical tips for clean, durable results | Stabilize properly (cut-away for dense designs); test stitchouts on denim scraps; edge finishing with satin or neat stitches; control foam height; follow care guidelines to preserve patches and panels. |
| Step-by-step guide: creating patches on denim | 1) Plan design and transfer to denim; 2) Hoop with stabilizer; 3) Place foam behind design; 4) Embroider base with dense fill; 5) Trim foam and satin/edge stitch; 6) Remove stabilizer and press lightly. |
| Step-by-step guide: creating embroidery panels on denim | 1) Draft a layout along garment seams; 2) Stabilize; 3) Use foam for raised elements and layered stitches; 4) Attach panel to garment; 5) Add finishing touches and ensure seams align. |
| Care, wear, and future updates | Gentle washing inside-out, air-dry to preserve foam; re-sew edges if loose; avoid high heat to maintain 3D effects. |
| Inspiration and next steps | Collect ideas from fashion blogs, embroidery forums, and social groups; create mood boards for patches and panels; mix and match ideas over time, starting with panels on a jacket and later adding monogram patches. |