
Screen Printing on Different Surfaces is an adaptable craft that lets designers and hobbyists transfer bold, durable graphics onto fabrics, woods, glass, and more. The core idea remains the same; ink is pushed through a finely prepared mesh stencil to create crisp edges and saturated color, yet the practical choices shift with surface texture, porosity, and finishing expectations, so printers must tune ink chemistry, squeegee pressure, mesh tension, and drying or curing strategies to fit each material: fabric, wood, glass, ceramic, plastics, and beyond, without compromising registration, hand feel, or long-term wear. When you work with screen printing fabric, you tailor your approach by selecting ink systems that balance hand feel with durability, choosing mesh counts that preserve fine lines while allowing solid fills, and applying heat or air curing in a way that minimizes off-press distortion. In multisurface contexts, planners often blend surface-specific inks, apply underbases or primer layers on woods and glasses, and plan color passes to ensure that a vibrant image remains cohesive as it crosses different substrate characteristics, from absorbent textiles to glossy non-porous panels. With deliberate testing, careful documentation, and iterative refinement, you can extend your expertise from fabric prints to hybrid workflows, enabling consistent results and a streamlined process that supports rapid prototyping across diverse surfaces.
To frame the concept more broadly, think of printing that transfers layered imagery across a spectrum of substrates, from textiles and timber to glass and plastics, while respecting the unique texture, porosity, and preparation needs of each surface. From an information architecture perspective, related topics such as ink chemistry, substrate preparation, curing dynamics, color consistency, finishing coatings, and process documentation create a semantic cluster that explains how a technique can stay coherent even as the material shifts and production constraints differ. In practice, designers build flexible workflows and document results across trials, calibrating pressure, squeegee speed, stroke count, drying times, and post-press treatments so one design can be adapted for multiple materials with reliable sharpness and vitality even after repeated wash cycles. This approach also invites experimentation with layered effects, underbases for lighter fabrics, sealants for slick surfaces, and color-matching strategies that respect the inherent gloss of glass or the tactile texture of wood, all while maintaining safety, efficiency, and environmental considerations. Ultimately, the goal is a repeatable, scalable process that translates creative ideas from cloth to panels to glassware, enabling rapid prototyping, tighter tolerances, and consistent outcomes across diverse substrates for commercial, educational, and personal projects.
Screen Printing on Different Surfaces: A Multisurface Approach to Fabric, Wood, and Glass
Screen Printing on Different Surfaces is an adaptable craft that lets designers move beyond single-material projects and embrace multisurface screen printing. By understanding how fabric, wood, and glass behave differently under ink, printers can plan for surface-specific adjustments while maintaining a cohesive visual language across each piece. This multisurface approach expands creative possibilities, enabling bold graphics that stretch from textiles to signage and home decor.
In practice, this approach requires a balanced workflow where ink selection, curing methods, and surface preparation harmonize across materials. Designers often curate a color sequence that respects each substrate’s curing time and surface texture, ensuring that a print on fabric remains vibrant after wash, while a wood panel holds its color under light activity, and a glazed glass surface retains clarity and gloss. The goal is consistent print clarity and color vibrancy across fabric, wood, and glass, achieved through deliberate planning and cross-material testing.
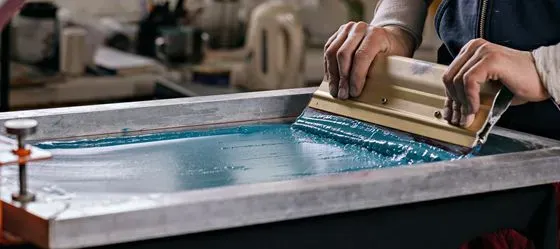
Fabric Screen Printing Essentials: Ink, Mesh, and Curing for Textiles
Fabric is the most common surface in screen printing, where absorbency and how ink sits on the cloth shape every step from prep to finish. A careful choice between water-based inks for a soft hand or plastisol inks for high opacity helps determine the project’s look and durability. For high-detail prints, selecting an appropriate mesh count and emulsion is essential to preserve edges and minimize blurring.
Surface prep begins with prewashing to remove sizing, followed by thorough drying to ensure ink adheres uniformly. Mesh and tension influence line crispness—finer fabrics benefit from higher mesh counts, around 230–305, while finishing steps like heat setting (approximately 320°F or 160°C for 1–2 minutes) and a post-cure wash test help verify wash-fastness and color longevity. Finishing touches, including treatments for colorfastness on blends, round out a fabric print designed to endure regular wear and washing.
Wood Screen Printing Techniques: Preparing Grain-Smooth Surfaces and Lasting Finishes
Wood presents a different set of challenges due to grain and porosity. Preparing the surface to be smooth and sealed minimizes ink grab and helps achieve solid, even color. Sanding to a smooth finish and applying a sealer or primer reduces grain rise and prevents ink bleed, allowing wood prints to achieve a durable, gallery-ready appearance.
Ink selection on wood often leans toward solvent- or oil-based formulations for rich saturation, though properly sealed surfaces can work with water-based inks. Alignment becomes critical across multiple colors, so registration marks and masking help maintain consistent layers along the grain. Finishing with a clear top coat—such as acrylic or polyurethane—protects the print from wear and moisture, preserving legibility and color for furniture and decorative panels.
Glass Screen Printing Techniques: Inks, Adhesion, and Durable Glass Finishes
Printing on glass requires inks and processes designed for non-porous, glossy surfaces. The goal is a vibrant, durable image that remains legible through cleaning and handling. Thorough surface prep to remove oils and residues is essential, with optional light abrasion to improve ink grip for certain branded pieces. Ink choices typically include ceramic enamel or specialized glass inks, some of which fuse through kiln firing while others air-cure or require UV curing.
Curing strategies on glass depend on the ink system chosen. Kiln firing follows specific firing curves and safety guidelines, whereas air-d cured or UV-cured inks require precise cure times and handling to avoid smudges. Finishing steps may include sealing or coating to resist solvents and cleaning agents, ensuring glass prints stay vivid over time and through regular maintenance.
Coordinating Multisurface Projects: Color Sequences, Inks, and Registration
When a project spans fabric, wood, and glass, planning color sequences becomes essential. Mapping out the order of colors and their curing requirements helps prevent smearing or misalignment as layers pass between substrates. Inks that cure quickly on one surface should not compromise another, so selecting versatile inks or tailoring the workflow for the majority of surfaces can simplify production.
Registration and alignment are particularly important for multisurface work. Using precise fixtures, jigs, or mechanical stops helps maintain consistent registration across irregular shapes or curved surfaces. Regular stool tests and representative samples across each material aid in predicting behavior, ensuring that a single design reads well on fabric, wood, and glass while maintaining color harmony and edge clarity.
Troubleshooting and Best Practices for Consistent Multisurface Results
Common challenges in multisurface printing include fabric bleed, wood grain raise, and glass adhesion issues. On fabric, tightening mesh tension and using barrier coats or controlled ink viscosity can reduce bleed. On wood, sealing and light sanding between layers help re-flow ink and minimize grain-related inconsistencies. For glass, ensuring thorough surface prep and selecting compatible inks are critical for durable adhesion.
Across all surfaces, a focus on safety and maintenance pays off. Adequate ventilation, personal protection, prompt cleaning of screens and tools, and documenting settings for each surface create a repeatable workflow. Sustainability considerations—like choosing water-based inks for fabric and low-VOC emulsions—support responsible multisurface production. By combining careful prep, tested color strategies, and rigorous testing, you can achieve reliable, high-quality results across fabric, wood, and glass.
Frequently Asked Questions
What is Screen Printing on Different Surfaces and how does it differ across fabric, wood, and glass?
Screen Printing on Different Surfaces is the process of applying ink through a mesh stencil onto various substrates. While the core principle remains the same, fabric, wood, and glass demand different ink formulations, curing methods, and surface prep to account for absorbency, grain, and gloss. By tailoring ink choice, mesh count, and finishing steps for each surface, you can achieve durable, vibrant results across fabric, wood, and glass.
How do you approach ink and mesh selection for screen printing fabric vs screen printing wood in the Screen Printing on Different Surfaces workflow?
For fabric, use water-based inks for a soft hand and wash-fastness, with higher mesh counts around 230–305 to preserve detail; cure with heat at about 320°F (160°C) for 1–2 minutes. For wood, use solvent- or oil-based inks for strong saturation; apply a wood sealer to reduce grain uptake and improve edge sharpness, and consider masking for multi-color runs. Align registration carefully across surfaces when doing multisurface projects.
What are essential steps for screen printing on glass to ensure durability and adhesion?
Glass printing requires thorough surface prep by cleaning oils and residues; use glass-specific inks such as ceramic enamel, and decide whether the ink requires firing or can cure in air or with UV. If firing, follow the ink’s firing curve; if not, allow proper cure times and handle surfaces to avoid smudges. Consider adding a sealing topcoat for extra abrasion resistance.
What is multisurface screen printing and how do you plan color sequences across fabric, wood, and glass?
Multisurface screen printing involves planning a single project that prints on fabric, wood, and glass, coordinating color sequences and curing so each layer adheres on every surface. Start with colors that need the longest cure time and ensure inks are compatible with all substrates. Use test prints and fixtures to align registration across uneven or curved surfaces, and sequence layers to prevent bleeding between materials.
What surface preparation steps are essential in screen printing techniques for different materials, and how does Screen Printing on Different Surfaces tailor prep for fabric, wood, and glass?
Essential steps include cleaning, sealing, and pre-treating per material: prewash fabric to remove sizing; sand and seal wood to reduce grain; clean glass and, if needed, roughen edges for ink grip. Choose compatible inks and sealants for each surface, and plan a workflow that minimizes cross-surface contamination. Document prep procedures and test on sample pieces before production.
How can I ensure color accuracy and alignment across fabric, wood, and glass in multisurface screen printing projects?
Calibrate with small test runs on each material to see how color renders on different substrates, adjust ink formulations or underbases, and use precise registration fixtures to maintain alignment. Keep consistent curing times and temperatures for each surface, and record settings for repeatability in multisurface projects.
| Surface | Key Points | Ink & Mesh | Curing & Finishing | Preparation & Notes |
|---|---|---|---|---|
| Fabric | – Most common surface; manage ink penetration and color fastness. – Prep: prewash/dry to remove sizing and even base; test on delicate synthetics for shrinkage. – Ink: water-based inks for a softer hand; plastisol for opacity (hand feel varies); choose mesh/count to preserve detail. | Water-based inks preferred; higher mesh counts help crisper lines (approximately 230–305). Plastisol is opaque and durable but sits on the surface. | Heat setting is typical; common target around 320°F (160°C) for 1–2 minutes, then cooldown. For blends, verify cure temps to avoid scorching. | Prewash, test for shrinkage and color integrity; post-treatment may improve colorfastness on color fabrics or blends. |
| Wood | – Grain and pores require a smooth, sealed surface. – Prep: sand to 180–220 grit; seal or prime to reduce grain rise and ink bleed. | Solvent- or oil-based inks work well on bare wood; water-based inks are possible with sealing. | Allow ink to dry/cure per ink instructions. Apply a clear top coat (acrylic or polyurethane) to protect against wear and moisture. | Masking and registration are important for multi-color work across grain; seal and lightly sand between layers as needed. |
| Glass | – Non-porous, glossy surface; aim for durable, vibrant results. – Prep: clean thoroughly; lightly roughen edges if ink grip is needed. | Ceramic enamel or specialized glass inks; some require kiln firing; others cure by air or UV. | Firing curves or air/UV cure times per ink; finish with a protective topcoat if possible to resist cleaning. | Thorough surface prep; ensure ink compatibility; avoid scratching the surface; sealants can help durability. |
| Multisurface (Fabric/Wood/Glass) | – Plan color sequences so each layer cures correctly on all surfaces; anticipate cross-surface interactions. – Run small test prints on representative samples before full runs. | Use inks with broad compatibility or dedicated multisurface formulations; calibrate mesh and viscosity for multiple substrates. | Coordinate curing steps to avoid smearing; use protective top coats suitable for all surfaces involved. | Map color layers, check color alignment across surfaces, and document results for repeatability. |
| Safety & Maintenance | – Ventilation and PPE are essential when using solvents or enamels. – Clean tools and screens promptly; follow ink-specific cleaners. | n/a | n/a | Maintain records of settings (mesh, squeegee, ink, cure times) to improve repeatability across multisurface projects. |