
The Step-by-Step Screen Printing Process guides you from concept to finished garment with precision, creativity, and a practical roadmap that demystifies a craft that blends art and chemistry, making complex layering predictable for beginners and reliable for seasoned printers. As you study screen printing steps and learn how to screen print, you’ll discover repeatable methods that safeguard color consistency, edge sharpness, and production efficiency across multiple runs, plus real-world case studies from hobbyists and small shops to illustrate practical outcomes. Understanding design to production workflow in screen printing helps you troubleshoot, optimize, and scale without sacrificing quality, with clear checkpoints from artwork preparation to stencil creation and ink management, and it promotes consistent results across varied designs and fabric blends. From artwork prep and screen exposure to curing and finishing, the workflow covers ink choice, registration, garment handling, and post-print care, ensuring each layer lands faithfully on fabric—whether you’re printing posters, bags, or t-shirt screen printing projects, and supporting colorfast, durable results over time. By following this structured approach, beginners and professional printers alike can reduce waste, speed up production, and deliver durable, shop-ready prints that look intentional and aligned with your brand while maintaining safe practices and cost control.
Viewed through a broader lens, this topic maps onto the screen printing workflow—also known as the print production pipeline or stencil-based apparel printing sequence. It traces the journey from concept art to finished fabric decoration, a design-to-fabric method that emphasizes registration accuracy, ink behavior, and efficient batch handling. You will see how preparation, screen setup, exposure, curing, and post-print care interlock to produce repeatable results on T-shirts and other textiles. Framing the subject with these related terms helps readers discover practical guidance when researching how to apply a professional, scalable production mindset to garment printing.
Frequently Asked Questions
What is the Step-by-Step Screen Printing Process, and why is design and artwork preparation critical?
The Step-by-Step Screen Printing Process begins with Phase 1: Design and Artwork Preparation. Create vector-ready artwork, separate colors into layers for each screen, and add registration marks so colors align on the garment. This upfront work ensures predictable results, smoother production, and easier troubleshooting later in the design to production workflow in screen printing.
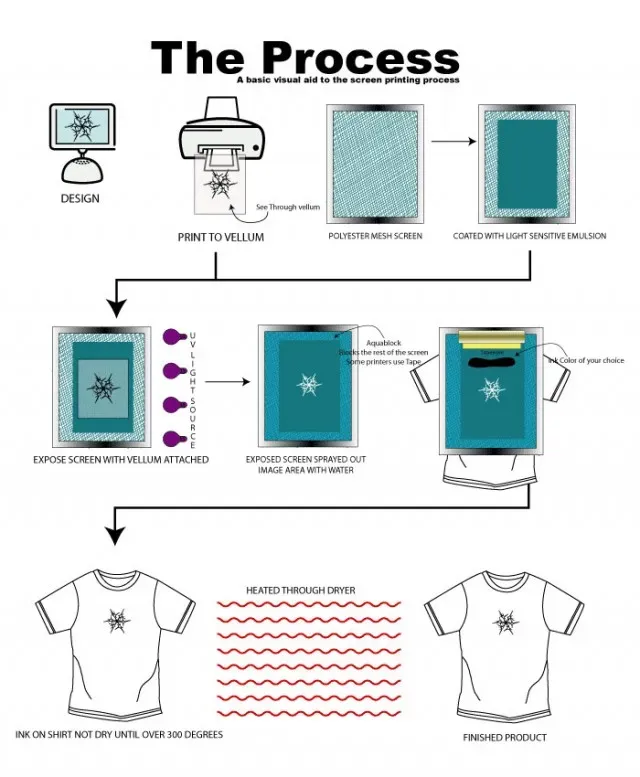
How to screen print a t-shirt using the Step-by-Step Screen Printing Process from setup to cure?
In the Step-by-Step Screen Printing Process, start with Phase 2 garment preparation, selecting a suitable fabric, pre-washing, and organizing sizes. Move through Phase 3 screen preparation and Phase 4 exposure, then proceed to Phase 7 printing and Phase 8 curing. Finish with a quick inspection and wash test to confirm durability.
In Phase 3 — Screen Preparation and Emulsion, what are the key decisions in the Step-by-Step Screen Printing Process?
Key decisions in Phase 3 include selecting an appropriate mesh count for the design and ink type, coating the screen with emulsion in a clean area, and drying it properly before alignment and exposure. These choices directly affect stencil fidelity, ink deposition, and edge sharpness in the Step-by-Step Screen Printing Process.
How does Phase 6 — Printing Setup and Registration ensure alignment in the Step-by-Step Screen Printing Process?
Phase 6 centers on Registration and Printing Setup. Use a platen, print pallet, and properly aligned screens with registration marks, then test on a garment to confirm alignment. A consistent routine, secure garments, and a registration system help minimize color shifts across multi-color prints.
What should you know about Phase 8 — Curing, Drying, and Post-Print Treatments in the Step-by-Step Screen Printing Process?
Phase 8 covers curing and finish. Plastisol inks typically cure around 320°F (160°C) for a short dwell, while water-based inks require appropriate heat to set without degrading the fabric hand. After curing, perform a quick wash test to verify durability and apply post-treatments if needed for fabric type.
How can you optimize the design to production workflow in screen printing within the Step-by-Step Screen Printing Process?
To optimize the design to production workflow in screen printing, focus on clear artwork, accurate color separation, and early pre-production checks. Include sampling from each batch and maintain consistent processes to reduce waste, shorten lead times, and improve overall print quality.
| Phase | Focus | Key Points |
|---|---|---|
| Introduction | Overview |
|
| Phase 1 — Design and Artwork Preparation | Artwork translation to screens |
|
| Phase 2 — Garment Selection and Preparation | Garment readiness and compatibility |
|
| Phase 3 — Screen Preparation and Emulsion | Creating the stencil |
|
| Phase 4 — Exposure and Washing Out the Image | Stencil development |
|
| Phase 5 — Ink, Ink Room, and Reclaiming Screens | Ink selection and preparation |
|
| Phase 6 — Printing Setup and Registration | Aligning and preparing for print |
|
| Phase 7 — The Printing Action: Applying Ink to Garment | Ink deposition and squeegee technique |
|
| Phase 8 — Curing, Drying, and Post-Print Treatments | Ink set and finish |
|
| Phase 9 — Quality Control and Troubleshooting in a Production Run | Ensuring consistency and addressing issues |
|
| Phase 10 — Maintenance, Safety, and Sustainability | Care and responsibility in production |
|
| Conclusion | Summary |
|
Summary
HTML table presented with key points by phase and a concluding descriptive SEO-friendly paragraph for the Step-by-Step Screen Printing Process.