
3D embroidery opens a world where fabric gains depth and tactile drama, moving beyond flat designs to real texture. From the start, the technique adds height through padding and raised stitches embroidery, transforming motifs into premium, craft-ready statements. In this guide, you’ll discover how 3D embroidery details, layering, and shading create dimensional embroidery techniques that elevate apparel, accessories, and home decor. The approach blends machine precision with hand-finishing, letting you balance tension, padding, and padded embroidery to achieve a natural lift. With careful planning, your designs invite touch and reflect light in ways that highlight embroidery texture ideas while remaining durable.
Beyond flat stitches, designers explore three-dimensional embroidery, a method that builds volume with padding, layering, and sculpted seams. This approach relies on dimensional stitching, raised textures, and tactile accents to transform motifs into stand-out, hand-crafted details. By pairing different fabrics, stabilizers, and finishing stitches, artists achieve embroidery texture ideas that read as natural dimension rather than surface decoration. Whether on garments or interiors, the concept emphasizes height, light reflection, and motion, inviting viewers to examine the craft up close.
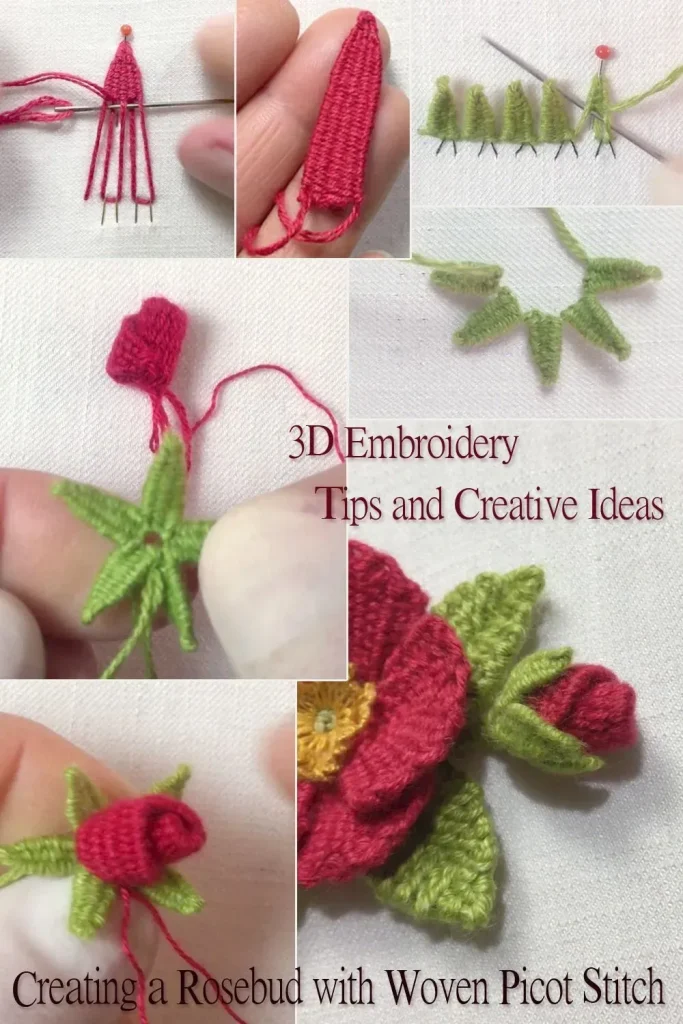
Exploring 3D Embroidery: From Flat Surfaces to Textured Statements
3D embroidery transforms flat fabric into a tactile landscape, turning simple motifs into dimensional statements. By elevating elements with padding, raised stitches, and careful shading, you can create depth that invites touch and close inspection. This approach aligns with the concept of 3D embroidery details, where height and texture become as important as color and form.
Across apparel, accessories, and home decor, the shift from flat to volumetric stitching opens new avenues for branding and storytelling. Designers can leverage light play on raised surfaces and deliberate color transitions to achieve natural shading that mimics real-world textures. Embracing this technique elevates projects from ordinary to premium, delivering a tactile experience that clients and gift recipients will notice and remember.
Dimensional Embroidery Techniques: Layering, Padding, and Shape Building
Dimensional embroidery techniques focus on layering materials and stitch structures to form a raised silhouette before final threads seal the design. Practitioners commonly combine padding with stitching to achieve consistent height, whether on a denim jacket emblem or a decorative pillow motif. This approach lays the groundwork for a controlled, repeatable 3D effect.
Key methods include raised satin stitches over padding, couching to fashion crisp edges, and layered applique with backing spacers. When used thoughtfully, these techniques create bold edges and soft, volumetric shapes that read as carved or sculpted on fabric, enhancing the overall impact of the embroidery texture ideas you pursue.
Mastering Raised Stitches Embroidery for Depth and Light
Raised stitches embroidery is a straightforward way to push motifs away from the fabric surface and generate subtle, pillowlike forms. By inserting padding beneath the stitch line and shaping threads to stand off the base, the design catches light at varying angles, producing natural highlights and shadows.
To maintain consistent depth, manage thread density and padding thickness across the motif. This discipline makes your 3D elements read clearly from a distance and up close, reinforcing the dimensional feel that defines modern textile art.
Padded Embroidery Essentials: Materials, Stabilizers, and Height Control
Padded embroidery relies on strategically placed cushioning under the stitching to achieve true height. Selecting materials such as foam or soft felt and pairing them with appropriate stabilizers helps keep padding secure and the raised elements uniform, even on busy or stretchy fabrics.
Backings and stabilizers play a crucial role in preserving shape, especially for dense areas. Cut-away stabilizers provide support for heavy padding, while tear-away options simplify removal after stitching. Choosing the right padding thickness and stabilizer combination is essential to keep padding from overwhelming the design.
Embroidery Texture Ideas: Color, Contrast, and Fabric Interaction
Texture ideas emerge from thoughtful color pairs, light-to-dark gradients, and layered threadwork that mimics natural surfaces. Using light shades for highlights and deeper tones for shadows helps the raised forms read as three-dimensional, regardless of fabric type.
Experiment with metallic threads, variegated fibers, and matte cottons to add shimmer, depth, and tactile variation. Beads or crystals can accent the raised areas, while texture-specific motifs—such as seeds, petals, or geometric reliefs—derive their character from careful stitch choice and padding strategy.
From Concept to Creation: Practical Steps and Common Pitfalls in 3D Embroidery Details
Planning is the backbone of successful 3D embroidery details. Start by sketching on swatches, identifying padding zones, and testing height on scraps before committing to the final piece. This preparatory work helps you align the dimensional effect with the overall design while keeping production efficient.
Common challenges include puckering from too-thick padding or uneven fabric tension, and thread breakage that interrupts the raised look. Solutions involve adjusting padding thickness, moderating stitch density, and gradually building height across the motif to monitor alignment and depth as you progress.
Frequently Asked Questions
What is 3D embroidery and how does it create height on fabric?
3D embroidery refers to embroidery that creates actual height and texture on the fabric surface. It uses padding (foam or felt), multiple layers of thread, and sometimes beads or crystals, so shapes stand away from the base fabric and read as dimensional, tactile embroidery details.
What are the key dimensional embroidery techniques used in 3D embroidery details?
Core dimensional embroidery techniques include raised satin stitches atop padding to form raised shapes, couching and outlining to define edges, layered applique with padding for bold elements, bullion knots and long‑and‑short stitches for texture, and the addition of beads or crystals as textured accents.
How do you plan and apply padding in padded embroidery to achieve consistent height?
Begin with a sturdy base fabric and appropriate stabilizers. Plan padding areas, place padding (foam or soft felt) under the shapes, and secure it. Outline, fill with stitches, and layer padding as needed to build height, finishing with edge detailing to keep shapes crisp.
How can embroidery texture ideas be applied to 3D embroidery on different fabrics?
Use embroidery texture ideas to inform color transitions and shading on raised forms. Choose thread types (polyester, rayon for sheen; cotton for matte), consider metallics for edges, and match padding to fabric weight. Test on scraps to ensure the design reads well on the chosen fabric.
What factors influence depth and shading in 3D embroidery details?
Depth and shading are influenced by thread weight, stitch density, padding thickness, stitch direction, and color transitions. Plan a light-to-dark gradient to mimic a light source and adjust layering to balance height with the fabric’s drape.
What care tips help preserve 3D embroidery details?
Wash gently inside out with a mild detergent and air dry or lay flat to maintain height. Avoid high heat that could distort padding. Repair loose stitches promptly and use appropriate stabilizers during laundering to preserve the dimensional effect.
| Key Point | Summary |
|---|---|
| Definition and effect of 3D embroidery | Creates actual height and texture on fabric using padding (foam, felt), multiple thread layers, specialized stitches, and sometimes beads/crystals; shapes stand away from the base fabric for tactile, dimensional designs. |
| Core techniques to build height | Raised satin stitches with padding; couching for elevated edges; layered applique with padding; bullion knots and long/short stitches for texture; beads/crystals for accent and depth. |
| Materials and tools | Sturdy base fabrics and appropriate stabilizers; padding materials (foam/soft felt); threads (polyester, rayon, cotton), and optional beads/crystals; stabilizers (cut-away, tear-away) and backing. |
| Color and depth | Light shades for highlights, darker tones for shadows; metallic/variegated/matte threads can add depth; consider thread weight, density, and stitch direction to influence perceived depth. |
| Machine vs hand technique | Machines excel at repeatable motifs and consistent height; hand embroidery offers nuanced control for padding and organic shapes; blending both approaches can balance uniformity and personality. |
| Practical steps (workflow) | Plan padding areas, place padding under intended shapes, outline shapes to lock padding, fill with satin stitches or knots, layer for depth, finish with edge detailing and optional beads. |
| Design considerations | Balance height with fabric behavior; avoid overpowering large shapes; plan negative space; test tension and padding on swatches; ensure color transitions imply light source for realism. |
| Care and maintenance | Wash gently, inside out; avoid high heat; air dry or lay flat to preserve height; repair loose stitches promptly to maintain the dimensional effect. |
| Applications and inspiration | Fits across apparel, accessories, home decor, and decorative textiles; use raised elements on jackets, totes, cushions, pillows, hats, scarves, quilts, wall hangings, and children’s wear for tactile impact. |
| Common challenges and solutions | Puckering from thick padding or uneven tension; address with lighter padding and stitch density; handle thread breakage by verifying needle size and thread path; build height gradually on intricate shapes. |
| Planning and growth | Plan swatches to refine padding thickness and stitch density; practice gradually before final pieces to understand how 3D embroidery changes a design. |
Summary
Conclusion: 3D embroidery transforms flat designs into tactile, dimensional art through raised stitches, padding, layering, and thoughtful color use. This versatile technique elevates garments, accessories, and home decor by adding depth and texture that catch the light and invite touch. By combining machine efficiency with handcrafted detailing, designers can balance consistency and personality. Practice with padding and raised stitches, then expand to more complex motifs to unlock the full potential of 3D embroidery as a craft that blends technique, texture, and design potential.