
3D embroidery vs flat embroidery presents a compelling choice for designers seeking texture, depth, and bold branding on fabric. This comparison highlights how 3D embroidery techniques create raised motifs that catch light, while examining flat embroidery differences in edge crispness and a flush finish. By looking at uses of 3D embroidery across apparel, bags, and caps, you’ll see why some projects benefit from padding and layered stitches for dimensional impact. We’ll also consider the stitches for 3D embroidery and how machine embroidery 3D setups influence setup time, costs, and durability. Understanding these differences helps designers choose the right approach, balancing visual impact with production efficiency.
Another way to frame this topic is through three-dimensional embroidery versus two-dimensional flat stitching, where texture and silhouette guide design choices. Using terms like dimensional embroidery, plush or padded stitching, and raised motifs aligns with LSI principles by connecting related concepts such as padding, backing, and digitizing strategies. This broader vocabulary helps designers and clients discuss possibilities without lockstep jargon while maintaining clear meaning across garments, accessories, and branding projects. By exploring synonyms and related ideas—such as foam backing, layered stitches, and textured appliqué—you can better plan production, budgeting, and visual impact.
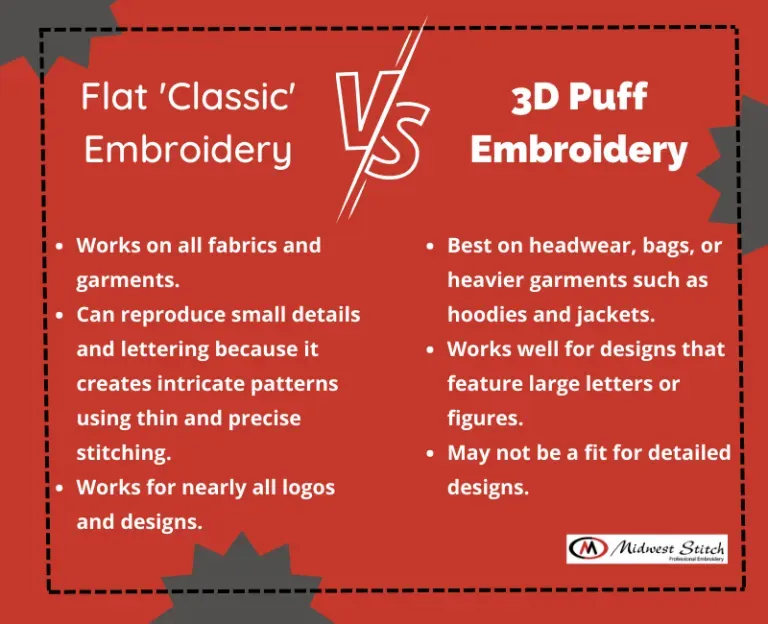
3D Embroidery Techniques: Crafting Depth with Padding and Foam
3D embroidery techniques rely on padding or foam under the stitched motif to create height and texture. By layering stitches and using a foam spacer, designers can push the top thread above the fabric surface, producing a dimensional, tactile effect that catches light from different angles.
This approach is particularly effective for logos, mascots, and decorative elements on items like caps, jackets, and bags. When planning 3D embroidery techniques, consider foam thickness, layering order, and the backing used to ensure the raised design maintains its shape through wear and washing.
Flat Embroidery Differences: Texture, Edges, and Production Speed
Flat embroidery differences center on a flush surface where stitches lie on the fabric without padding. It delivers clean edges, crisp outlines, and steady wear over time, making it a reliable choice for corporate logos and small text.
Because there is no padding, flat embroidery can often be produced more quickly and at a lower cost, especially for bulk runs. Stabilizers, satin and fill stitches, and precise digitizing help maintain legibility and edge definition across diverse fabrics.
3D embroidery vs flat embroidery: A Practical Comparison for Designers
When deciding between 3D embroidery and flat embroidery, consider brand goals, fabric type, and how visible you want the design to be. 3D offers height, texture, and a premium feel, while flat embroidery emphasizes clean lines and legibility.
For product lines that require rapid production, flat embroidery often minimizes production time and cost, whereas 3D embroidery adds tactile impact on select items like caps or backpacks. The choice should align with the intended use, durability needs, and audience expectations.
Stitches for 3D Embroidery: From Puffy Edges to Layered Depth
Stitches for 3D embroidery include puffy or plush stitches around the edges to trap the foam and define the raised border. A base fill can be followed by top stitches that build the visible height.
Layered stitching creates contour and depth by stacking separate elements—base fills, then raised shapes, then final outlines. This technique, along with appropriate foam padding and backing, helps maintain height without excessive fabric distortion.
Uses of 3D Embroidery: Elevating Logos, Mascots, and Accessories
Uses of 3D embroidery span logos on hats, denim patches, backpacks, and decorative badges where texture adds premium branding. The raised motifs can enhance recognition in retail displays and on interactive merchandise.
In fashion and accessories, 3D embellishment offers a tactile element that stands out in photos and in person. When paired with thoughtful color contrast and durable threads, it creates long-lasting branding opportunities across materials.
Machine Embroidery 3D: Tools, Backing, and Digitizing for Dimensional Design
Machine embroidery 3D benefits from specialized backings, foam padding, and digitizing that supports padding, foam allowance, and layer stacking. The right stabilizers help prevent fabric distortion while preserving height.
Choosing the right threads, foam thickness, and digitizing approach is crucial. Test swatches on similar fabrics to confirm height, edge crispness, and how well the design will hold up under washing and wear. In practice, machine embroidery 3D workflows often integrate professional digitizers with multi-technique embroidery to achieve consistent results.
Frequently Asked Questions
What are the key differences between 3D embroidery vs flat embroidery in texture, durability, and best uses?
3D embroidery vs flat embroidery create distinct texture: 3D uses padding such as foam and layered stitches to raise the motif, delivering a tactile, high‑contrast look ideal for logos on caps, patches, and bags. Flat embroidery lies flush with the fabric, offering clean edges, faster production, and lower cost, making it suitable for everyday wear, two‑tone branding, and high‑volume orders. In terms of durability, flat embroidery is typically more resistant to snagging, while 3D elements can compress over time if padding is too thick. Choose based on visibility, fabric behavior, and product goals.
What are 3D embroidery techniques vs flat embroidery techniques, and when should padding or foam be used?
3D embroidery techniques often combine foam padding, puff stitches, layered stitching, and sometimes couching to build height. Flat embroidery techniques rely on flat stitches like satin and fill with standard stabilizers. Use padding/foam when you want height and texture (on caps, badges, or decorative motifs); avoid it on very lightweight or highly stretched fabrics where distortion may occur.
Where are the uses of 3D embroidery best suited, and how does that compare to flat embroidery across products like caps, backpacks, and apparel?
The uses of 3D embroidery include caps, backpacks, jackets, and promotional patches where a tactile, premium look is desired. Flat embroidery is widely used for polo shirts, uniforms, and everyday apparel due to its clean silhouette, legibility, and durability. For branding, mix and match depending on visibility, wear, and product type.
Which stitches for 3D embroidery are common, and how do they differ from the stitches used in flat embroidery?
Stitches for 3D embroidery often include base fills, satin borders, and top padding stitches around the edges, plus layered stitching to create contours. Flat embroidery relies on precise satin stitches for edges and fill stitches for solid areas, designed for legibility and edge crispness on flat surfaces. The padding in 3D is what creates the raised effect, while flat embroidery stays flush.
How does machine embroidery handle 3D embroidery vs flat embroidery, including backing and stabilization considerations?
Machine embroidery 3D requires foam backing, heavier or specialized stabilizers beneath the fabric, and sometimes a softer interior backing to support raised areas. Flat embroidery uses standard stabilizers (cutaway or tear-away) and threads that remain flat; it’s generally faster and easier to digitize. Proper hooping, backing choice, and fabric type are key to preventing distortion in both approaches.
What factors should guide the choice between 3D embroidery vs flat embroidery for branding, budget, and durability?
Consider brand goals (premium, tactile impact vs clean, low-profile branding), fabric type (weight and stretch), design scale, and intended use. Budget and timeline matter: 3D embroidery is typically slower and pricier than flat embroidery, but can deliver standout growth in visibility on caps, bags, or jackets. For high-volume orders or small text, flat embroidery often provides better durability and cost efficiency.
| Aspect | Summary |
|---|---|
| What is 3D embroidery? | Uses padding or foam under stitches to create height; produces a raised motif, ideal for logos on caps, bags, jackets, or patches. |
| What is flat embroidery? | Stitches lie flat without added thickness; durable, economical, and suitable for simple logos and large quantity runs. |
| Texture and depth | 3D embroidery adds height and depth; flat embroidery remains flush with the fabric. |
| Visual impact | 3D elements draw attention and provide a bold look; flat embroidery is subtler and cleaner. |
| Stitching requirements | 3D requires padding/backing and more complex digitizing; flat uses standard stabilizers and stitches. |
| Cost and time | Padding adds cost and setup time; 3D is typically more expensive and slower than flat embroidery, especially for large runs. |
| Durability and care | Flat tends to resist snagging and distortion; 3D padding can compress over time, though high-quality foam/backing mitigates this. |
| Applications | 3D excels on caps, backpacks, badges; flat is ideal for everyday wear, performance fabrics, and low-profile branding. |
| 3D embroidery techniques | Foam padding, puff stitches, layered stitching, couching, and backing choices help create depth and hold shape. |
| Flat embroidery techniques | Satin stitches for borders, fill stitches for solid areas, and careful digitizing for smooth curves and legibility. |
| Choosing between methods: factors | Brand goals and visibility; fabric and item type; application and use; budget and timeline; readability and detail. |
| Tips for designing with 3D and flat embroidery | Start with a clear brief; consider scale and spacing; digitizing matters; choose suitable threads; stabilizers are critical; test swatches. |
| Common mistakes | Over-padding; under-stitching near edges; inadequate contrast; misaligned text. |
| Practical applications and cross-technique considerations | Mixing methods—e.g., flat logo with a 3D badge—requires careful sizing, alignment, and multi-layer digitizing. |
Summary
3D embroidery vs flat embroidery represent two distinct approaches to fabric decoration, each with its own texture, impact, and production considerations. Understanding their differences helps designers select the right method for logos, branding, or decorative motifs across apparel and accessories. 3D embroidery delivers height, tactile interest, and premium branding when used on the right materials, while flat embroidery offers reliable, fast, and legible results for bulk orders and everyday wear. By weighing fabric type, application, budget, and desired visual effect, you can choose the most effective technique and achieve professional embroidery outcomes. The key is thoughtful digitizing, proper backing, and careful material choices to ensure your embroidery communicates your message clearly and with style.