
3D embroidery techniques open a new dimension for fabric lovers, stitchers, and textile artists. Raised stitch embroidery adds height and texture, turning flat fabric into tactile, shadowed surfaces. A compact 3D embroidery tutorial can guide beginners through layering, padding, and careful thread selection. By practicing raised stitch techniques and selecting embroidery stitches for 3D effect, you’ll achieve convincing volume. With thoughtful planning and steady hands, your designs will pop from the cloth and invite closer inspection.
From a modern textile perspective, this practice centers on three-dimensional stitching that builds volume through padding, layering, and deliberate contouring. LSI principles favor related terms such as dimensional embroidery, volumetric stitching, and sculptural needlework to describe the same goal of added height. Practitioners plan layouts, choose threads with varying thickness, and decide padding strategies to achieve a natural lift. Whether you call it raised work, textured embroidery, or layered stitch work, the core idea remains creating tactile, sculptural forms.
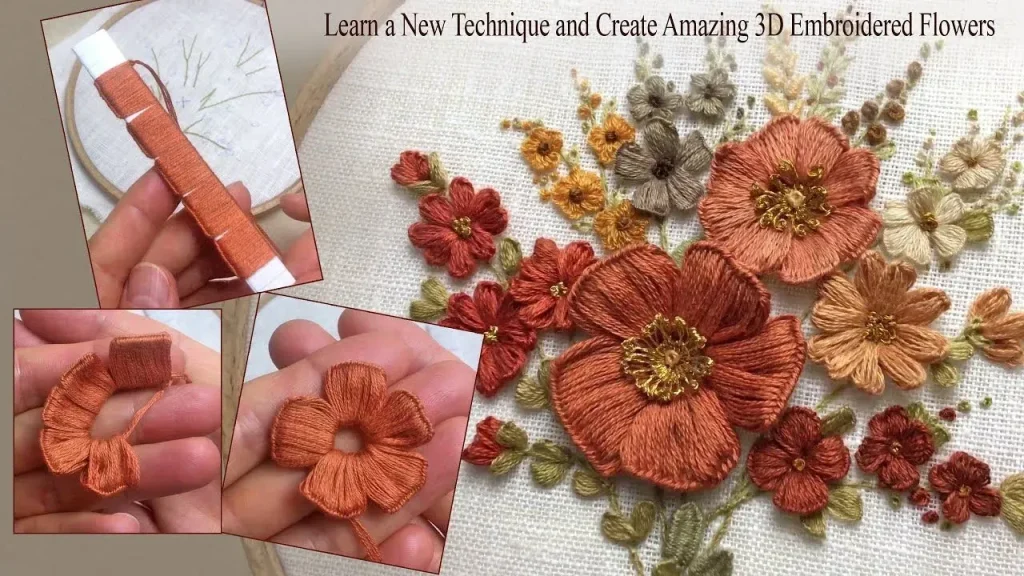
3D embroidery techniques: An overview of raised stitch embroidery and dimensional design
3D embroidery techniques bring height and tactile texture to flat fabric by layering stitches over padding. Raised stitch embroidery uses underlayment such as batting or felt to push stitches outward, creating shadows that read as dimensional forms. This fusion of surface work and padding is what gives a simple motif its sculptural presence.
This approach blends surface stitching with strategic padding to transform motifs—petals, lettering, or geometric shapes—into sculptural elements. As you explore 3D embroidery techniques, you’ll notice how height, contrast, and edge definition elevate the design, turning a two-dimensional image into a lively, touch‑friendly piece.
Raised stitch techniques: padding, layering, and shadow to sculpt fabric
Padding under satin stitches adds a purposeful elevation, while layering threads builds volume and contour. By placing padding selectively, you can push specific areas forward, creating a controlled sense of depth that remains breathable and flexible.
Practicing these raised stitch techniques helps you control height, edge quality, and shadow direction, turning simple motifs into tactile art that invites touch. These embroidery stitches for 3D effect rely on careful padding, precise stitch placement, and thoughtful color transitions to read as dimensional.
3D embroidery tutorial: Step-by-step approach from base stitches to raised elements
A practical 3D embroidery tutorial begins with design transfer, stabilizing the fabric, and laying a flat base to anchor padding. This foundation ensures that the raised areas stay crisp and that the surrounding stitches remain even and smooth.
Next comes padding placement, building the raised sections with stacked or satin stitches, and finally blending color to harmonize the raised elements with the background. Following this guided sequence helps you achieve consistent height, clean edges, and a cohesive overall look.
Choosing the right materials for 3D embroidery techniques: fabrics, stabilizers, and threads
Select a stable base fabric and a sturdy stabilizer to prevent distortion when padding is added. The choice of fabric impacts how well the padding sits and how easily you can work multiple layers without puckering.
A mix of cotton, rayon, and metallic threads can add depth, with thicker floss for pronounced raised spots and padding materials like batting or felt to create the height. Matching thread types to the project’s mood helps you achieve natural shadows and highlights in your 3D embroidery techniques.
Stitch patterns for a convincing 3D effect: embroidery stitches for 3D effect and texture
Explore stitches such as satin, long-and-short, and bullion-inspired wraps to generate volume; position them over padding to push the thread outward and catch light from different angles. The careful arrangement of stitches determines how boldly the design reads in three dimensions.
Combine couching and color shading to simulate light and create more natural shadows, emphasizing the 3D effect. Layered color transitions around raised elements help integrate height with the surrounding fabric, making the piece feel cohesive and dynamic.
Troubleshooting and expanding: avoiding common flaws and growing your 3D embroidery projects
Common issues include fabric puckering, uneven height, and visible padding; solutions include using a firmer stabilizer, planning padding thickness carefully, and regularly checking height as you stitch. Addressing tension and grain alignment early helps maintain a smooth underlying surface.
As you gain confidence, expand into borders, monograms, or appliqué designs that use raised elements, turning a single technique into a portfolio of 3D embroidery techniques. A planned series of projects lets you experiment with different fabrics, stitches, and padding combinations while maintaining a consistent, high‑quality raised look.
Frequently Asked Questions
What are 3D embroidery techniques and how do raised stitches create dimensional effects?
3D embroidery techniques add height and texture by layering padding under selected stitches and using raised stitch embroidery to push parts away from the fabric. A combination of base satin stitches, padding, and color layering creates a three‑dimensional look.
What is a simple 3D embroidery tutorial for beginners focusing on raised stitch embroidery?
A beginner-friendly 3D embroidery tutorial starts with a small motif. Stabilize the fabric, stitch a flat base, add padding under the area you want raised, then cover the padding with raised stitches to build height.
Which embroidery stitches for 3D effect are most effective for height and texture?
For a strong 3D effect, use stitches that work well with padding, such as raised satin stitches, stacked stitches, and bullion‑inspired strokes. Combine these with base satin stitches to create dimensional contrast.
How do you plan padding and layering in raised stitch techniques for a balanced look?
Plan padding thickness and layer colors strategically. Identify focal points, add padding only where height is desired, and alternate flat areas with raised sections to build dimension without overwhelming the design.
What tools and materials are essential for mastering 3D embroidery techniques?
Essential tools include a sturdy stabilizer and base fabric, an embroidery hoop, a mix of threads (cotton, rayon, metallic), padding materials (batting or felt), sharp or chenille needles, and marking tools to transfer designs without marks.
How can I troubleshoot common issues in raised stitch embroidery to improve results?
Common issues include fabric puckering, uneven height, and visible padding. Fixes include using firmer stabilizer, ensuring padding thickness is consistent, blending edge colors to hide padding, and securing thread ends with backstitches or finishing knots.
| Aspect | Key Points |
|---|---|
| Core idea | Create height, texture, and shadow by layering padding under threads; raised stitch embroidery yields dimensional look; combine surface stitching, padding, and color layering to read as a 3D object. |
| Tools, materials & preparation | Stabilizer: sturdy cutaway or tear-away; Fabric: stable base; Embroidery hoop or frame; Threads: cotton, rayon, metallic (thicker for raised areas); Padding: batting, felt, or foam; Needles & tools: sharp needles; Marking tools: water-soluble/air-erase pens. |
| Practical approach to raised stitch embroidery | Plan focal points first; manage padding thickness, thread count, and color transitions; alternate flat satin stitches with padded sections to create contrast and dimension. |
| Step-by-step basic raised stitch project | 1) Design and transfer motif; plan padding. 2) Stabilize and baste. 3) Create base with satin/long-and-short. 4) Add padding under area. 5) Build raised area with stacked or tight stitches. 6) Blend colors for depth. 7) Finish and secure ends. |
| Variations to explore | Padding under satin stitches; Layered petals; Bullion-inspired volume; Couching with accent threads; Color shading for depth. |
| Beginner-friendly tutorial | Start with a small motif (flower or leaf center) to practice padding, edge management, and color blending before expanding to more complex designs. |
| Tips for success | Plan padding thickness and test height; keep edges neat; use color strategically for highlights/shadows; practice consistent stitch length; protect work with proper finishing. |
| Common pitfalls & fixes | Puckering: use firmer stabilizer and snug hoop; uneven height: build height gradually; frayed edges: secure ends; visible padding outlines: blend with shading. |
| Care & maintenance | Store flat or rolled to avoid crushing; gentle hand wash; lay flat to dry; avoid high heat to preserve height. |
| Expanding your practice | Design seasonal motifs, multi-element designs, or personalized items; create a small series to explore different raised elements. |
| Incorporating into broader projects | Apply to borders, monograms, appliqué shapes; combine with cutwork or lace for texture; suitable for accessories, home decor, or wearable art. |
Summary
3D embroidery techniques open a world of height, texture, and shadow on fabric, inviting touch and exploration. This overview highlights the essential concepts, tools, and methods needed to practice raised stitch techniques effectively, from planning focal points and padding placement to building the raised shapes and blending color for depth. With the right materials, careful technique, and patience, you can create petals, lettering, and decorative motifs that feel tangible. Common pitfalls are addressed with stabilization, even padding, and gradual height-building. As you expand your practice to variations like layered petals, bullion-inspired elements, and shading, you’ll apply 3D embroidery techniques to borders, monograms, and wearable art, developing a versatile portfolio of textured fabric art.