
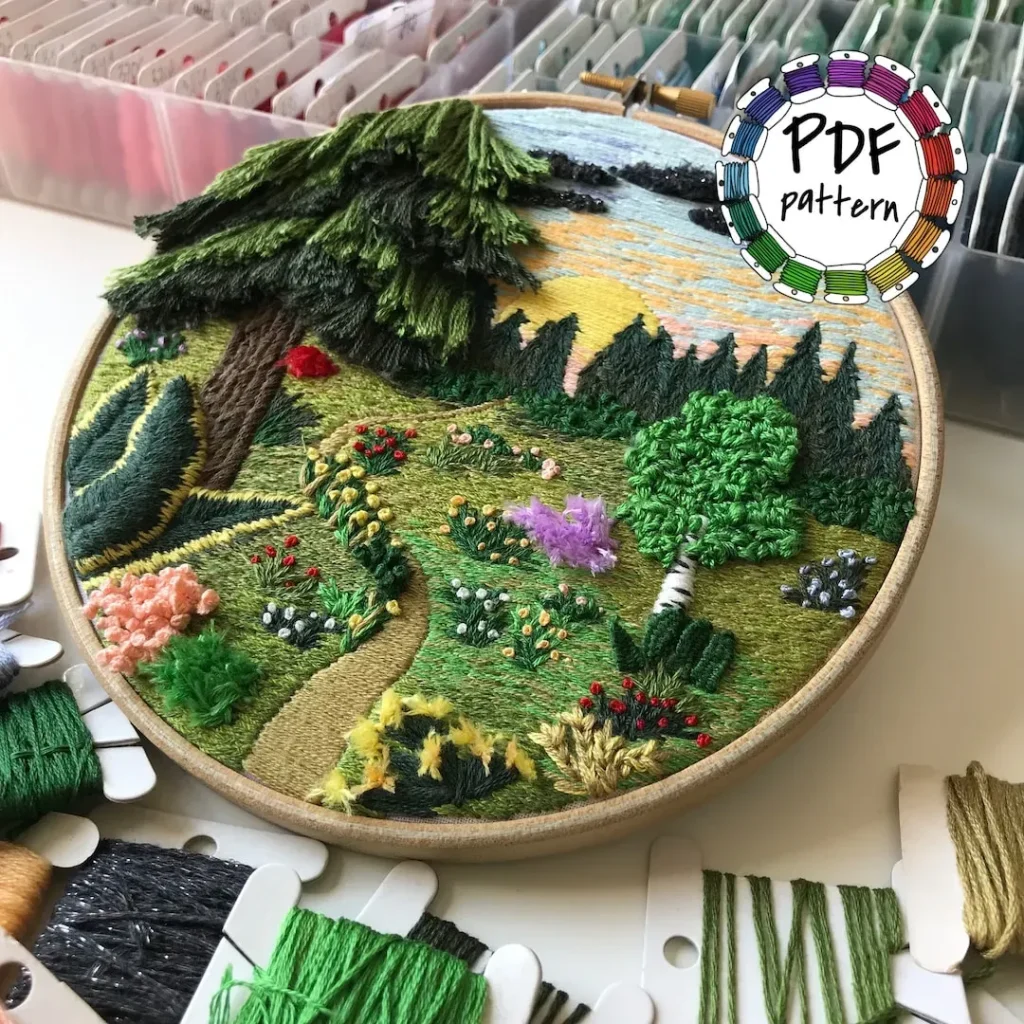
3D embroidery patterns open up a world of texture, depth, and tactile appeal that flat embroidery simply can’t match. By layering stitches, padding areas, and combining different thread types, you create pieces that seem to rise off the fabric and catch the light from multiple angles, inviting closer inspection and a sense of sculptural form. This introductory overview guides you from a rough sketch to a finished, dimensional stitchscape, emphasizing careful technique choices, selecting materials, and the patient planning that makes true dimension possible on a range of fabrics. If you’re seeking to elevate garments, accessories, or home decor, mastering even the most modest 3D approaches can turn simple ideas into tactile art you can wear, display, or gift with confidence. Throughout the process, stay curious, document results, test padding and layering on swatches, and experiment with thread finishes to build confidence with three-dimensional stitching that feels both intentional and expressive.
In broader textile terms, the field centers on raised motifs, textured surface embroidery, and sculptural stitchwork that adds height and shadow to fabric. In line with Latent Semantic Indexing principles, designers describe similar effects with related terms such as dimensional stitching, layered textures, and raised appliqué, expanding the conceptual web around the craft. This approach reframes the practice as a conversation between sketch, plan, and stitch, highlighting 3D embroidery techniques as the toolkit for creating tangible dimension. Rather than a single term, the topic is conveyed through signals of texture, depth, and form, guiding readers toward practical steps like testing on swatches and refining balance. Ultimately, the aim is to communicate sculptural potential in cloth through thoughtful padding, thread choice, and lighting effects that enhance readability and tactile appeal.
Exploring 3D embroidery patterns: depth, texture, and storytelling
3D embroidery patterns open doors to tactile art, where depth and texture replace flat surfaces. By layering stitches, padding areas, and mixing thread types, you can create pieces that seem to rise from the fabric, inviting a closer look and a different sense of shadow and light.
To plan compelling patterns, think in terms of embroidery pattern design ideas that align focal points with elevations. Consider how light skims raised elements and how color shifts across a raised surface to enhance the sense of volume.
From embroidery pattern design ideas to a finished piece: planning the sketch-to-stitch journey
From an initial sketch to a tangible stitched piece, begin with a clear plan for how dimensional features will unfold. Map where padding will push surfaces forward, where dense fills define form, and where negative space stays flat. This is where embroidery pattern design ideas come to life as you map elevation and plan your stitching workflow, and you can explicitly consider how to translate sketches into embroidery.
Select stitches with purpose: padded satin, stacked fills, and layered stitches create varying heights. Decide on materials and thicknesses early to maintain harmony across the piece, and keep a running log of padding choices for future projects. This is where stitching tips for 3D embroidery can guide you toward consistent results.
How to translate sketches into embroidery: practical mapping and mock-ups
Translating sketches into embroidery starts with a practical map that marks flat, padded, and layered regions. Produce a small mock-up or swatch to test padding and layering before committing to the full design.
Build confidence by testing different 3D embroidery techniques on a controlled sample, then document how padding, thread choices, and color transitions affect final height. This test phase is essential for maintaining structural integrity as you scale up.
3D embroidery techniques for volume and light: padding, stumpwork, and layering
3D embroidery techniques thrive on controlled height: padded stitches push surfaces outward, stumpwork-inspired layering builds lift in petals or leaves, and layering provides smooth transitions between levels.
Experiment with beads, wires, or textured yarns to add light reflection and tactile contrast. Remember to plan where embellishments will be secured so they don’t sag or shift with wear. These stitching tips for 3D embroidery help you secure heavy details and keep the surface cohesive.
Materials, tools, and color strategies for dimensional stitching
A practical toolkit supports reliable, repeatable results. Use an embroidery hoop with adjustable tension, stabilizers behind dense 3D embroidery patterns to support height, and a mix of threads (cotton, silk, rayon, metallic) to create varied surfaces.
Color strategy matters as much as stitch choice: plan light-to-dark shading and subtle color progressions to enhance depth. Document how different plies and finishes interact with padding to maintain flexibility.
Applications, maintenance, and avoiding common mistakes with 3D embroidery patterns
3D embroidery patterns adapt to garments, accessories, and wall décor, offering a tactile focal point that elevates any textile project.
Common mistakes include over-bulking, uneven height, and stiff pockets. To avoid problems, test padding on swatches, balance density with breathability, and choose compatible fabrics and stabilizers. With careful planning, you can preserve movement while showcasing dimensional stitching.
Frequently Asked Questions
What makes 3D embroidery patterns distinctive compared with flat embroidery, and how do they use height and layering?
3D embroidery patterns create texture, depth, and a sculptural presence by layering stitches and padding. Elevation is achieved with raised satin stitches, stumpwork-inspired elements, and selective materials like beads or lightweight wires. Start by identifying the focal point and mapping which areas will be raised to guide the dimensional design, then consider how light and perspective will interact with the stitched surfaces.
Which 3D embroidery techniques are most effective for building raised petals and textured elements in 3D embroidery patterns?
Key 3D embroidery techniques include padded or filled stitches, layered stumpwork, and strategic layering of different stitches to create height variation. These methods let you sculpt petals, leaves, or textured features while keeping the fabric workable. Combining padding with careful layering and optional wire supports for larger shapes yields durable, dimensional results.
How to translate sketches into embroidery to lay out a successful 3D embroidery pattern?
How to translate sketches into embroidery starts with a clear map that labels flat versus padded or layered areas. Create a small mock-up to test padding thickness and to verify height balance before committing to the final piece. Build from the inside out, use precise backstitching for edges, and document stitch choices and padding decisions for future projects.
What embroidery pattern design ideas work well for creating striking 3D embroidery patterns?
Embroidery pattern design ideas for 3D embroidery patterns include multi-layer floral clusters, dimensional animal features, and abstract geometric motifs with raised sections. Plan shading and color progression to boost depth, and think about how padding interacts with light to enhance contrast and texture. Detachable 3D ornaments can also add a wearable gallery effect.
What stitching tips for 3D embroidery help maintain consistent height and avoid stiff bulk when building 3D embroidery patterns?
Stitching tips for 3D embroidery focus on balancing padding with open space and choosing compatible fabrics and stabilizers. Test swatches to determine padding thickness, use appropriate stitch densities for the desired height, and secure layers firmly while avoiding visible channels or bulk that could stiffen the piece. Always consider fabric support to maintain flexibility.
From sketch to stitch: how to translate sketches into embroidery to complete a 3D embroidery pattern?
This process involves mapping the sketch to 3D elements, then building in layers from the inside out with padding and textured stitches. Start with a scaled model or swatch to confirm height balance, stitch core shapes first, then add raised details. Finish with careful backing and accents like beads or highlights to emphasize dimension and cohesion.
| Aspect | Key Points |
|---|---|
| What makes 3D embroidery patterns special |
|
| From sketch to pattern: the design process |
|
| Tools and materials you’ll need |
|
| Techniques that create 3D effects |
|
| Translating sketches into embroidery: practical tips |
|
| Real-world design ideas and applications |
|
| Common mistakes and how to avoid them |
|
| Putting it all together: a simple step-by-step example |
|
Summary
Conclusion: 3D embroidery patterns open new possibilities for textile art by turning flat stitches into tactile, sculptural surfaces. By balancing sketch-based ideas with careful use of 3D techniques, you can create pieces that are visually striking and delightfully tactile. This approach invites experimentation with padding, materials, and color to guide the viewer’s eye and tell a story through form. Whether enhancing garments, accessories, or wall art, 3D embroidery patterns encourage ongoing exploration and personal expression in your stitching journey.