
3D embroidered vs flat embroidery shapes texture, personality, and durability in fabric projects, influencing how people perceive detail, movement, and quality across different garment applications. From hats to patches, understanding how these stitches affect design, fabric, care, and wear durability helps you choose the right approach for branding, visibility, and practical maintenance. This guide outlines core distinctions, when to use each method, and practical tips for professional results, including considerations for backing, stitch density, and laundering. You’ll also see how puff embroidery can elevate texture. For readers comparing techniques, note how 3D effects influence visibility and maintenance across fabrics, finishes, and care labels.
In other words, three-dimensional stitching adds height and tactile interest by lifting threads off the fabric. For readers seeking contrast, flat embroidery remains the classic, two-dimensional method that yields crisp edges and durable wear. Using Latent Semantic Indexing principles, terms like raised satin stitches, dimensional embroidery, and foam-backed backing help connect readers to the same ideas in different contexts. Whether your goal is bold branding on apparel or subtle texture on a patch, these related terms help explain the same concepts when planning your project. Consider design intent, fabric constraints, and care needs to choose the method that best communicates your message.
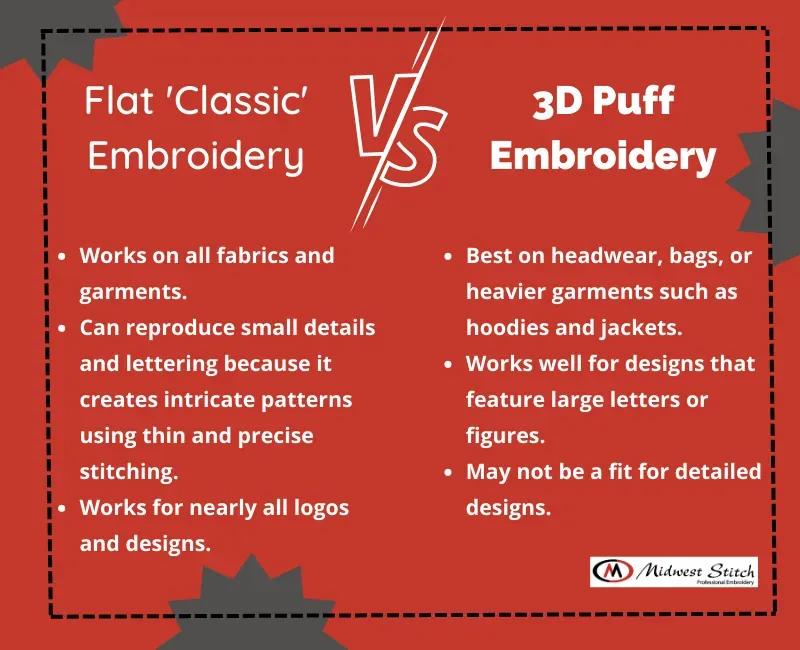
3D embroidered vs flat embroidery: Core differences in texture and impact
3D embroidered vs flat embroidery describes two distinct approaches to stitching on fabric, each delivering a very different look and feel. Flat embroidery lays stitches flush against the surface, producing crisp edges, clean color blocks, and a smooth, durable finish ideal for logos, text, and simple shapes. In contrast, 3D embroidery uses additional backing, foam, or layered stitching to lift elements off the fabric, creating height, shadows, and tactile texture that catch light and invite touch.
Understanding these differences helps you choose the right method for your project, whether you’re decorating a hat, jacket, bag, or patch. Factors to consider include the fabric type, care requirements, and the level of visual impact you want. Puff embroidery often sits at the intersection of 3D texture and practicality, while traditional flat embroidery emphasizes precision and longevity with less bulk.
What is 3D embroidery vs regular embroidery? Texture, depth, and application
3D embroidery introduces depth by elevating stitches above the fabric surface, using techniques like padding, multi-pass satin, and raised stitches. Regular or traditional embroidery (often referred to as flat embroidery) concentrates color-filled shapes that sit evenly on the surface. The result is two different sensory experiences: 3D embroidery offers tactile dimension and shadow, while flat embroidery delivers a sleek, durable, low-profile finish.
When deciding between these approaches, consider where the piece will be worn and washed. 3D embroidery may require special backing and more careful care, but it provides a premium presence on patches, caps, and fashion items. Flat embroidery, meanwhile, tends to withstand frequent laundering and abrasion with less risk of distortion.
Puff embroidery and other 3D techniques: elevating fabrics with texture
Puff embroidery is a popular 3D technique that uses foam or padding beneath the stitches to create a cushioned, rounded effect. This approach increases visibility from a distance and adds a bold sculptural quality to the design. Other 3D techniques, such as layered stitches and raised satin, build depth by stacking shapes and using offset placements to catch light from different angles.
To execute puff embroidery effectively, choosing the right backing and foam thickness is essential. Proper stabilization prevents puckering, fabric pull, or distortion. A thoughtful combination of density, stitch type, and underlay stitches ensures the raised elements read clearly and remain durable through wear and washing.
Choosing the right embroidery method by fabric and care needs
Fabric selection and stabilization play key roles in whether 3D or flat embroidery is appropriate. Stable, non-stretch fabrics with adequate backing respond well to 3D methods, while delicate or very stretchy materials may require special support to maintain height and prevent distortion. For apparel like caps or denim jackets, flat embroidery is often favored for readability and resilience, whereas patches or decorative accents can benefit from puff or layered 3D effects.
Care requirements also drive the choice. Flat embroidery tends to survive standard washing more reliably, while 3D elements may require gentler cycles or specific care instructions to preserve height and texture. Planning for maintenance from the start, including recommended temperatures and drying methods, helps your finished piece stay sharp and vibrant.
Design strategies for 3D effects: layering, backing, and color planning
Designers can maximize depth by layering stitches, balancing color transitions, and using shading to imply dimension. Layered stitches increase texture and create visual interest, especially on larger motifs where depth can be showcased. Backing choices—foam, cap backing, or specialized stabilizers—support the structure and maintain height across the design.
Color planning also plays a crucial role in readability and impact. Selecting thread finishes that hold color well under stress, choosing contrasting tones to enhance depth, and planning edge finishes for clean silhouettes all contribute to professional results. Understanding embroidery techniques for 3D effects helps you map the design from concept to finished piece with confidence.
Maintenance and care: keeping 3D and flat embroidery looking fresh over time
Maintenance routines differ for 3D and flat embroidery. Flat embroidery is generally more forgiving in daily wear and machine washing, with colors remaining crisp and edges staying sharp. 3D embroidery can soften or lose some height if exposed to harsh washing conditions, so care instructions may include gentle cycles, lower heat, and air drying to preserve volume.
Periodically inspecting backing, foam integrity, and stitch density helps catch looseness or distortion before it worsens. Re-stabilizing or re-stitching may be necessary for high-use items. By aligning care practices with the chosen method—whether 3D embroidery or flat embroidery—you can extend the life of the design while maintaining its intended texture and visual impact.
Frequently Asked Questions
What is the difference between 3D embroidered vs flat embroidery?
Flat embroidery creates a two-dimensional, flush-to-fabric look with crisp edges and durable wear. 3D embroidered vs flat embroidery adds height and texture, using raised stitches to create depth. Choose flat for legibility and washability, and 3D for bold, tactile impact on patches or fashion items.
How does puff embroidery fit into 3D embroidered vs flat embroidery?
Puff embroidery is a common 3D technique that uses foam or padding under the stitches to lift the design from the fabric. This sits under the 3D embroidered vs flat embroidery umbrella, giving a rounded, silhouetted shape. Expect slightly higher cost and care due to backing and height.
What embroidery techniques for 3D effects are commonly used, and how do they affect durability?
Common embroidery techniques for 3D effects include puff embroidery, layered or multi-pass stitches, and foam backing with stabilizers. These methods create depth and contrast with 3D embroidery vs regular embroidery, with durability depending on backing quality, stitch density, and fabric compatibility. Proper stabilization helps the 3D elements hold their shape longer.
When should you choose 3D embroidered vs flat embroidery for a project?
Choose 3D embroidered vs flat embroidery based on design goals and use. If you need bold texture and a premium look, 3D embroidery shines on caps, jackets, or patches. For simple logos or frequent washing, flat embroidery often delivers better readability, faster production, and lower cost.
What care and maintenance considerations differ between 3D embroidered vs flat embroidery?
Maintenance differs: flat embroidery is generally machine-wash friendly, while 3D embroidery requires gentler washing, lower heat, and careful drying. Check backing and thread finish regularly to prevent distortion, and re-stabilize if the foam or padding shifts. Follow care instructions specific to 3D details.
What design considerations apply to small text or logos when choosing 3D embroidery vs flat embroidery?
For small text or logos, flat embroidery often preserves legibility better than 3D approaches. Consider scaling, backing quality, and density to maintain height without crowding stitches. In tight placements, 3D effects may be possible with precise calibration, but plan for larger final sizes if needed.
| Key Point | Details |
|---|---|
| Definition and Core Concepts | Flat embroidery: two-dimensional stitches lying flush against fabric. 3D embroidery: height and depth using puff embroidery, foam backing, layered stitches. Puff embroidery: a 3D technique creating a raised, cushioned effect under stitches. |
| Look, feel, and typical use | Flat embroidery: crisp edges; durable; best for logos/text. 3D embroidery: textured, raised look; ideal for patches, fashion accents, decorative motifs. |
| Key differences in practice | Look/Texture: Flat = smooth; 3D = depth. Fabric interaction: Flat sits flat; 3D may require backing/foam. Durability and care: Flat generally robust; 3D can be sensitive to washing depending on backing. Production time and cost: 3D usually longer and costlier; flat faster/cheaper. Applications: Flat for simple logos/text; 3D for patches, branding, high-visibility pieces. |
| Practical tips for deciding | Consider design (bold color blocks vs texture), fabric stabilization, maintenance, scale and placement (small details may struggle with 3D). |
| Why designers choose 3D embroidery | To convey premium quality and brand personality; puff and other 3D effects can elevate logos; but require more planning, cost, and care. |
| Techniques for achieving 3D effects | Puff embroidery; layered stitches; backing and stabilizers; dense anchor stitches; finishing touches. |
| Puff embroidery step-by-step | 1) Choose stable base fabric and backing. 2) Apply foam backing to desired height. 3) Layer stitches with consistent density. 4) Use underlay stitches to anchor foam. 5) Finish with edge stitches and stabilize/remove excess stabilizers. |
| When to choose 3D vs flat in practice | 3D for standout branding on caps, jackets, patches; flat for cost-sensitive projects and items requiring frequent washing; use on patches or decorative elements; small text may favor flat. |
| Common pitfalls and how to avoid | Overly thick foam; poor backing; color bleed; improper wash care. Prevent by selecting appropriate foam, stabilizers, high-quality thread, and following care guidelines. |
| Maintenance considerations | Flat embroidery is generally machine-wash friendly; 3D needs gentler care, cooler cycles, air-dry when possible; inspect and re-stabilize as needed. |
| Summary or takeaway | The choice depends on design goals and practical constraints. Proper materials, stabilization, and technique yield durable, high-quality results, whether you choose 3D embroidery or flat embroidery. |
Summary
3D embroidered vs flat embroidery are two popular methods for adding texture, personality, and durability to fabric projects. This comparison helps designers choose the right technique based on fabric type, care requirements, budget, and the desired visual impact. 3D embroidery offers depth and tactile appeal, whereas flat embroidery provides crisp edges, readability, and durability. By understanding differences in texture, elevation, and maintenance, you can select the method that best fits your project. With proper preparation, stabilization, and technique, both approaches can yield professional results that look great and endure wear and washing over time.