
3D embroidered quilts are transforming the traditional quilt into a living, textured artwork. By combining dimensional embroidery, layered fabrics, and thoughtful color choices, quilters can create pieces that feel sculptural as well as cozy, revealing dimensional quilt patterns that glow with depth. This approach—often called 3D embroidery on quilts—opens up a world of patterns, layers, and mixed-media quilting ideas that go far beyond flat fabric. Whether you’re a seasoned stitcher or a curious beginner, this guide will help you explore textured quilt ideas, layered quilt techniques, and more. You’ll learn practical tips, design strategies, and project ideas that emphasize texture, depth, and storytelling.
Beyond the name, the idea translates into sculptural quilting where motifs rise from the fabric through padding and strategic layering. In LSI terms, readers may encounter phrases such as three-dimensional quilting, fabric relief, dimensional stitching, or sculptural fiber art that describe the same phenomenon. Crafters experiment with height, texture, and mixed-media accents to build depth and a sense of movement across a quilt surface. By reframing the technique as tactile sculpture rather than flat decoration, the approach invites experimentation with color, contrast, and material variety.
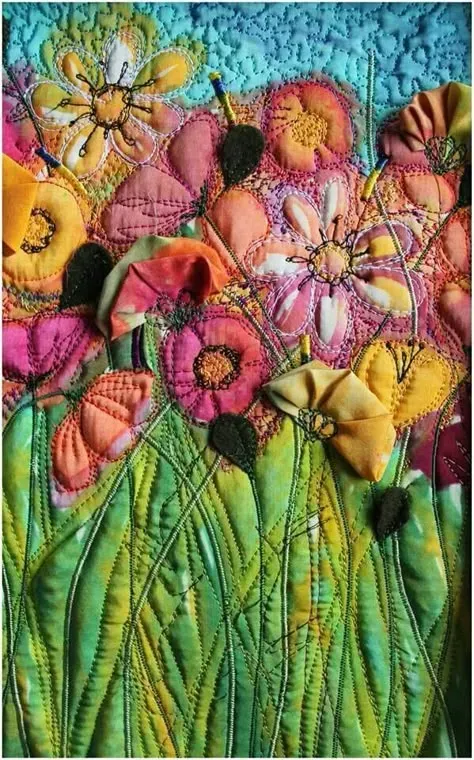
3D Embroidered Quilts: Elevating Fabric into Living Art
3D Embroidered Quilts transform ordinary fabric into living sculpture, turning stitches into relief you can see and feel. By layering dimensional embroidery with thoughtful color choices, quilters create pieces that read as art and as cozy textile objects. This approach—often described as 3D embroidery on quilts—invites exploration of height, motion, and shadow, expanding the vocabulary beyond a flat surface. From botanical blooms with raised petals to landscapes that gain depth as light shifts, you’re designing texture-rich stories rather than just patterns.
To begin, plan dimensional quilt patterns that balance forward-facing motifs with receding planes. Decide which elements will pop and which will anchor, then test padding thickness, fabric choices, and stitch density. Use padding with felt or foam behind motifs and combine satin stitches with stem stitches to create contour, yielding textured quilt ideas that reward close inspection and gentle touch.
Patterns that Pop: Dimensional Quilt Patterns for Real Depth
Dimensional quilt patterns form the backbone of 3D embroidered quilts, guiding how layers interact with light and space. A strong pattern provides a clear composition that you can build upon in stages, adding height with padding, foam, or felt.
When you design, think about front-to-back layering and how each lift will catch light. Testing with a quick sampler helps you judge padding thickness and stitch density, turning dimensional quilt patterns into textured quilt ideas that read clearly from a distance and invite touch up close.
Layered Quilt Techniques: Building Height and Shadow
Layered quilt techniques lie at the heart of depth in 3D embroidery on quilts. Start with a solid sandwich: top, batting, backing, then add extra behind motifs to lift them. The careful stacking preserves height while letting each element exist in its own plane.
Think in three planes: foreground motifs that pop, mid-ground elements that float on slight offsets, and a background that’s either flat or softly embossed. Edge finishes like piping or blanket stitch help define raised forms and preserve their sculpture-like presence.
Mixed-Media Quilting Ideas: Texture, Color, and Surprise
Mixed-media quilting ideas push 3D quilts beyond fabric alone. Integrate beads, ribbons, metallic threads, or fabric collage to create micro-texture and varied weight that reads up close and from afar.
Create a focal point with layered fabric leaves and surround with machine embroidery textures, then add varnished fabric petals or fabric collage for sheen. If you enjoy hand stitching, add French knots or couching to create micro-texture that catches light in different ways, expanding the quilt’s expressive range.
Color, Texture, and Light: Crafting Texture with 3D Embroidery on Quilts
Texture is a design tool: in 3D embroidery on quilts, you blend matte and glossy threads to create subtle reflections that change with ambient light. Dense areas contrasted with open stitching emulate natural depth, while color choices anchor the composition so texture remains coherent and intentional.
Bring in textured quilt ideas through controlled color relationships and mixed-media attachments that stay washable and durable. A cohesive palette helps the texture read as planned rather than chaotic, letting surface relief be the hero.
Care, Durability, and Display for Sculptural Quilts
Maintaining dimensionality requires thoughtful care. Hand washing or gentle cycles protect raised elements, while backing and stabilizers prevent sagging and distortion over time.
Display considerations matter: framing, protective sleeves, or dedicated wall display can protect the piece while allowing it to be appreciated as textile sculpture. Regularly inspect threads and attachments, re-sew as needed, and plan for long-term maintenance of the layered surfaces and textured quilt ideas that give these works their sculpture-like presence.
Frequently Asked Questions
What defines 3D embroidered quilts, and how do dimensional quilt patterns add depth to the design?
3D embroidered quilts use padded stitches, layered fabrics, and strategic embellishments to create a sculptural surface. Dimensional quilt patterns guide placement and height, making motifs rise from the base and cast subtle shadows. Start with a bold shape and test padding and density on scraps before committing to a full piece.
How can I plan patterns for 3D embroidery on quilts to balance height and light using layering techniques?
Begin with a concept that considers front-to-back layering and how light will interact with raised areas. Use dimensional quilt patterns to designate foreground, mid-ground, and background elements, then map padding and fabric placement. Build a small sampler first to fine-tune height, density, and shadow.
Which layered quilt techniques are most effective for creating height in 3D embroidered quilts?
Layered quilt techniques rely on stacking fabrics and batting with careful seam placement. Build a sandwich (top, batting, backing), add a behind-the-motif layer with foam or felt for lift, and finish edges to keep shapes crisp. Plan three planes—foreground, mid-ground, and background—to enhance depth.
How can I incorporate mixed-media quilting ideas into 3D embroidered quilts while keeping the design cohesive?
Yes, you can blend mixed-media quilting ideas with 3D embroidered quilts by tying elements together with a common color palette and a central focal point. Combine fabric collage, beads, ribbons, and metallic threads around embroidered motifs, using machine stitching to unify textures without overwhelming the composition.
What stitches and materials work best for textured quilt ideas in 3D embroidered quilts?
For textured quilt ideas, use satin stitch and long-and-short stitch for smooth forms, split stitch for outlines, and French knots or seed stitches for micro-texture. Pair these with stable fabrics, foam or soft batting behind raised elements, and appropriate stabilizers to preserve height during wear or display.
What beginner-friendly projects illustrate dimensional quilt patterns and the potential of 3D embroidery on quilts?
Try a wall hanging with a central motif built in four lifts, a skyline quilt with foamed building elements, or a garden quilt where leaves and blooms overlap using varying stuffing thicknesses. These projects demonstrate dimensional quilt patterns and allow you to practice layering, padding, and varied textures in 3D embroidery on quilts.
| Topic | Key Points | Notes / Examples |
|---|---|---|
| Patterns and Motifs | Patterns, textures, and motifs drive design; aim for elevation; plan for motion and shadow as light hits raised elements. | Examples: botanical blooms, geometric relief, landscapes with depth. |
| Dimensional Quilt Patterns Backbone | Clear composition with multiple layers; build in stages; start with bold shapes; use varied textures (felt, batting, voile, cotton sateen). | Front-to-back layering to decide which elements appear closest. |
| Layered Quilt Techniques | Stack fabrics and batting; add an extra layer behind motifs (fusible fleece, foam, or felt) to lift elements; plan three planes: foreground, mid-ground, background; crisp silhouettes with piping or blanket stitch. | Test on scraps; layering affects how surface breathes and how light interacts with raised areas. |
| Mixed-Media Ideas | Incorporate non-fabric elements; beads, ribbons, fabric collage; cohesive color palette; focal points help unity. | Examples: central bouquet, textured field, metallic accents. |
| Texture and Color for Depth | Use matte vs glossy threads; mix dense and open stitching; color strategies: monochrome to emphasize texture or vibrant colors to emphasize form; ensure harmony with mixed-media. | Light interacts with raised areas; balance with mixed-media elements. |
| Tools, Materials, and Practical Tips | Hoop/frame for tension; stabilizers; foam batting behind motifs; plan height without excessive weight; test on scraps when fusing. | Edge finishing keeps height and prevent wobble; organize supplies before starting. |
| Stitches that Work Well in 3D Quilts | Satin and long-and-short stitches for smooth shapes; split stitch for outlines; lazy daisy, French knots, seed stitches for texture; couching for corded edges; backstitch and stem stitch for subtle lines. | Combine stitches to define raised elements and add micro-texture. |
| Material Selection and Care | Choose fabrics with stable finishes; cotton is classic; blends add shape retention; interfacing or stabilizers behind delicate motifs; consider protective backing for display. | Care: gentle washing, air-dry; avoid distortion; protect by backing or framing. |
| Project Ideas to Jump-Start Creativity | Wall hanging with layered lifts; skyline quilt with foam elements; garden quilt with overlapping leaves; textile sampler focusing on texture and controlled color palette. | Great for practicing padding, layering, and color control. |
| Keeping It Real: Durability and Maintenance | Hand wash or gentle cycle; air-dry flat; reinforce beads/ribbons with stabilizer; inspect and resew as needed; consider protective framing or sleeve for display. | Display-ready pieces stay pristine with careful handling. |
Summary
3D embroidered quilts invite you to see how textile technique can become sculpture. By balancing patterns, layered techniques, and mixed-media ideas, you can create quilts with texture, depth, and narrative that remain cozy and functional. Whether you stitch by hand or machine, focus on height without sacrificing softness and wearability, and test padding and light interaction on scraps before committing a full quilt. With deliberate design choices and patient practice, 3D embroidered quilts transform ordinary fabric into expressive, tactile art that celebrates texture, color, and craft.