
3D embroidered patterns for shirts bring texture, depth, and a tactile wow factor to modern wardrobes. This guide explains how these raised designs work on fabrics from cotton tees to denim jackets and why they excel as embroidery patterns for shirts. From subtle floral details to bold typography, raised embroidery can elevate simple silhouettes into statement pieces. You’ll find design ideas, step-by-step tutorials, and tips to ensure raised motifs stay durable wash after wash, including DIY shirt embroidery tutorials. If you’ve ever dreamed of combining traditional stitches with contemporary texture, you’re in the right place.
In other words, this trend centers on raised or dimensional stitching on garments, where padding and layering create tactile sculpture. You may encounter terms like textured garment decoration, fabric relief with stitching, or padded embroidery for clothing, all pointing to the same three-dimensional effect. Whether you’re a hobbyist or a small studio, the approach benefits from accessible tools and guides, including options for home machines and machine embroidery for clothing.
1. What are 3D embroidered patterns for shirts and why they transform fabric
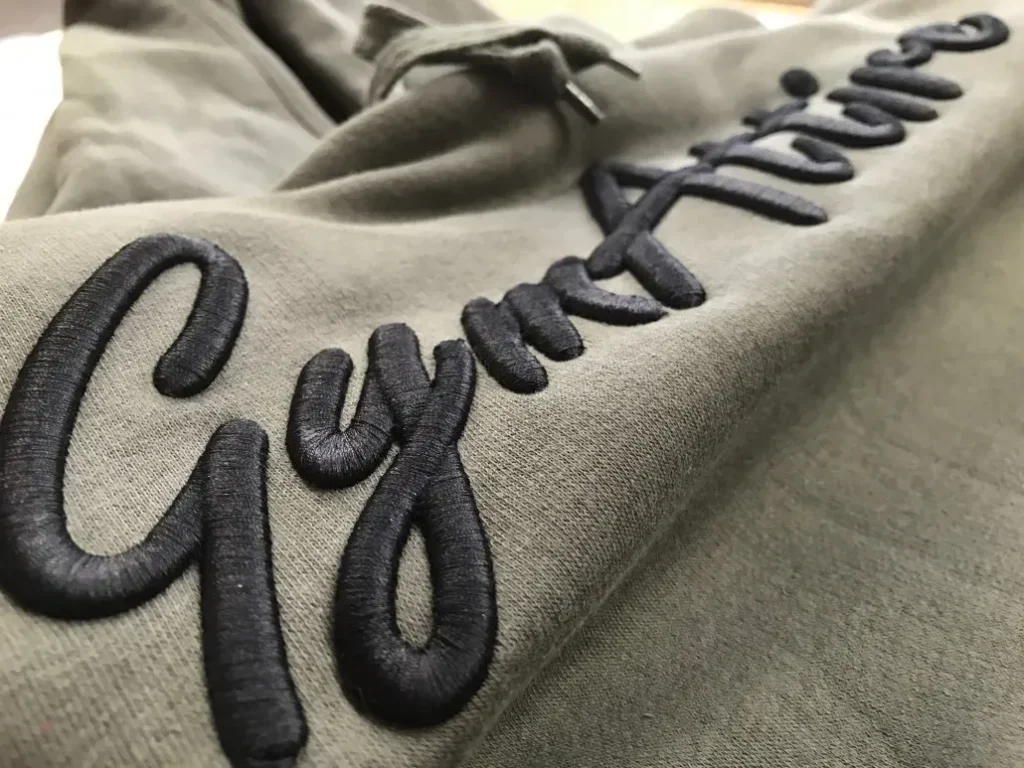
3D embroidered patterns for shirts rise above the fabric using padding, foam, and layered stitching to create a sculptural effect that flat embroidery can’t match. This approach adds texture, shadow, and a tactile dimension that draws the eye and invites a closer touch. By pursuing 3D embroidery patterns for shirts, you transform a simple garment into a wearable piece of art that feels premium and crafted.
The result works across different shirt types—from lightweight cotton tees to sturdy denim—so you can adapt the technique to your favorite silhouettes. With the right choice of stabilizers and padding, these patterns stay dimensional through wear and wash. This ties into the broader category of embroidery patterns for shirts and aligns with DIY shirt embroidery tutorials and machine embroidery for clothing, making it accessible for hobbyists and small studios alike.
2. Core techniques to achieve 3D effects on shirts
Core techniques for 3D effects include padding with foam or batting to lift the motif from the base fabric, puff stitches that add height, and layered appliqué that creates distinct edges and shadows. Each method yields a different silhouette—from soft, cushiony petals to crisp raised outlines—depending on fabric weight and design intent. This is especially true for 3D shirt embroidery designs, where the feel of the texture is as important as the visual outcome.
Experimenting with combinations—such as pairing puffy stitches with foam underlay or layering small fabric pieces—lets you tailor depth to the garment. As you grow more confident, you can consult DIY shirt embroidery tutorials to refine technique, then translate your results into machine embroidery for clothing for faster production and consistent results.
3. Materials, stabilizers, and tools for durable 3D shirt embroidery
A reliable setup starts with selecting fabric stabilizers appropriate for the shirt—tear-away for woven fabrics, cut-away for denser stitching, or wash-away for delicate knits—paired with padding materials like foam or polyfill. The padding under the top layer is what creates the 3D effect, so choosing the right thickness is key to achieving the desired height without overwhelming the fabric.
Durable threads, proper backing, sharp scissors, and a dependable embroidery machine or hand-embroidery tools complete the kit. This foundation supports embroidery patterns for shirts across different materials and ensures longevity under movement and washing. It also dovetails with machine embroidery for clothing, helping you maintain consistent tension and clean, raised edges.
4. Step-by-step guide: foam-padded, machine-stitched 3D embroidery for shirts
Begin by selecting a motif and preparing it for digitizing or adapting a ready-made design. Hoop the fabric with a stable stabilizer suitable for the chosen material, then place a foam pad under the embroidery area to create height. Stitch a base layer to anchor the padding and establish the motif’s outline.
Next, add additional foam layers to build the 3D height, using small, controlled stitches to keep layers aligned. Finish with a dense satin or outline stitch to seal the edges, trim any visible foam, and gently press with a cloth to avoid deforming the padding. For hands-on learners, there are many DIY shirt embroidery tutorials that walk through these steps, and you can apply the same approach to machine embroidery for clothing for efficient, repeatable results.
5. Creative design ideas for 3D embroidery patterns that pop on shirts
Floral bouquets with raised petals, animal silhouettes with dimensional accents, and typographic motifs with halo effects offer striking starting points for 3D embroidery. Each design can be built with padding and layered stitches to create depth, turning a simple shirt into a focal piece of wearable art. These ideas align with the concept of 3D embroidery patterns and embroidery patterns for shirts, providing texture in a versatile format.
Geometric patterns—like hexagons or abstract shapes—paired with subtle color changes can read as modern art on fabric. Seasonal motifs such as leaves, snowflakes, or pumpkins benefit from 3D accents that add whimsy and tactile interest. Whether you’re sketching designs for a casual tee or a denim jacket, these concepts work well with DIY shirt embroidery tutorials and machine embroidery for clothing, translating well into production settings.
6. Care and maintenance to preserve 3D embroidery on shirts
Proper care helps 3D embroidery on shirts retain height and detail. Turn garments inside out, wash on a gentle cycle, and avoid high heat that can compress padding or flatten raised areas. Following washing directions preserves the dimensional look and reduces distortion across repeated wears.
Plan for shrinkage by pre-shrinking fabrics or adjusting the design height to accommodate future changes. Air-drying or line-drying is preferable to maintain the integrity of padding and layers. With careful maintenance, embroidery patterns for shirts stay vibrant and durable, sustaining the impact of 3D embroidery throughout the garment’s life in line with good machine embroidery for clothing practices.
Frequently Asked Questions
What are 3D embroidered patterns for shirts and how do they differ from flat embroidery?
3D embroidered patterns for shirts are designs that rise above the fabric using padding, layering, or finishing techniques. They create height, texture, and shadows, making motifs appear sculpted on the garment. Compared to flat embroidery, 3D patterns work across shirt fabrics from cotton to denim when the right stabilizers and padding are used.
What tools and materials are essential for creating 3D embroidery patterns for shirts with a machine?
You’ll need an embroidery machine or hand embroidery setup, appropriate stabilizers (tear-away, cut-away, or wash-away), polyester or rayon threads, padding material (foam or polyfill), and scissors. For added durability and texture, consider layered appliqué and perhaps beads. This aligns with machine embroidery for clothing.
Where can I find DIY shirt embroidery tutorials to learn 3D embroidered patterns for shirts?
Start with beginner-friendly DIY shirt embroidery tutorials that cover padding, puffy stitches, and layered appliqué. Practice on scrap fabric and simple motifs before tackling complex 3D embroidered patterns for shirts. Look for tutorials that include step-by-step photos and troubleshooting for machine embroidery for clothing.
Which design techniques are most effective for sturdy 3D embroidered patterns for shirts?
Padding under the design, puffy stitches, and layered appliqué are core methods. Use the right stabilizers, test swatches, and finish with dense satin or outline stitches to lock edges. Be mindful of washing and shrinkage, as shirts may change shape after laundering.
What beginner-friendly design ideas work well as 3D embroidery patterns for shirts?
Small floral bouquets, geometric shapes with depth, animal silhouettes, and typographic motifs with shadowing are great starters. Start with simple motifs and gradually increase height and layering. These embroidery patterns for shirts can be scaled to fit different garment styles.
How should I care for shirts with 3D embroidered patterns to maximize durability?
Turn garments inside out and wash on a gentle cycle, avoid high heat, and air dry or use low heat to preserve padding height. Pre-shrink fabric or pre-wash shirts to limit distortion. Store and handle with care. This approach aligns with machine embroidery for clothing care.
| Point | Key takeaway |
|---|---|
| Definition | 3D embroidered patterns rise above the fabric using padding, layering, or finishing techniques to create height and shadow. |
| Benefits | Adds texture, depth, and tactile appeal; stands out; versatile for various styles. |
| Suitable shirt types | Works across lightweight cottons, denim, and jersey blends with proper stabilizers and padding. |
| Core methods | Padding/foam support; Puffy/raised stitches; Layered appliqué; Beads/embellishments; Tailored finishing. |
| Tools and materials | Embroidery machine or hand setup; Fabric stabilizer; Embroidery threads; Padding material; Backing material; Scissors/hoop; Optional fusible web; Beads/sequins. |
| Design ideas | Floral bouquets; Animal silhouettes; Typographic motifs; Geometric patterns; Seasonal motifs. |
| Step-by-step (foam padding) | Prepare design and hoop; Place padding; Stitch base layer; Build height; Finish with stitched edges. |
| Step-by-step (hand-stitched puff) | Prepare fabric and stabilizer; Outline motif; Create puff; Layer for dimension; Edge finishing; Final touches. |
| Color/fabric considerations | Use light-to-dark shading for depth; high contrast for pronounced depth; fabrics: cottons, denims, knits; appropriate stabilizers. |
| Practical tips | Start simple; test swatches; plan for shrinkage; maintenance and care; safety and durability. |
| Inspiration & best practices | Balance texture with garment practicality; test on similar fabric; refine approach for durability and wash-ability. |